内存与IO,磁盘IO,网络IO 文件描述符 1 2 常用软件: yum install -y strace lsof pmap tcpdump
1 2 3 4 5 6 7 VFS: 虚拟文件系统 案例 [root@node01 ~]# df Filesystem 1K-blocks Used Available Use% Mounted on /dev/sda3 202092480 10776508 181050220 6% / tmpfs 1954400 0 1954400 0% /dev/shm /dev/sda1 198337 27795 160302 15% /boot
1 2 3 4 5 df Filesystem 1K-blocks Used Available Use% Mounted on /dev/sda3 202092480 7187520 184639208 4% / tmpfs 1954400 0 1954400 0% /dev/shm /dev/sda1 198337 27795 160302 15% /boot
1 2 3 4 测试pipeline类型: { echo $BASHPID ; read x; } | { cat ; echo $BASHPID ; read y; } 测试socket类型: exec 8<> /dev/tcp/www.baidu.com/80
1 2 3 4 5 6 7 8 9 10 11 [root@localhost ~] Active Internet connections (servers and established) Proto Recv-Q Send-Q Local Address Foreign Address State PID/Program name tcp 0 0 127.0.0.1:25 0.0.0.0:* LISTEN 1235/master tcp 0 0 0.0.0.0:22 0.0.0.0:* LISTEN 1008/sshd tcp 0 0 192.168.163.129:22 192.168.163.1:2307 ESTABLISHED 1525/sshd: root@pts tcp 0 0 192.168.163.129:37606 211.139.243.23:80 TIME_WAIT - tcp 0 0 192.168.163.129:37602 211.139.243.23:80 TIME_WAIT - tcp6 0 0 ::1:25 :::* LISTEN 1235/master tcp6 0 0 :::22 :::* LISTEN 1008/sshd
1 2 3 4 5 6 7 8 9 10 [root@localhost ~] COMMAND PID USER FD TYPE DEVICE OFFSET NODE NAME bash 1529 root cwd DIR 253,0 100663361 /root bash 1529 root rtd DIR 253,0 64 / bash 1529 root txt REG 253,0 8388 /usr/bin/bash bash 1529 root 0u CHR 136,0 0t0 3 /dev/pts/0 bash 1529 root 1u CHR 136,0 0t0 3 /dev/pts/0 bash 1529 root 2u CHR 136,0 0t0 3 /dev/pts/0 bash 1529 root 255u CHR 136,0 0t0 3 /dev/pts/0
1 2 3 4 通过读取fd6内容输入到a变量中,这时fd6的OFFSET会发生变化 read a <& 6 fd:文件描述符代表打开的文件,有inode号和seek偏移指针的概念
1 2 3 4 5 6 7 8 9 10 11 12 13 14 15 16 17 18 19 20 管道: 1,衔接,前一个命令的输出作为后一个命令的输入 2,管道会触发创建【子进程】,管道左右两边的命令都是当前/bin/bash的子进程 echo $$ | more -->输出当前bash的进程号 echo $BASHPID | more -->输出当前bash的子进程的进程号 原因:$$ 高于 | 使用linux的时候: 父进程的数据,子进程不可以看得到父进程的数据,也无法更改。 常规思想,进程是数据隔离的! 进阶思想,父进程其实可以让子进程看到数据! 通过【export】 linux中 export的环境变量,子进程的修改不会破坏父进程 父进程的修改也不会破坏子进程 Fork的作用是复制一个与当前进程一样的进程。新进程的所有数据(变量、环境变量、程序计数器等)数值都和原进程一致,但是是一个全新的进程,并作为原进程的子进程。
1 2 3 4 5 6 7 8 9 10 11 12 sysctl -a | grep dirty vi /etc/sysctl.conf vm.dirty_background_ratio = 0 vm.dirty_background_bytes = 1048576 vm.dirty_ratio = 0 vm.dirty_bytes = 1048576 vm.dirty_writeback_centisecs = 5000 vm.dirty_expire_centisecs = 30000
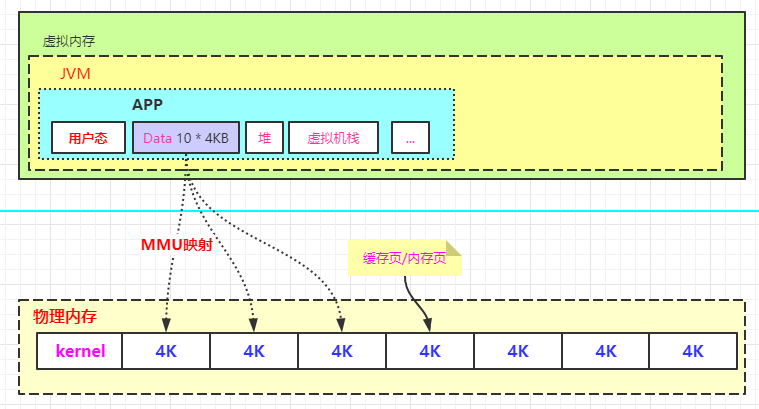
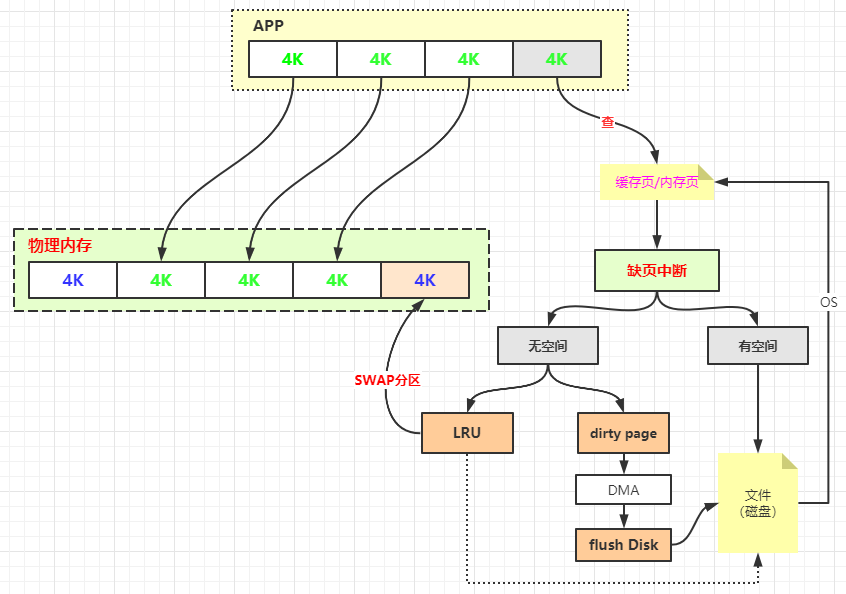
虚拟内存和内存映射
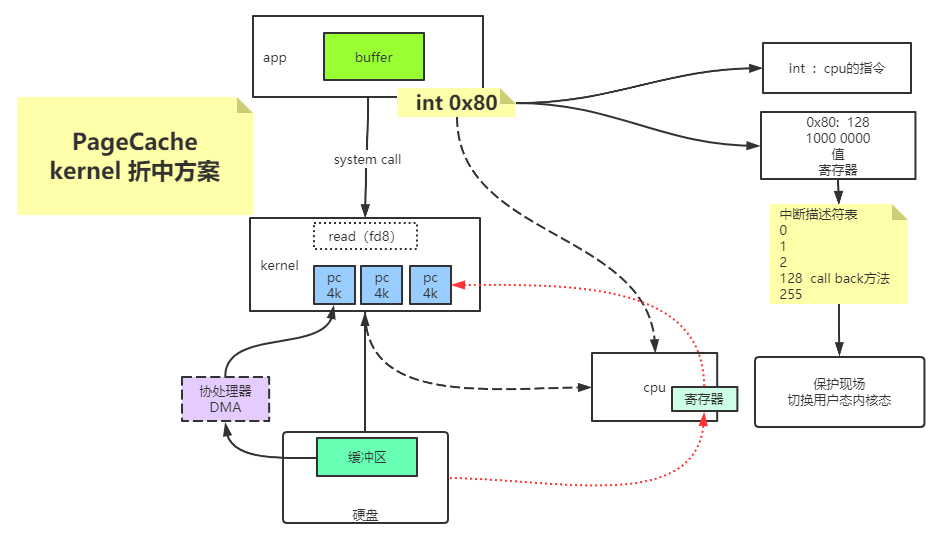
不同的FD可以共享访问同一个pageCache,他们有各自的seek偏移量来读取pageCache的数据。
pageCache若被修改,会把该页标记成脏页,如果pageCache这时候没有flush到磁盘中,系统断电的话,会丢失未持久化到磁盘的脏页数据。
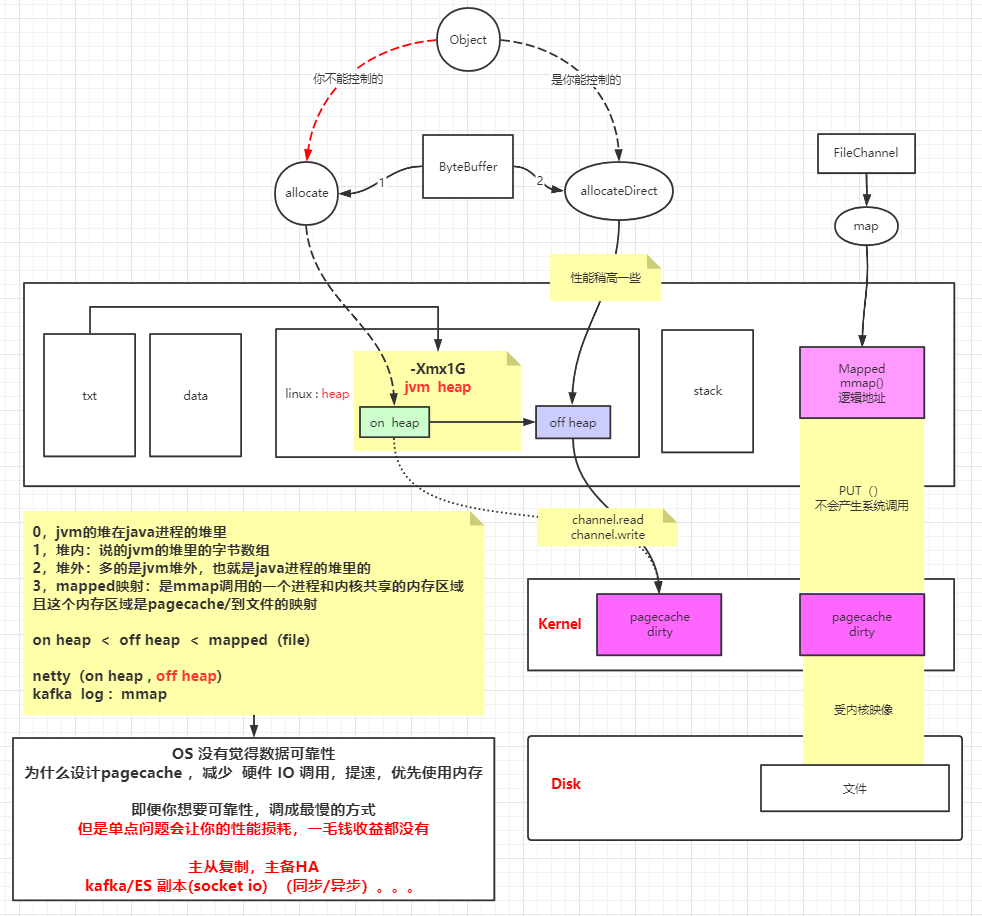
pageCache 会优化IO性能,但是会丢数据的风险。
磁盘IO 1 2 3 4 5 6 7 8 public static void testBasicFileIO () throws Exception File file = new File(path); FileOutputStream out = new FileOutputStream(file); while (true ){ out.write(data); } }
为什么 缓冲区 比 普通IO 快?
1 2 3 4 5 6 7 8 9 10 public static void testBufferedFileIO () throws Exception File file = new File(path); BufferedOutputStream out = new BufferedOutputStream(new FileOutputStream(file)); while (true ){ out.write(data); } }
1 2 3 4 5 6 7 8 9 10 11 12 13 14 15 16 17 18 19 20 21 22 23 24 25 26 27 28 29 30 31 32 33 34 35 36 37 38 39 40 41 42 43 44 45 46 47 48 49 50 51 52 53 public static void testRandomAccessFileWrite () throws Exception RandomAccessFile raf = new RandomAccessFile(path, "rw" ); raf.write("hello mashibing\n" .getBytes()); raf.write("hello seanzhou\n" .getBytes()); System.out.println("write------------" ); System.in.read(); raf.seek(4 ); raf.write("ooxx" .getBytes()); System.out.println("seek---------" ); System.in.read(); FileChannel rafchannel = raf.getChannel(); MappedByteBuffer map = rafchannel.map(FileChannel.MapMode.READ_WRITE, 0 , 4096 ); map.put("@@@" .getBytes()); System.out.println("map--put--------" ); System.in.read(); raf.seek(0 ); ByteBuffer buffer = ByteBuffer.allocate(8192 ); int read = rafchannel.read(buffer); System.out.println(buffer); buffer.flip(); System.out.println(buffer); for (int i = 0 ; i < buffer.limit(); i++) { Thread.sleep(200 ); System.out.print(((char )buffer.get(i))); } }
1 2 3 4 5 6 7 8 9 10 11 12 13 14 15 16 17 18 19 20 21 22 23 24 25 26 27 28 29 30 31 32 33 34 35 36 37 38 public void whatByteBuffer () ByteBuffer buffer = ByteBuffer.allocateDirect(1024 ); System.out.println("postition: " + buffer.position()); System.out.println("limit: " + buffer.limit()); System.out.println("capacity: " + buffer.capacity()); System.out.println("mark: " + buffer); buffer.put("123" .getBytes()); System.out.println("-------------put:123......" ); System.out.println("mark: " + buffer); buffer.flip(); System.out.println("-------------flip......" ); System.out.println("mark: " + buffer); buffer.get(); System.out.println("-------------get......" ); System.out.println("mark: " + buffer); buffer.compact(); System.out.println("-------------compact......" ); System.out.println("mark: " + buffer); buffer.clear(); System.out.println("-------------clear......" ); System.out.println("mark: " + buffer); }
网络IO 1 2 3 4 5 6 7 8 9 10 11 12 13 14 15 16 17 18 19 20 21 22 23 24 25 26 27 28 29 30 31 32 33 34 35 36 37 38 39 40 41 42 43 44 45 46 47 48 49 50 51 52 53 54 55 56 57 58 59 60 61 62 63 64 65 66 67 68 69 70 71 72 73 74 75 76 77 78 79 80 81 82 83 84 85 86 87 88 89 90 91 92 93 94 95 96 97 98 99 100 101 102 103 104 105 106 107 public class SocketIOPropertites private static final int RECEIVE_BUFFER = 10 ; private static final int SO_TIMEOUT = 0 ; private static final boolean REUSE_ADDR = false ; private static final int BACK_LOG = 2 ; private static final boolean CLI_KEEPALIVE = false ; private static final boolean CLI_OOB = false ; private static final int CLI_REC_BUF = 20 ; private static final boolean CLI_REUSE_ADDR = false ; private static final int CLI_SEND_BUF = 20 ; private static final boolean CLI_LINGER = true ; private static final int CLI_LINGER_N = 0 ; private static final int CLI_TIMEOUT = 0 ; private static final boolean CLI_NO_DELAY = false ; public static void main (String[] args) ServerSocket server = null ; try { server = new ServerSocket(); server.bind(new InetSocketAddress(9090 ), BACK_LOG); server.setReceiveBufferSize(RECEIVE_BUFFER); server.setReuseAddress(REUSE_ADDR); server.setSoTimeout(SO_TIMEOUT); } catch (IOException e) { e.printStackTrace(); } System.out.println("server up use 9090!" ); try { while (true ) { Socket client = server.accept(); System.out.println("client port: " + client.getPort()); client.setKeepAlive(CLI_KEEPALIVE); client.setOOBInline(CLI_OOB); client.setReceiveBufferSize(CLI_REC_BUF); client.setReuseAddress(CLI_REUSE_ADDR); client.setSendBufferSize(CLI_SEND_BUF); client.setSoLinger(CLI_LINGER, CLI_LINGER_N); client.setSoTimeout(CLI_TIMEOUT); client.setTcpNoDelay(CLI_NO_DELAY); new Thread( () -> { try { InputStream in = client.getInputStream(); BufferedReader reader = new BufferedReader(new InputStreamReader(in)); char [] data = new char [1024 ]; while (true ) { int num = reader.read(data); if (num > 0 ) { System.out.println("client read some data is :" + num + " val :" + new String(data, 0 , num)); } else if (num == 0 ) { System.out.println("client readed nothing!" ); continue ; } else { System.out.println("client readed -1..." ); System.in.read(); client.close(); break ; } } } catch (IOException e) { e.printStackTrace(); } } ).start(); } } catch (IOException e) { e.printStackTrace(); } finally { try { server.close(); } catch (IOException e) { e.printStackTrace(); } } } }
1 2 3 4 5 6 7 8 9 10 11 12 13 14 15 16 17 18 19 20 21 22 23 24 25 26 27 28 public class SocketClient public static void main (String[] args) try { Socket client = new Socket("192.168.150.11" ,9090 ); client.setSendBufferSize(20 ); client.setTcpNoDelay(false ); OutputStream out = client.getOutputStream(); InputStream in = System.in; BufferedReader reader = new BufferedReader(new InputStreamReader(in)); while (true ){ String line = reader.readLine(); if (line != null ){ byte [] bb = line.getBytes(); for (byte b : bb) { out.write(b); } } } } catch (IOException e) { e.printStackTrace(); } } }
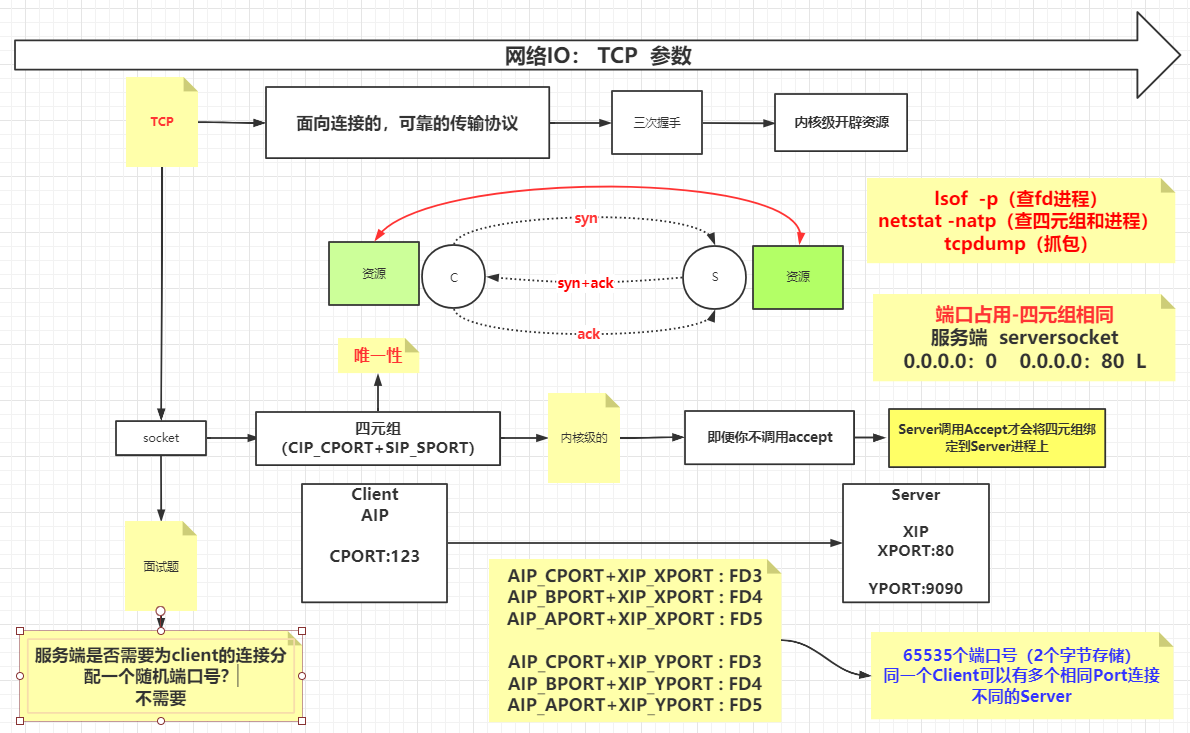
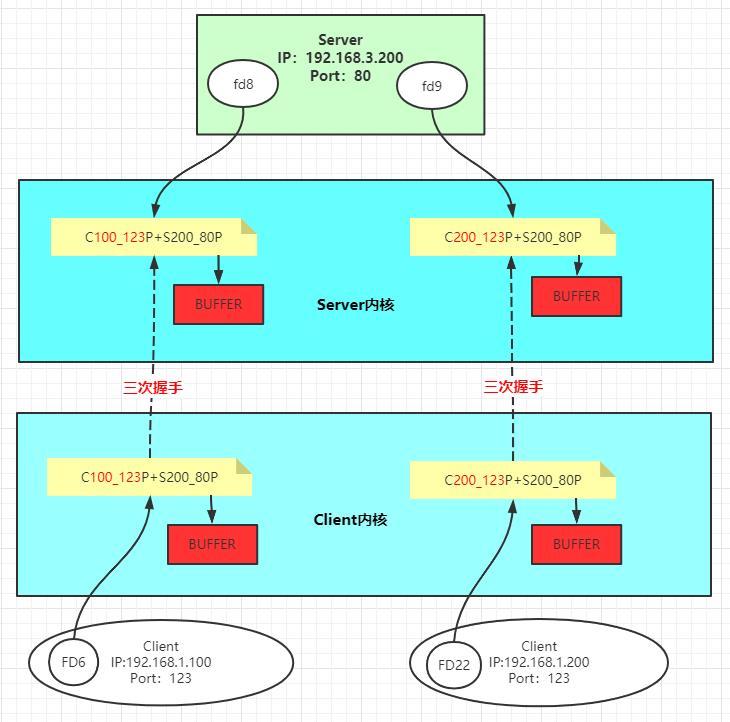
1 2 3 4 5 6 7 8 9 10 11 12 13 14 15 16 17 18 19 20 TCP通信的几个维度: win : 窗口大小 seq : 序列号 mss : 数据的真实大小(除去报文头) Client -> Fin ->Server时,会带上自身的seq序列号 Server -> Fin + ACK -> Client时,会在这个对方序列号上 + 1,并带上自身的序列号 客户端建立TCP连接时会发送能接收的数据包大小(滑动窗口),如上图:【win 14600】 服务端回复ACK时会带上自身能够接收的数据包大小(MTU):【win 1448】 [root@localhost ~]# ifconfig ens33: flags=4163<UP,BROADCAST,RUNNING,MULTICAST> mtu 1500 通过ifconfig 能够查询到服务端一次最多能够接收的数据包大小 MTU 1500 bytes 拥塞控制: 服务端每次接收到数据包时服务端会返回还能接收的数据包大小。 如果客户端发送的数据包超过了服务端的能接收的大小,客户端需要阻塞等待服务端的处理。 服务端有空闲空间之后,服务端会补发一个消息到客户端上,通知可以继续发送了。 若客户端在没空闲空间的情况下,继续发送数据包,那么服务端将会把它丢弃,称之为丢包。
TCP的拥塞控制详解 :慢开始、拥塞避免、快重传、快恢复
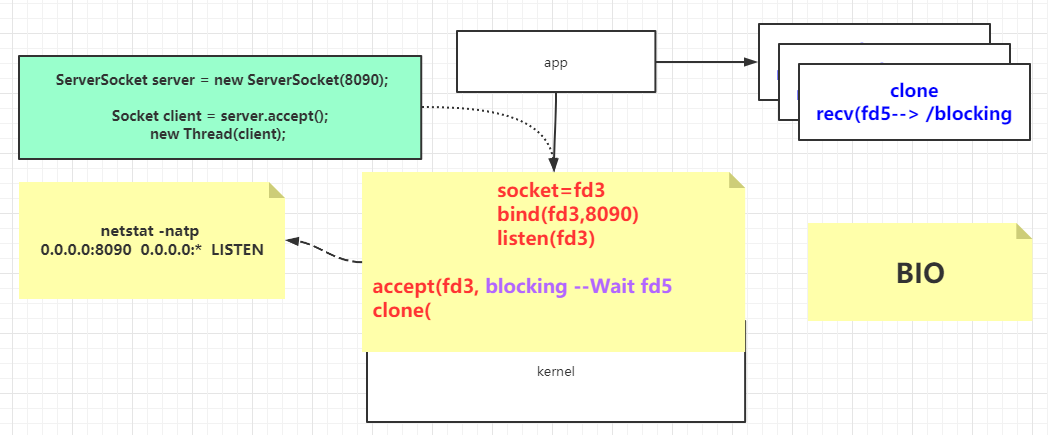
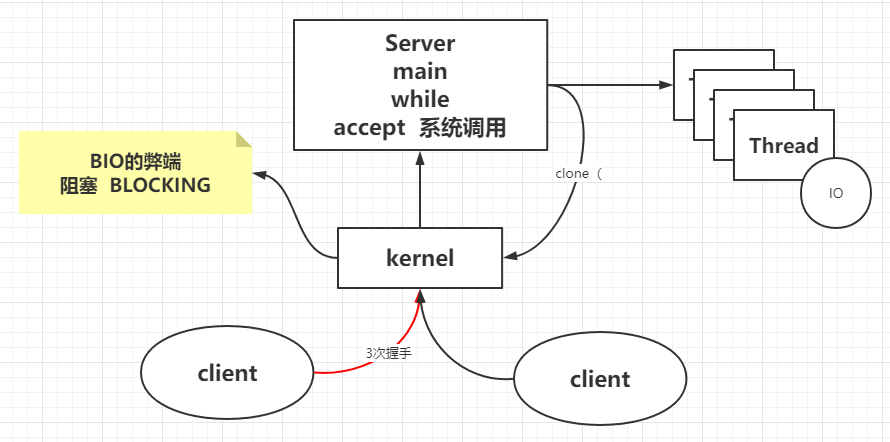
BIO 1 2 3 4 5 6 7 8 9 10 11 12 13 14 15 16 17 18 19 20 21 22 23 24 25 26 27 28 29 30 31 32 33 34 35 36 public class SocketBIO public static void main (String[] args) throws Exception ServerSocket server = new ServerSocket(8090 ,20 ); System.out.println("step1: new ServerSocket(8090) " ); while (true ) { Socket client = server.accept(); System.out.println("step2:client\t" + client.getPort()); new Thread(new Runnable(){ public void run () InputStream in = null ; try { in = client.getInputStream(); BufferedReader reader = new BufferedReader(new InputStreamReader(in)); while (true ){ String dataline = reader.readLine(); if (null != dataline){ System.out.println(dataline); }else { client.close(); break ; } } System.out.println("客户端断开" ); } catch (IOException e) { e.printStackTrace(); } } }).start(); } } }
1 2 3 追踪文件对内核的系统调用:strace -ff o out cmd [root@localhost ~]# strace -ff o out /home/local/java/jdk1.8.0_191/bin/java SocketBIO
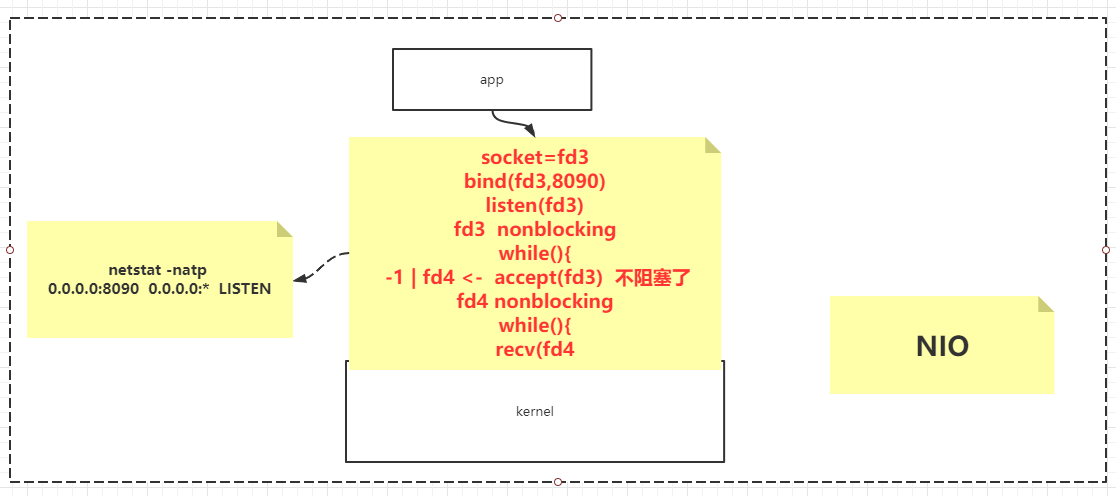
NIO 1 2 3 4 5 6 7 8 9 10 11 12 13 14 15 16 17 18 19 20 21 22 23 24 25 26 27 28 29 30 31 32 33 34 35 36 37 38 39 40 41 42 43 44 45 46 public class SocketNIO public static void main (String[] args) throws Exception LinkedList<SocketChannel> clients = new LinkedList<>(); ServerSocketChannel ss = ServerSocketChannel.open(); ss.bind(new InetSocketAddress(9090 )); ss.configureBlocking(false ); while (true ) { Thread.sleep(1000 ); SocketChannel client = ss.accept(); if (client == null ) { } else { client.configureBlocking(false ); int port = client.socket().getPort(); System.out.println("client..port: " + port); clients.add(client); } ByteBuffer buffer = ByteBuffer.allocateDirect(4096 ); for (SocketChannel c : clients) { int num = c.read(buffer); if (num > 0 ) { buffer.flip(); byte [] aaa = new byte [buffer.limit()]; buffer.get(aaa); String b = new String(aaa); System.out.println(c.socket().getPort() + " : " + b); buffer.clear(); } } } } }
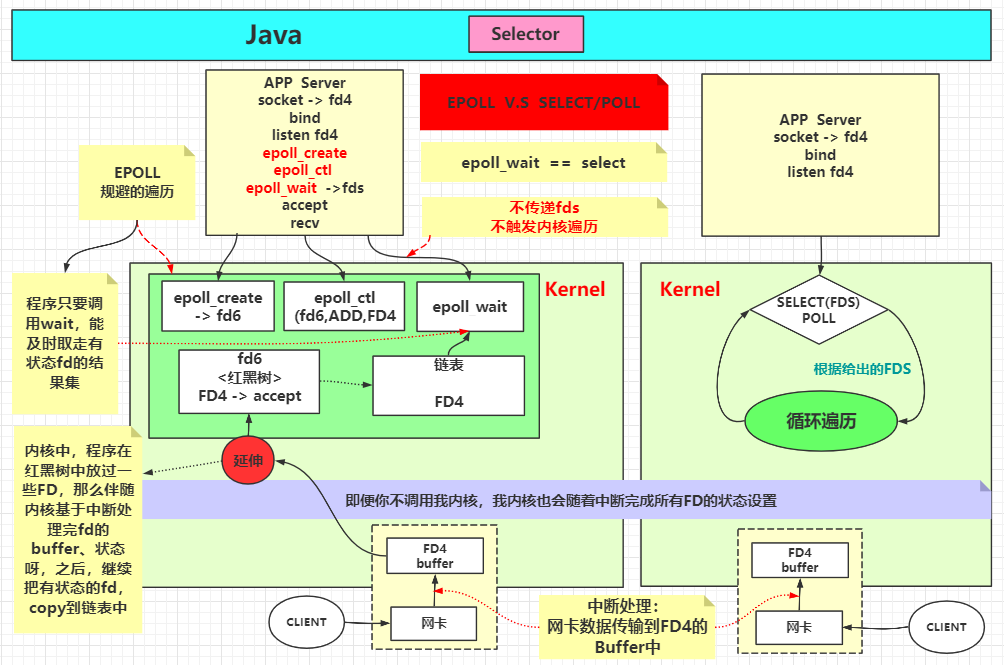
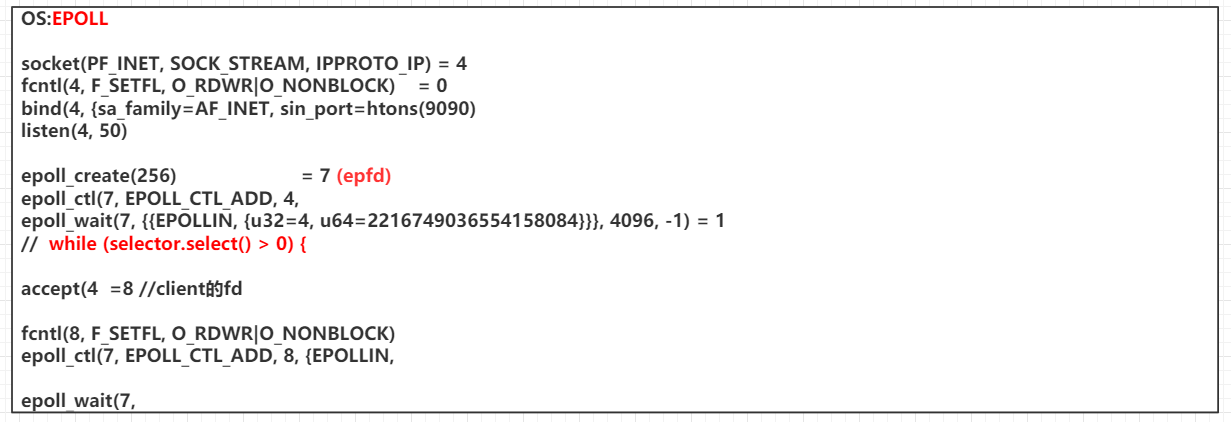
Linux内核函数 1 2 3 4 5 6 7 8 9 10 11 12 13 14 15 16 17 18 19 20 21 22 23 24 25 26 27 28 29 30 31 32 33 34 35 int socket (int domain, int type, int protocol) int bind (int sockfd, const struct sockaddr *addr, socklen_t addrlen) int listen (int sockfd, int backlog) int accept (int sockfd, struct sockaddr *addr, socklen_t *addrlen) ssize_t recv (int sockfd, void *buf, size_t len, int flags) ;int poll (struct pollfd *fds, nfds_t nfds, int timeout) int fcntl (int fd, int cmd, ... ) int epoll_create (int size) int epoll_ctl (int epfd, int op, int fd, struct epoll_event *event) int epoll_wait (int epfd, struct epoll_event *events,int maxevents, int timeout) EPOLLIN 连接到达 有数据来临 The associated file is available for read (2 ) operations. EPOLLOUT 有数据要写 The associated file is available for write (2 ) operations.
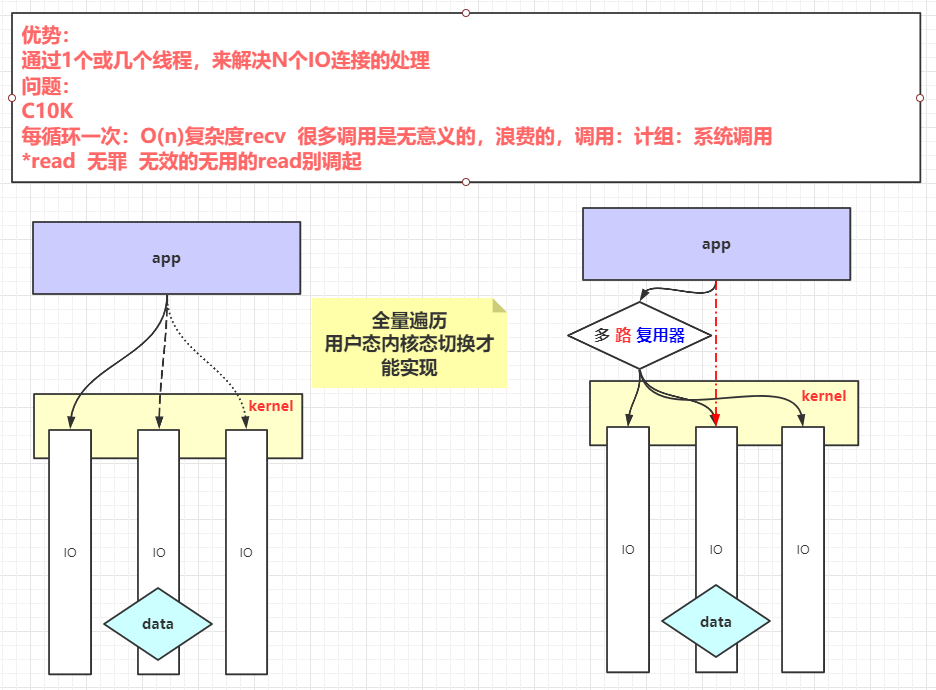
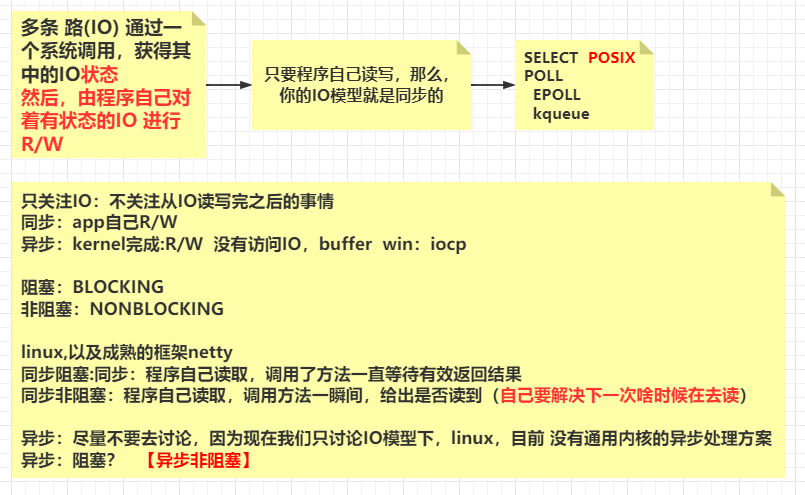
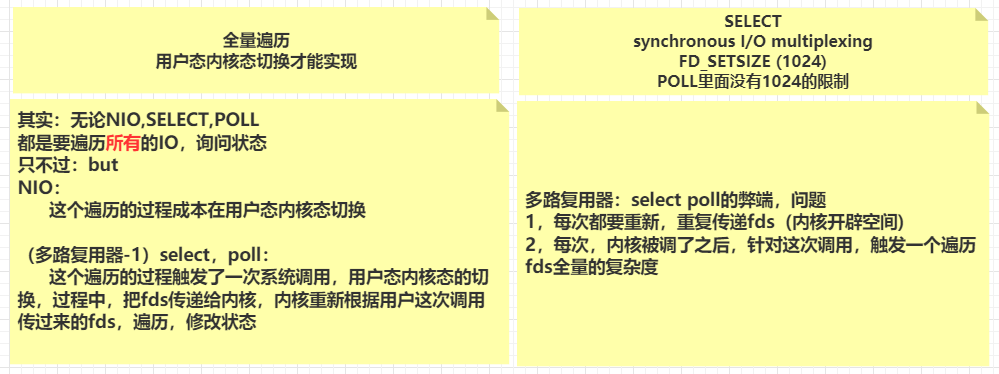
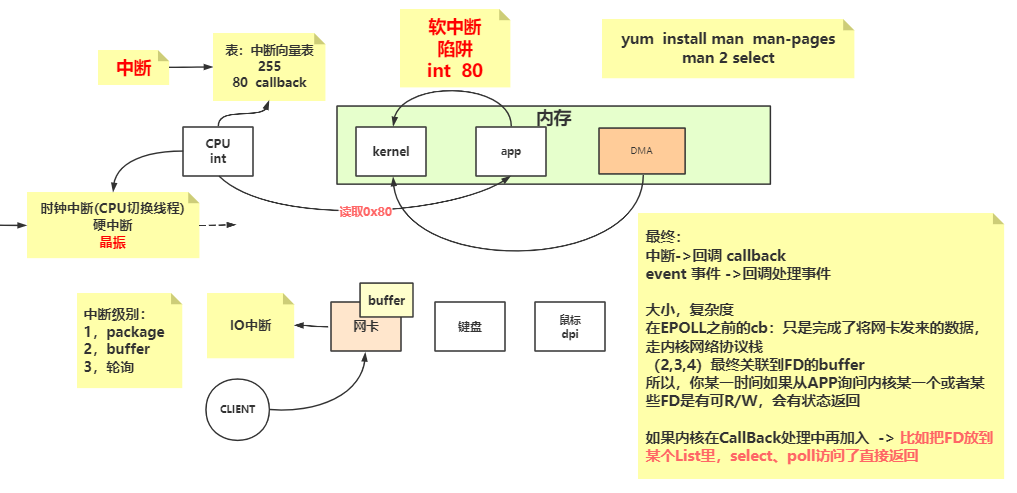
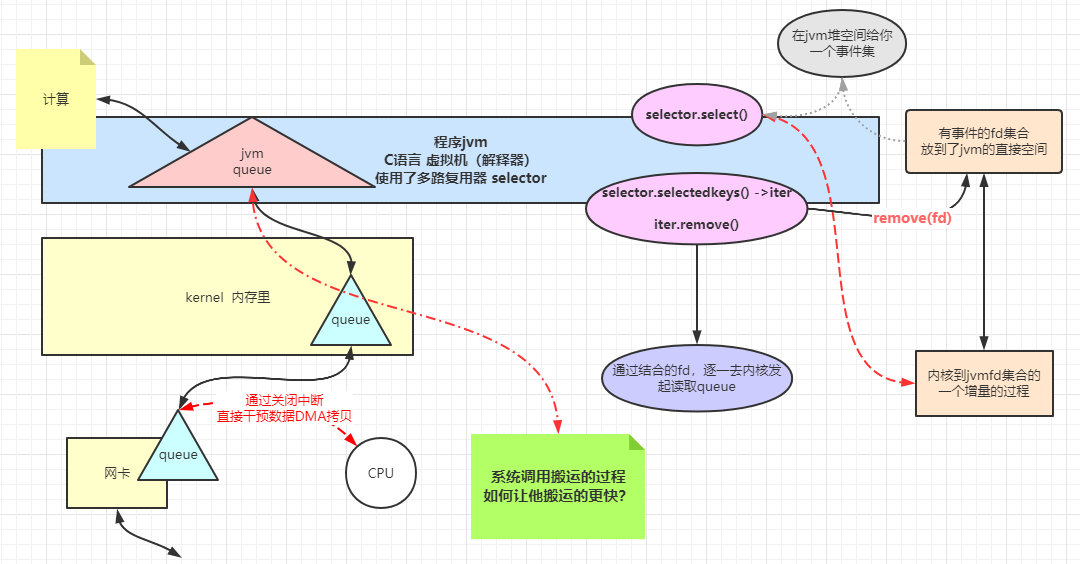
多路复用器
1 2 3 4 5 6 7 8 9 10 11 12 13 -Djava.nio.channels.spi.SelectorProvider =sun.nio.ch.EPollSelectorProvider -Djava.nio.channels.spi.SelectorProvider =sun.nio.ch.PollSelectorProvider javac SocketMultiplexingSingleThreadv1.class strace -ff -o out java SocketMultiplexingSingleThreadv1 nc 192.168.163.1 9090 nc -l 192.168.163.1 9090
1 2 3 4 5 6 7 8 9 10 11 12 13 14 15 16 17 18 19 20 21 22 23 24 25 26 27 28 29 30 31 32 33 34 35 36 37 38 39 40 41 42 43 44 45 46 47 48 49 50 51 52 53 54 55 56 57 58 59 60 61 62 63 64 65 66 67 68 69 70 71 72 73 74 75 76 77 78 79 80 81 82 83 84 85 86 87 88 89 90 91 92 93 94 95 96 97 98 99 100 101 102 103 104 105 106 107 108 109 110 111 112 113 114 115 116 117 118 119 120 121 122 123 124 125 126 127 128 129 130 131 132 133 134 135 136 137 138 139 140 public class SocketMultiplexingSingleThreadv1 private ServerSocketChannel server = null ; private Selector selector = null ; int port = 9090 ; public void initServer () try { server = ServerSocketChannel.open(); server.configureBlocking(false ); server.bind(new InetSocketAddress(port)); selector = Selector.open(); server.register(selector, SelectionKey.OP_ACCEPT); } catch (IOException e) { e.printStackTrace(); } } public void start () initServer(); System.out.println("服务器启动了。。。。。" ); try { while (true ) { Set<SelectionKey> keys = selector.keys(); System.out.println(keys.size()+" size" ); while (selector.select() > 0 ) { Set<SelectionKey> selectionKeys = selector.selectedKeys(); Iterator<SelectionKey> iter = selectionKeys.iterator(); while (iter.hasNext()) { SelectionKey key = iter.next(); iter.remove(); if (key.isAcceptable()) { acceptHandler(key); } else if (key.isReadable()) { readHandler(key); } } } } } catch (IOException e) { e.printStackTrace(); } } public void acceptHandler (SelectionKey key) try { ServerSocketChannel ssc = (ServerSocketChannel) key.channel(); SocketChannel client = ssc.accept(); client.configureBlocking(false ); ByteBuffer buffer = ByteBuffer.allocate(8192 ); client.register(selector, SelectionKey.OP_READ, buffer); System.out.println("-------------------------------------------" ); System.out.println("新客户端:" + client.getRemoteAddress()); System.out.println("-------------------------------------------" ); } catch (IOException e) { e.printStackTrace(); } } public void readHandler (SelectionKey key) SocketChannel client = (SocketChannel) key.channel(); ByteBuffer buffer = (ByteBuffer) key.attachment(); buffer.clear(); int read = 0 ; try { while (true ) { read = client.read(buffer); if (read > 0 ) { buffer.flip(); while (buffer.hasRemaining()) { client.write(buffer); } buffer.clear(); } else if (read == 0 ) { break ; } else { client.close(); break ; } } } catch (IOException e) { e.printStackTrace(); } } public static void main (String[] args) SocketMultiplexingSingleThreadv1 service = new SocketMultiplexingSingleThreadv1(); service.start(); } }
底层实现
状态
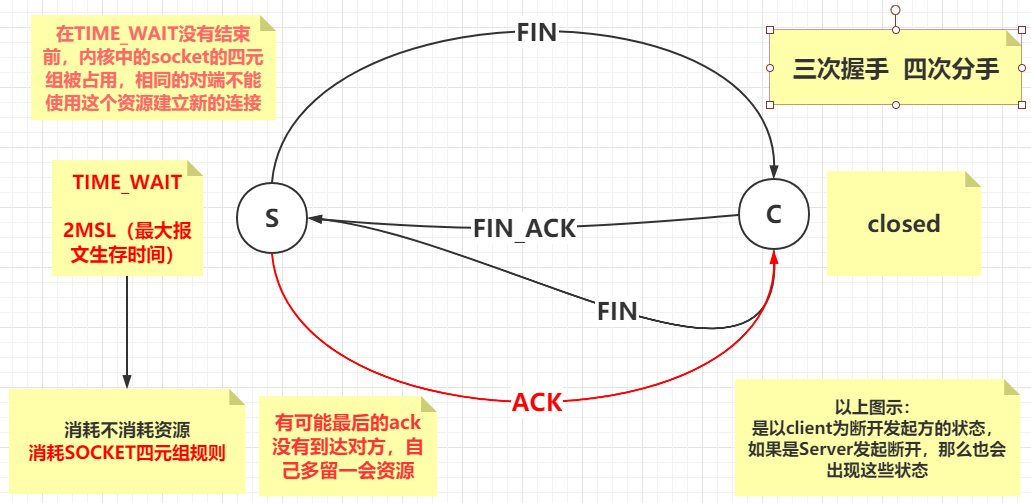
四次分手:
1.服务端发起断开连接的FIN通知
2.客户端接收FIN通知并返回FIN_ACK确认
3.客户端也发送断开连接的FIN通知
4.服务端接受FIN通知并返回ACK确认
经过正常的四次分手后,客户端处于 closed 状态
由于是服务端先发起断开请求,所以服务端处于TIME_WAIT状态
如果服务端代码中没有写client.close():
1.客户端发起了断开连接的FIN通知
2.服务端接收到FIN通知并返回FIN_ACK确认
3.服务端自身标记成 close_wait 状态
4.客户端接收到FIN_ACK,标记自身状态为FIN_WAIT2等待服务端发送FIN通知
4.由于服务端没有编写client.close(),所以不会发送四次分手的二次确认
5.客户端没有收到客户端也想断开FIN的通知,依旧是 FIN_WAIT2 状态
单Selector单线程 1 2 3 4 5 6 7 8 9 10 11 12 13 14 15 16 17 18 19 20 21 22 23 24 25 26 27 28 29 30 31 32 33 34 35 36 37 38 39 40 41 42 43 44 45 46 47 48 49 50 51 52 53 54 55 56 57 58 59 60 61 62 63 64 65 66 67 68 69 70 71 72 73 74 75 76 77 78 79 80 81 82 83 84 85 86 87 88 89 90 91 92 93 94 95 96 97 98 99 100 101 102 103 104 105 106 107 108 109 110 111 112 113 114 115 116 117 118 119 120 121 122 public class SocketMultiplexingSingleThreadv1_1 private ServerSocketChannel server = null ; private Selector selector = null ; int port = 9090 ; public void initServer () try { server = ServerSocketChannel.open(); server.configureBlocking(false ); server.bind(new InetSocketAddress(port)); selector = Selector.open(); server.register(selector, SelectionKey.OP_ACCEPT); } catch (IOException e) { e.printStackTrace(); } } public void start () initServer(); System.out.println("服务器启动了。。。。。" ); try { while (true ) { while (selector.select() > 0 ) { Set<SelectionKey> selectionKeys = selector.selectedKeys(); Iterator<SelectionKey> iter = selectionKeys.iterator(); while (iter.hasNext()) { SelectionKey key = iter.next(); iter.remove(); if (key.isAcceptable()) { acceptHandler(key); } else if (key.isReadable()) { readHandler(key); } else if (key.isWritable()){ writeHandler(key); } } } } } catch (IOException e) { e.printStackTrace(); } } private void writeHandler (SelectionKey key) System.out.println("write handler..." ); SocketChannel client = (SocketChannel) key.channel(); ByteBuffer buffer = (ByteBuffer) key.attachment(); buffer.flip(); while (buffer.hasRemaining()) { try { client.write(buffer); } catch (IOException e) { e.printStackTrace(); } } try { Thread.sleep(2000 ); } catch (InterruptedException e) { e.printStackTrace(); } buffer.clear(); key.cancel(); try { client.close(); } catch (IOException e) { e.printStackTrace(); } } public void acceptHandler (SelectionKey key) try { ServerSocketChannel ssc = (ServerSocketChannel) key.channel(); SocketChannel client = ssc.accept(); client.configureBlocking(false ); ByteBuffer buffer = ByteBuffer.allocate(8192 ); client.register(selector, SelectionKey.OP_READ, buffer); System.out.println("-------------------------------------------" ); System.out.println("新客户端:" + client.getRemoteAddress()); System.out.println("-------------------------------------------" ); } catch (IOException e) { e.printStackTrace(); } } public void readHandler (SelectionKey key) System.out.println("read handler....." ); SocketChannel client = (SocketChannel) key.channel(); ByteBuffer buffer = (ByteBuffer) key.attachment(); buffer.clear(); int read = 0 ; try { while (true ) { read = client.read(buffer); if (read > 0 ) { client.register(key.selector(),SelectionKey.OP_WRITE,buffer); } else if (read == 0 ) { break ; } else { client.close(); break ; } } } catch (IOException e) { e.printStackTrace(); } } public static void main (String[] args) SocketMultiplexingSingleThreadv1_1 service = new SocketMultiplexingSingleThreadv1_1(); service.start(); } }
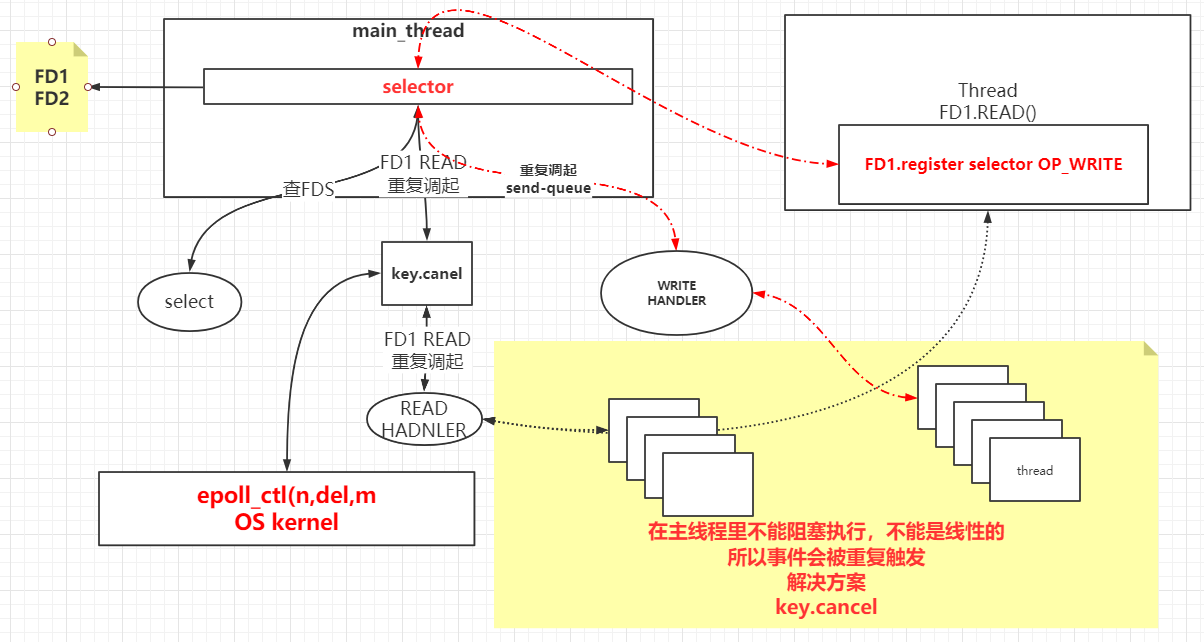
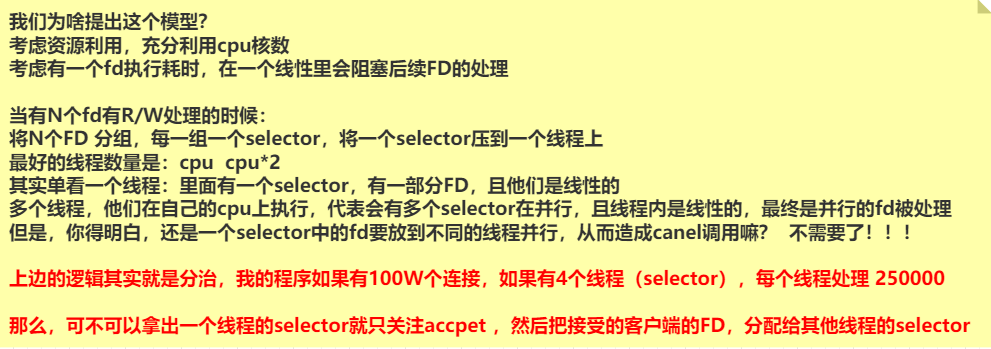
在上面单线程的Selector中,先accept、read、write,都处于一个单线程中,没有什么问题,但是会造成CPU资源无法充分利用,若有其中一个Client处理了很长时间,会导致事件的堆积。
单Selector多线程 1 2 3 4 5 6 7 8 9 10 11 12 13 14 15 16 17 18 19 20 21 22 23 24 25 26 27 28 29 30 31 32 33 34 35 36 37 38 39 40 41 42 43 44 45 46 47 48 49 50 51 52 53 54 55 56 57 58 59 60 61 62 63 64 65 66 67 68 69 70 71 72 73 74 75 76 77 78 79 80 81 82 83 84 85 86 87 88 89 90 91 92 93 94 95 96 97 98 99 100 101 102 103 104 105 106 107 108 109 110 111 112 113 114 115 116 117 118 119 120 121 122 123 124 125 126 127 128 129 130 131 public class SocketMultiplexingSingleThreadv2 private ServerSocketChannel server = null ; private Selector selector = null ; int port = 9090 ; public void initServer () try { server = ServerSocketChannel.open(); server.configureBlocking(false ); server.bind(new InetSocketAddress(port)); selector = Selector.open(); server.register(selector, SelectionKey.OP_ACCEPT); } catch (IOException e) { e.printStackTrace(); } } public void start () initServer(); System.out.println("服务器启动了。。。。。" ); try { while (true ) { while (selector.select(50 ) > 0 ) { Set<SelectionKey> selectionKeys = selector.selectedKeys(); Iterator<SelectionKey> iter = selectionKeys.iterator(); while (iter.hasNext()) { SelectionKey key = iter.next(); iter.remove(); if (key.isAcceptable()) { acceptHandler(key); } else if (key.isReadable()) { System.out.println("in....." ); key.interestOps(key.interestOps() | ~SelectionKey.OP_READ); readHandler(key); } else if (key.isWritable()){ key.interestOps(key.interestOps() & ~SelectionKey.OP_WRITE); writeHandler(key); } } } } } catch (IOException e) { e.printStackTrace(); } } private void writeHandler (SelectionKey key) new Thread(()->{ System.out.println("write handler..." ); SocketChannel client = (SocketChannel) key.channel(); ByteBuffer buffer = (ByteBuffer) key.attachment(); buffer.flip(); while (buffer.hasRemaining()) { try { client.write(buffer); } catch (IOException e) { e.printStackTrace(); } } try { Thread.sleep(2000 ); } catch (InterruptedException e) { e.printStackTrace(); } buffer.clear(); }).start(); } public void acceptHandler (SelectionKey key) try { ServerSocketChannel ssc = (ServerSocketChannel) key.channel(); SocketChannel client = ssc.accept(); client.configureBlocking(false ); ByteBuffer buffer = ByteBuffer.allocate(8192 ); client.register(selector, SelectionKey.OP_READ, buffer); System.out.println("-------------------------------------------" ); System.out.println("新客户端:" + client.getRemoteAddress()); System.out.println("-------------------------------------------" ); } catch (IOException e) { e.printStackTrace(); } } public void readHandler (SelectionKey key) new Thread(()->{ System.out.println("read handler....." ); SocketChannel client = (SocketChannel) key.channel(); ByteBuffer buffer = (ByteBuffer) key.attachment(); buffer.clear(); int read = 0 ; try { while (true ) { read = client.read(buffer); System.out.println(Thread.currentThread().getName()+ " " + read); if (read > 0 ) { key.interestOps( SelectionKey.OP_READ); client.register(key.selector(),SelectionKey.OP_WRITE,buffer); } else if (read == 0 ) { break ; } else { client.close(); break ; } } } catch (IOException e) { e.printStackTrace(); } }).start(); } public static void main (String[] args) SocketMultiplexingSingleThreadv2 service = new SocketMultiplexingSingleThreadv2(); service.start(); } }
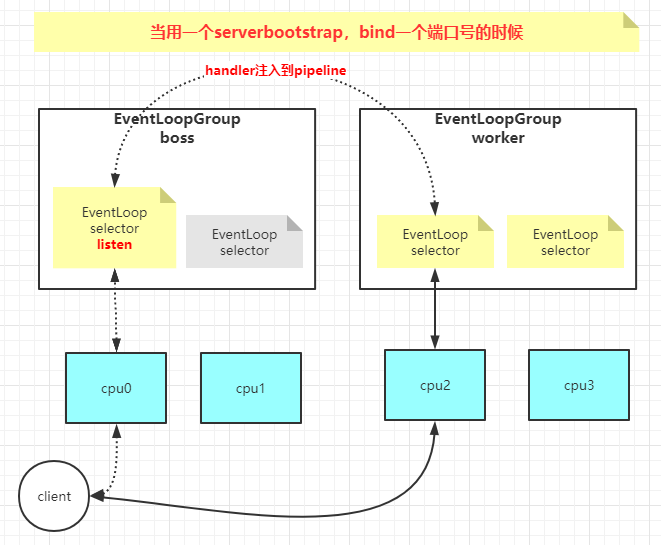
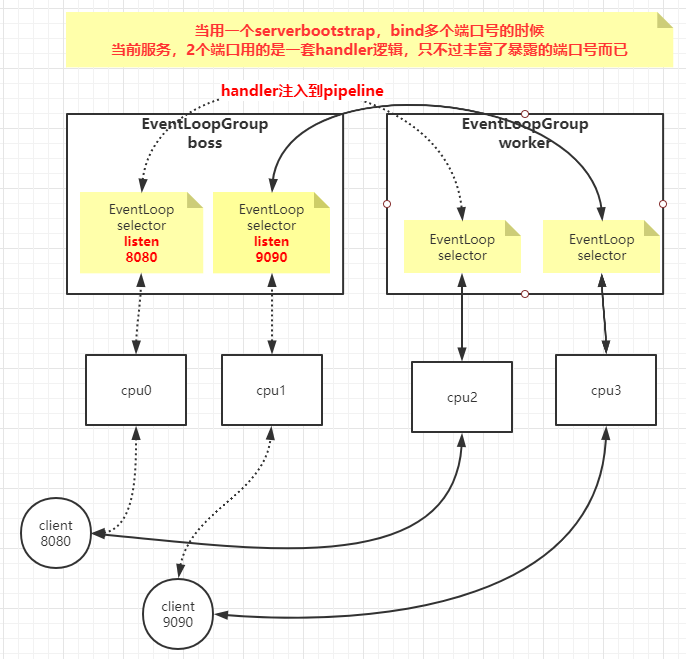
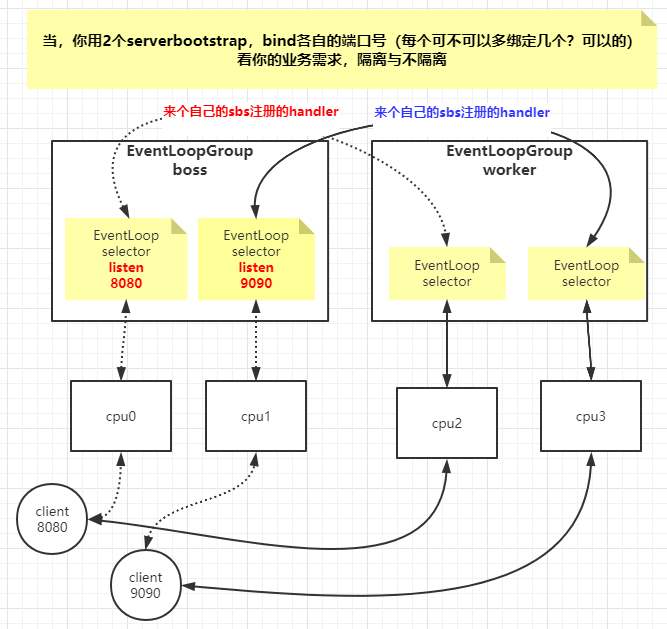
多Selector单线程 1 2 3 4 5 V1版本:混合模式,只有一个线程负责accept,每个都会被分配client,进行R/W V2版本:index=[0]的Selector只注册ACCEPT事件,其他Selector注册R/W事件 V3版本:创建Boss线程组,多个Selector负责ACCEPT事件,创建Wroker线程组,多个Select负责R/W事件
1 2 3 4 5 6 7 8 9 10 11 12 13 14 15 16 17 18 19 20 21 public class MainSocketServer public static void main (String[] args) throws IOException SelectorThreadGroup bossGroup = new SelectorThreadGroup(3 ); SelectorThreadGroup workerGroup = new SelectorThreadGroup(3 ); bossGroup.start(); workerGroup.start(); bossGroup.setWorker(workerGroup); bossGroup.bind(7777 , 8888 , 9999 ); } }
1 2 3 4 5 6 7 8 9 10 11 12 13 14 15 16 17 18 19 20 21 22 23 24 25 26 27 28 29 30 31 32 33 34 35 36 37 38 39 40 41 42 43 44 45 46 47 48 49 50 51 52 53 54 55 56 57 58 59 60 61 62 63 64 65 66 67 68 69 70 71 72 73 74 75 76 77 78 79 80 81 82 83 84 85 86 87 88 89 90 91 92 93 94 95 96 97 98 99 100 101 102 103 public class SelectorThread implements Runnable SelectorThreadGroup stg; Selector selector; LinkedBlockingDeque<Channel> queue = new LinkedBlockingDeque<>(); public SelectorThread (SelectorThreadGroup stg) throws IOException this .stg = stg; this .selector = Selector.open(); } @Override public void run () try { while (true ) { int num = selector.select(); if (num > 0 ) { Set<SelectionKey> selectionKeys = selector.selectedKeys(); Iterator<SelectionKey> iterator = selectionKeys.iterator(); while (iterator.hasNext()) { SelectionKey next = iterator.next(); iterator.remove(); if (next.isAcceptable()) { acceptHandler(next); } else if (next.isReadable()) { readHandler(next); } } } while (!queue.isEmpty()) { Channel channel = queue.take(); registerChannel(channel); } } } catch (Exception e) { e.printStackTrace(); } } public void registerChannel (Channel channel) throws IOException if (channel instanceof ServerSocketChannel) { ServerSocketChannel server = (ServerSocketChannel) channel; server.register(selector, SelectionKey.OP_ACCEPT); System.out.println(Thread.currentThread().getName() + " " + server.getLocalAddress() + " ServerSocket has register to Selector..." ); } else { SocketChannel client = (SocketChannel) channel; client.configureBlocking(false ); ByteBuffer byteBuffer = ByteBuffer.allocate(4096 ); client.register(selector, SelectionKey.OP_READ, byteBuffer); System.out.println(Thread.currentThread().getName() + " " + client.getRemoteAddress() + " Socket has register to Selector..." ); } } public void acceptHandler (SelectionKey key) throws IOException ServerSocketChannel channel = (ServerSocketChannel) key.channel(); System.out.println(Thread.currentThread().getName() + " " + channel.getLocalAddress() + " accept listen..." ); SocketChannel client = channel.accept(); stg.registerV3(client); } public void readHandler (SelectionKey key) throws IOException SocketChannel channel = (SocketChannel) key.channel(); System.out.println(Thread.currentThread().getName() + " register read..." + channel.getRemoteAddress()); ByteBuffer byteBuffer = (ByteBuffer) key.attachment(); byteBuffer.clear(); while (true ) { int read = channel.read(byteBuffer); if (read > 0 ) { byteBuffer.flip(); while (byteBuffer.hasRemaining()) { channel.write(byteBuffer); } byteBuffer.clear(); } else if (read == 0 ) { break ; } else { key.channel(); System.out.println("断开连接:" + channel.getRemoteAddress()); break ; } } } }
1 2 3 4 5 6 7 8 9 10 11 12 13 14 15 16 17 18 19 20 21 22 23 24 25 26 27 28 29 30 31 32 33 34 35 36 37 38 39 40 41 42 43 44 45 46 47 48 49 50 51 52 53 54 55 56 57 58 59 60 61 62 63 64 65 66 67 68 69 70 71 72 73 74 75 76 77 78 79 80 81 82 83 84 85 86 87 88 89 90 91 92 public class SelectorThreadGroup SelectorThread[] sts; AtomicInteger count = new AtomicInteger(); SelectorThreadGroup worker = this ; public SelectorThreadGroup (int num) throws IOException sts = new SelectorThread[num]; for (int i = 0 ; i < num; i++) { sts[i] = new SelectorThread(this ); } } public void start () for (int i = 0 ; i < sts.length; i++) { new Thread(sts[i]).start(); } } public void setWorker (SelectorThreadGroup worker) this .worker = worker; } public void bind (int ... ports) throws IOException for (int port : ports) { ServerSocketChannel server = ServerSocketChannel.open(); server.bind(new InetSocketAddress(port)); server.configureBlocking(false ); registerV3(server); } System.out.println("服务器启动了......" ); } public void registerV3 (Channel channel) SelectorThread st = null ; if (channel instanceof ServerSocketChannel) { st = this .nextSelectorV1(); } else { st = worker.nextSelectorV1(); } st.queue.add(channel); st.selector.wakeup(); } public void registerV2 (Channel channel) SelectorThread st = null ; if (channel instanceof ServerSocketChannel) { st = sts[0 ]; } else { st = nextSelectorV2(); } st.queue.add(channel); st.selector.wakeup(); } public SelectorThread nextSelectorV2 () int index = count.getAndIncrement() % (sts.length - 1 ); return sts[index + 1 ]; } public void registerV1 (Channel channel) SelectorThread st = nextSelectorV1(); st.queue.add(channel); st.selector.wakeup(); } public SelectorThread nextSelectorV1 () int index = count.getAndIncrement() % sts.length; return sts[index]; } }
Netty响应式编程 缓冲池概念 在对象引用的实现中,每当一个Buffer实例没有被引用时,则会销毁该对象实例,如被GC回收,但是Buffer对象创建时的内存分配开销是比较大的,如果频繁创建Buffer对象,频繁进行内存分配释放,则开销较大,影响性能,故在netty4中新增了对象池化机制,即Buffer对象没有被引用时,可以放到一个对象缓存池中,而不是马上销毁,当需要时,则重新从对象缓存池中取出,而不需要重新创建。
PooledByteBuf 继承于AbstractReferenceCountedByteBuf,在引用计数的基础上,添加池化机制减少对象创建,内存分配释放,提高性能。
1 2 3 4 5 6 7 8 9 10 11 12 13 14 15 16 17 18 19 20 21 22 23 24 25 26 27 28 29 30 31 32 33 34 35 36 37 38 39 40 41 abstract class PooledByteBuf <T > extends AbstractReferenceCountedByteBuf private final Recycler.Handle<PooledByteBuf<T>> recyclerHandle; protected PoolChunk<T> chunk; protected long handle; protected T memory; protected int offset; protected int length; int maxLength; PoolThreadCache cache; private ByteBuffer tmpNioBuf; private ByteBufAllocator allocator; ... @Override protected final void deallocate () if (handle >= 0 ) { final long handle = this .handle; this .handle = -1 ; memory = null ; tmpNioBuf = null ; chunk.arena.free(chunk, handle, maxLength, cache); chunk = null ; recycle(); } } private void recycle () recyclerHandle.recycle(this ); } }
PooledDirectByteBuf 直接内存的池化实现类
RECYCLER为PooledDirectByteBuf类的对象实例缓存池;
newInstance方法,从缓存池RECYCLER获取一个DirectByteBuf的对象实例,然后调用reuse重置该buf,然后返回给调用方。
1 2 3 4 5 6 7 8 9 10 11 12 13 14 15 16 17 18 19 20 21 22 23 24 25 26 27 28 29 final class PooledDirectByteBuf extends PooledByteBuf <ByteBuffer > private static final Recycler<PooledDirectByteBuf> RECYCLER = new Recycler<PooledDirectByteBuf>() { @Override protected PooledDirectByteBuf newObject (Handle<PooledDirectByteBuf> handle) return new PooledDirectByteBuf(handle, 0 ); } }; static PooledDirectByteBuf newInstance (int maxCapacity) PooledDirectByteBuf buf = RECYCLER.get(); buf.reuse(maxCapacity); return buf; } ... } PooledDirectByteBuf的reuse实现: final void reuse (int maxCapacity) maxCapacity(maxCapacity); setRefCnt(1 ); setIndex0(0 , 0 ); discardMarks(); }
PooledHeapByteBuf 堆内存的池化实现类
1 2 3 4 5 6 7 8 9 10 11 12 13 14 15 16 17 18 class PooledHeapByteBuf extends PooledByteBuf<byte[]> { private static final Recycler<PooledHeapByteBuf> RECYCLER = new Recycler<PooledHeapByteBuf>() { @Override protected PooledHeapByteBuf newObject (Handle<PooledHeapByteBuf> handle) return new PooledHeapByteBuf(handle, 0 ); } }; static PooledHeapByteBuf newInstance (int maxCapacity) PooledHeapByteBuf buf = RECYCLER.get(); buf.reuse(maxCapacity); return buf; } ... }
ByteBuf 1 2 3 4 5 6 7 8 9 10 11 12 13 14 15 16 17 18 19 20 21 22 23 24 25 26 27 28 29 30 31 32 33 34 35 36 37 38 39 40 41 42 43 44 45 46 47 48 @Test public void myBytebuf () ByteBuf buf = PooledByteBufAllocator.DEFAULT.heapBuffer(8 , 20 ); print(buf); buf.writeBytes(new byte []{1 ,2 ,3 ,4 }); print(buf); buf.writeBytes(new byte []{1 ,2 ,3 ,4 }); print(buf); buf.writeBytes(new byte []{1 ,2 ,3 ,4 }); print(buf); buf.writeBytes(new byte []{1 ,2 ,3 ,4 }); print(buf); buf.writeBytes(new byte []{1 ,2 ,3 ,4 }); print(buf); buf.writeBytes(new byte []{1 ,2 ,3 ,4 }); print(buf); } public static void print (ByteBuf buf) System.out.println("buf.isReadable() :" +buf.isReadable()); System.out.println("buf.readerIndex() :" +buf.readerIndex()); System.out.println("buf.readableBytes() " +buf.readableBytes()); System.out.println("buf.isWritable() :" +buf.isWritable()); System.out.println("buf.writerIndex() :" +buf.writerIndex()); System.out.println("buf.writableBytes() :" +buf.writableBytes()); System.out.println("buf.capacity() :" +buf.capacity()); System.out.println("buf.maxCapacity() :" +buf.maxCapacity()); System.out.println("buf.isDirect() :" +buf.isDirect()); System.out.println("--------------" ); }
客户端 1 2 3 4 5 6 7 8 9 10 11 12 13 14 15 16 17 18 19 20 21 22 23 24 25 26 27 28 29 30 31 32 @Test public void clientMode () throws Exception NioEventLoopGroup thread = new NioEventLoopGroup(1 ); NioSocketChannel client = new NioSocketChannel(); thread.register(client); ChannelPipeline p = client.pipeline(); p.addLast(new MyInHandler()); ChannelFuture connect = client.connect(new InetSocketAddress("192.168.150.11" , 9090 )); ChannelFuture sync = connect.sync(); ByteBuf buf = Unpooled.copiedBuffer("hello server" .getBytes()); ChannelFuture send = client.writeAndFlush(buf); send.sync(); sync.channel().closeFuture().sync(); System.out.println("client over...." ); }
1 2 3 4 5 6 7 8 9 10 11 12 13 14 15 16 17 18 19 20 21 22 23 24 25 26 27 28 29 30 @ChannelHandler .Sharableclass MyInHandler extends ChannelInboundHandlerAdapter @Override public void channelRegistered (ChannelHandlerContext ctx) throws Exception System.out.println("client registed..." ); } @Override public void channelActive (ChannelHandlerContext ctx) throws Exception System.out.println("client active..." ); } @Override public void channelRead (ChannelHandlerContext ctx, Object msg) throws Exception ByteBuf buf = (ByteBuf) msg; CharSequence str = buf.getCharSequence(0 ,buf.readableBytes(), CharsetUtil.UTF_8); System.out.println(str); ctx.writeAndFlush(buf); } }
服务端 1 2 3 4 5 6 7 8 9 10 11 12 13 14 15 16 17 18 19 20 21 22 23 24 25 26 @Test public void serverMode () throws Exception NioEventLoopGroup thread = new NioEventLoopGroup(1 ); NioServerSocketChannel server = new NioServerSocketChannel(); thread.register(server); ChannelPipeline p = server.pipeline(); p.addLast(new MyAcceptHandler(thread,new MyInHandler())); p.addLast(new MyAcceptHandler(thread,new ChannelInit())); ChannelFuture bind = server.bind(new InetSocketAddress("192.168.150.1" , 9090 )); bind.sync().channel().closeFuture().sync(); System.out.println("server close...." ); }
1 2 3 4 5 6 7 8 9 10 11 12 13 14 15 16 17 18 19 20 21 22 23 24 25 26 27 28 29 30 31 class MyAcceptHandler extends ChannelInboundHandlerAdapter private final EventLoopGroup selector; private final ChannelHandler handler; public MyAcceptHandler (EventLoopGroup thread, ChannelHandler myInHandler) this .selector = thread; this .handler = myInHandler; } @Override public void channelRegistered (ChannelHandlerContext ctx) throws Exception System.out.println("server registerd..." ); } @Override public void channelRead (ChannelHandlerContext ctx, Object msg) throws Exception SocketChannel client = (SocketChannel) msg; ChannelPipeline p = client.pipeline(); p.addLast(handler); selector.register(client); } }
优化 由于使用注解@ChannelHandler.Sharable造成所有客户端都使用了同一个Handler对象,如果每个客户端都想要独立的Handler对象呢?
1 2 3 4 5 6 7 8 9 10 11 12 13 14 @ChannelHandler .Sharableclass ChannelInit extends ChannelInboundHandlerAdapter @Override public void channelRegistered (ChannelHandlerContext ctx) throws Exception Channel client = ctx.channel(); ChannelPipeline p = client.pipeline(); p.addLast(new MyInHandler()); ctx.pipeline().remove(this ); } }
Netty客户端 1 2 3 4 5 6 7 8 9 10 11 12 13 14 15 16 17 18 19 20 21 @Test public void nettyClient () throws InterruptedException, IOException NioEventLoopGroup group = new NioEventLoopGroup(1 ); Bootstrap bootstrap = new Bootstrap(); ChannelFuture connect = bootstrap.group(group) .channel(NioSocketChannel.class ) .handler (new ChannelInitializer <SocketChannel >() { @Override protected void initChannel (SocketChannel socketChannel) throws Exception ChannelPipeline pipeline = socketChannel.pipeline(); pipeline.addLast(new MyHandler()); } }) .connect(new InetSocketAddress("192.168.1.134" , 9090 )); connect.sync(); NioSocketChannel client = (NioSocketChannel) connect.channel(); ByteBuf buf = Unpooled.copiedBuffer("hello server" .getBytes()); ChannelFuture channelFuture = client.writeAndFlush(buf); channelFuture.sync(); }
Netty服务端 1 2 3 4 5 6 7 8 9 10 11 12 13 14 15 16 17 @Test public void nettyServer () throws InterruptedException NioEventLoopGroup group = new NioEventLoopGroup(1 ); ServerBootstrap bootstrap = new ServerBootstrap(); ChannelFuture bind = bootstrap.group(group, group) .channel(NioServerSocketChannel.class ) .childHandler (new ChannelInitializer <NioServerSocketChannel >() { @Override protected void initChannel (NioSocketChannel channel) throws Exception ChannelPipeline pipeline = channel.pipeline(); pipeline.addLast(new MyHandler()); } }) .bind(new InetSocketAddress("192.168.3.32" , 9090 )); bind.sync().channel().closeFuture().sync(); }
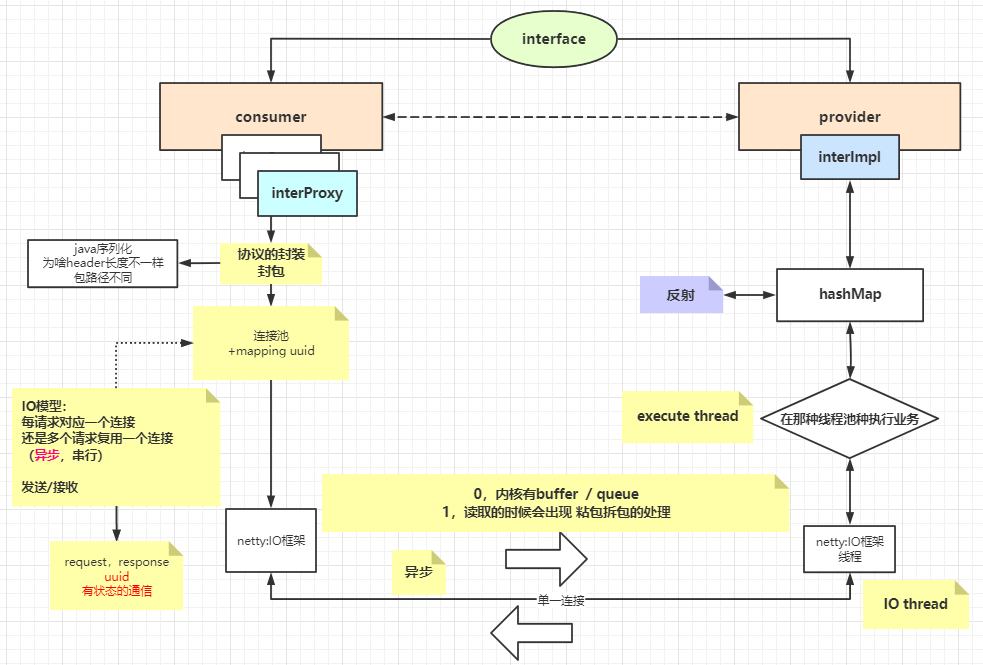
手写RPC框架
1 2 3 4 interface Say String saySomething (String hello) ; }
消费者 1 2 3 4 5 6 7 8 9 10 11 12 13 14 15 public class MainConsumer public static void main (String[] args) throws InterruptedException for (int i = 0 ; i < 20 ; i++) { String Isay = "~~~hello~~~~" + i; new Thread(() -> { Say say = ProxyUtils.proxy(Say.class ) ; String recv = say.saySomething(Isay); System.out.println("I say : 【" + Isay + "】 and provider return :" + recv); }).start(); } } }
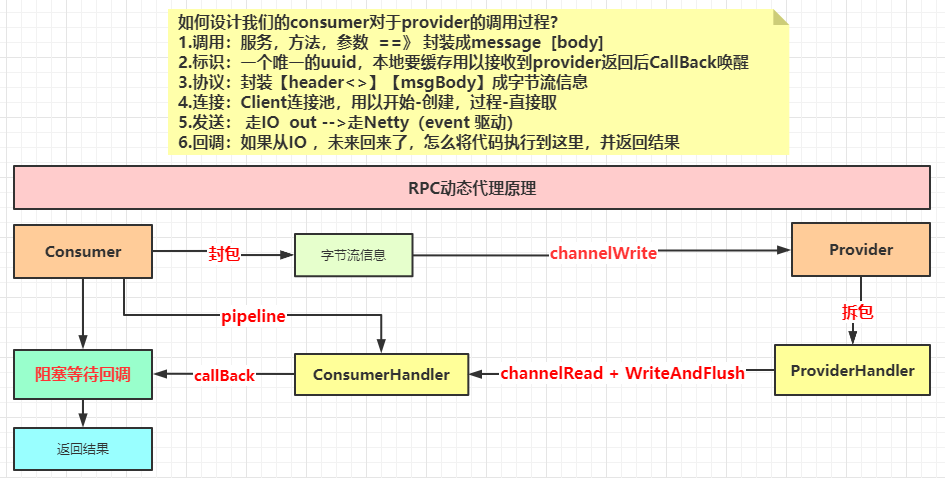
动态代理 1 2 3 4 5 6 7 8 9 10 11 12 13 14 15 16 17 18 19 20 21 22 23 24 25 26 27 28 29 public class ProxyUtils public static <T> T proxy (Class<T> clazz) { ClassLoader classLoader = clazz.getClassLoader(); Class<?>[] classes = {clazz}; return (T) Proxy.newProxyInstance(classLoader, classes, (proxy, method, args) -> { Class<?>[] parameterTypes = method.getParameterTypes(); String methodName = method.getName(); String name = clazz.getName(); Object object = Dispatcher.get(clazz.getName()); if (object != null ) { System.out.println("走本地调用:FC..." ); Method m = clazz.getMethod(methodName, parameterTypes); return m.invoke(object, args); } System.out.println("走RPC调用:RPC..." ); MsgBody msgBody = new MsgBody(name, methodName, args, parameterTypes); SynchronousQueue<Object> blockQueue = ClientFactory.getFactory().transport(msgBody); return blockQueue.take(); }); } }
协议 1 2 3 4 5 6 7 8 9 10 11 12 13 14 15 16 17 18 19 20 21 public class MsgHeader implements Serializable public int protocol; public String uuid; public long dataLen; public static final int tranProtocol = 0x1010 ; public static final int recvProtocol = 0x0101 ; public MsgHeader (int protocol, String uuid, long dataLen) this .protocol = protocol; this .uuid = uuid; this .dataLen = dataLen; } }
1 2 3 4 5 6 7 8 9 10 11 12 13 14 15 16 17 18 19 public class MsgBody implements Serializable String name; String method; Object[] args; Class<?>[] parameterTypes; public MsgBody (String name, String method, Object[] args, Class<?>[] parameterTypes) this .name = name; this .method = method; this .args = args; this .parameterTypes = parameterTypes; } }
1 2 3 4 5 6 7 8 9 10 11 12 13 14 15 16 17 public class SerializableUtils static ByteArrayOutputStream baos = new ByteArrayOutputStream(); public synchronized static byte [] toBytes(Object object) throws IOException { baos.reset(); ObjectOutputStream oos = new ObjectOutputStream(baos); oos.writeObject(object); return baos.toByteArray(); } public static Object toObject (byte [] bytes) throws IOException, ClassNotFoundException ByteArrayInputStream bais = new ByteArrayInputStream(bytes); ObjectInputStream ois = new ObjectInputStream(bais); return ois.readObject(); } }
链接池 1 2 3 4 5 6 7 8 9 10 11 12 13 14 15 16 17 18 19 20 21 22 23 24 25 26 27 28 29 30 31 32 33 34 35 36 37 38 39 40 41 42 43 44 45 46 47 48 49 50 51 52 53 54 55 56 57 58 59 60 61 62 63 public class ClientFactory int size = 10 ; private static final ClientFactory factory = new ClientFactory(); ConcurrentHashMap<InetSocketAddress, ClientPool> pools = new ConcurrentHashMap<>(); public static ClientFactory getFactory () return factory; } private ClientFactory () } public NioSocketChannel getClientChannel (InetSocketAddress server) ClientPool pool = pools.get(server); if (pool == null ) { pools.putIfAbsent(server, new ClientPool(size)); pool = pools.get(server); } try { return pool.getClient(server); } catch (InterruptedException e) { e.printStackTrace(); } return null ; } public SynchronousQueue<Object> transport (MsgBody msgBody) throws Exception SynchronousQueue<Object> blockQueue = new SynchronousQueue<>(); String uuid = UUID.randomUUID().toString(); CallBackUtils.add(uuid, blockQueue); byte [] bodyBytes = SerializableUtils.toBytes(msgBody); MsgHeader header = new MsgHeader(MsgHeader.tranProtocol, uuid, bodyBytes.length); byte [] headerBytes = SerializableUtils.toBytes(header); ByteBuf byteBuf = PooledByteBufAllocator.DEFAULT.heapBuffer(headerBytes.length + bodyBytes.length); byteBuf.writeBytes(headerBytes); byteBuf.writeBytes(bodyBytes); InetSocketAddress server = new InetSocketAddress("localhost" , 9090 ); NioSocketChannel clientChannel = getClientChannel(server); ChannelFuture channelFuture = clientChannel.writeAndFlush(byteBuf); channelFuture.sync(); return blockQueue; } }
1 2 3 4 5 6 7 8 9 10 11 12 13 14 15 16 17 18 19 20 21 22 23 24 25 26 27 28 29 30 31 32 33 34 35 36 37 38 39 40 41 42 43 44 45 46 47 48 public class ClientPool Random random = new Random(); NioSocketChannel[] clients; public ClientPool (int num) clients = new NioSocketChannel[num]; } public synchronized NioSocketChannel getClient (InetSocketAddress server) throws InterruptedException int index = random.nextInt(clients.length); NioSocketChannel client = clients[index]; if (client != null && client.isActive()) { return client; } clients[index] = create(server); return clients[index]; } public NioSocketChannel create (InetSocketAddress server) throws InterruptedException NioEventLoopGroup worker = new NioEventLoopGroup(1 ); Bootstrap bootstrap = new Bootstrap(); ChannelFuture connect = bootstrap.group(worker) .channel(NioSocketChannel.class ) .handler (new ChannelInitializer <NioSocketChannel >() { @Override protected void initChannel (NioSocketChannel ch) throws Exception ChannelPipeline pipeline = ch.pipeline(); pipeline.addLast(new ProtocolDecoder()); pipeline.addLast(new ConsumerHandler()); } }) .connect(server); connect.sync(); return (NioSocketChannel) connect.channel(); } }
生产者 1 2 3 4 5 6 7 8 9 10 11 12 13 14 15 16 17 18 19 20 21 22 23 24 25 26 27 28 29 30 31 public class MainProvider public static void main (String[] args) throws InterruptedException NioEventLoopGroup boss = new NioEventLoopGroup(1 ); NioEventLoopGroup worker = new NioEventLoopGroup(20 ); ServerBootstrap bootstrap = new ServerBootstrap(); ChannelFuture bind = bootstrap.group(boss, worker) .channel(NioServerSocketChannel.class ) .childHandler (new ChannelInitializer <NioSocketChannel >() { @Override protected void initChannel (NioSocketChannel ch) throws Exception System.out.println("server accept client port: " + ch.remoteAddress().getPort()); ChannelPipeline pipeline = ch.pipeline(); pipeline.addLast(new ProtocolDecoder()); pipeline.addLast(new ProviderHandler()); } }) .bind(new InetSocketAddress("localhost" , 9090 )); bind.sync().channel().closeFuture().sync(); } }
实现类 1 2 3 4 5 6 7 public class MySay implements Say @Override public String saySomething (String hello) return "I say Hello back" ; } }
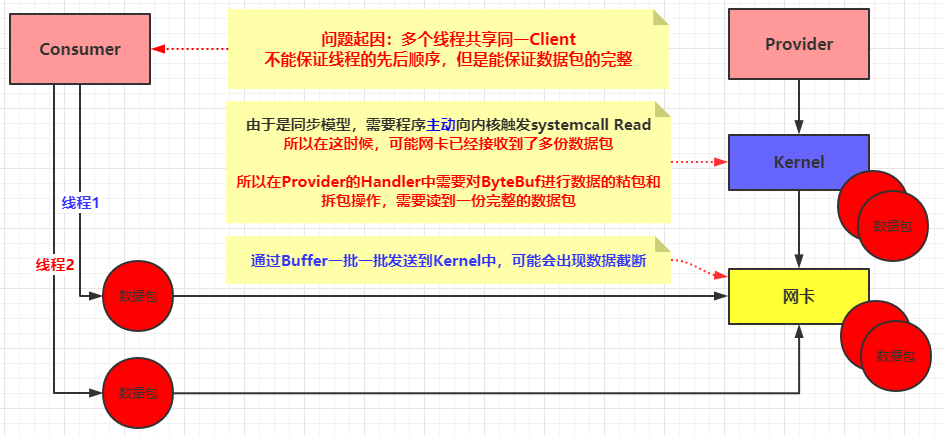
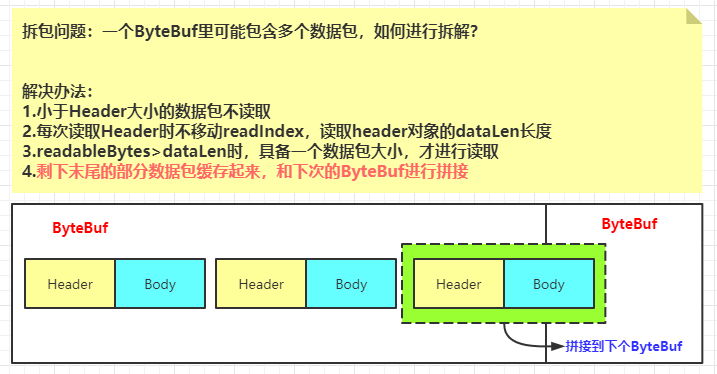
1 2 3 4 5 Provider原始思想的Handler: 1.读取到ByteBuf后,根据消息头的大小进行数据分割,由于前面预测试输出过一个MsgHttper对象的byte数组大小为143 2.所以读取的前143个字节的数据转换成MsgHeader对象 3.然后根据MsgHeader的属性dataLen获取到消息体大小 4.然后读取dataLen个字节的数据转换成MsgBody对象
1 2 3 4 5 6 7 8 9 10 11 12 13 14 15 16 17 18 19 20 public class ProviderRequestHandler extends ChannelInboundHandlerAdapter @Override public void channelRead (ChannelHandlerContext ctx, Object buf) throws Exception ByteBuf byteBuf = (ByteBuf) buf; if (byteBuf.readableBytes() > 143 ) { byte [] headBytes = new byte [143 ]; byteBuf.readBytes(headBytes, byteBuf.readerIndex(), headBytes.length); MsgHeader header = (MsgHeader) SerializableUtils.toObject(headBytes); System.out.println(header); if (byteBuf.readableBytes() >= header.dataLen) { byte [] bodyBytes = new byte [(int ) header.dataLen]; byteBuf.readBytes(bodyBytes); MsgBody msgBody = (MsgBody) SerializableUtils.toObject(bodyBytes); System.out.println(msgBody); } } } }
思考:这种设计在并发的情况下会不会产生问题?一个ByteBuf对象包含一个完整的数据包吗?
解码器
根据上文的思想,需要实现拆包和缓存不完整的数据包和下次数据包进行拼接,而Netty框架肯定也考虑了这个问题,对种现象进行了封装,称做 解码器 ,它的作用是实现数据包的拆包操作,并将拆好的数据包添加进一个List<Object> obj中,它会一个一个传递给下一个Handler。
1 2 3 4 5 6 7 8 9 10 11 12 13 14 15 16 17 18 19 20 21 22 23 24 25 26 27 28 29 30 31 32 33 34 35 36 37 38 39 40 41 42 43 public class ProtocolDecoder extends ByteToMessageDecoder @Override protected void decode (ChannelHandlerContext ctx, ByteBuf buf, List<Object> out) throws Exception ByteBuf byteBuf = (ByteBuf) buf; while (byteBuf.readableBytes() > 143 ) { byte [] headBytes = new byte [143 ]; byteBuf.getBytes(byteBuf.readerIndex(), headBytes); MsgHeader header = (MsgHeader) SerializableUtils.toObject(headBytes); if (byteBuf.readableBytes() - headBytes.length >= header.dataLen) { byteBuf.readBytes(headBytes.length); byte [] msgBytes = new byte [(int ) header.dataLen]; byteBuf.readBytes(msgBytes); if (header.protocol == MsgHeader.tranProtocol) { MsgBody msgBody = (MsgBody) SerializableUtils.toObject(msgBytes); out.add(new ProtocolMessage(header, msgBody)); } else if (header.protocol == MsgHeader.recvProtocol) { Object result = SerializableUtils.toObject(msgBytes); out.add(new ProtocolMessage(header, result)); } } else { break ; } } } }
1 2 3 4 5 6 7 8 9 10 11 12 13 14 15 16 public class ProtocolMessage MsgHeader header; MsgBody msgBody; Object result; public ProtocolMessage (MsgHeader header, MsgBody msgBody) this .header = header; this .msgBody = msgBody; } public ProtocolMessage (MsgHeader header, Object result) this .header = header; this .result = result; } }
1 2 3 4 这里做具体ChannelRead的IO逻辑: 如果假设处理完了,要给客户端返回了~!!!需要注意哪些环节~? 1.因为是个RPC,得返回Header带过来的uuid!!!! 2.关注RPC通信协议 protocol,在client那一侧也要解决解码问题 3.业务数据处理
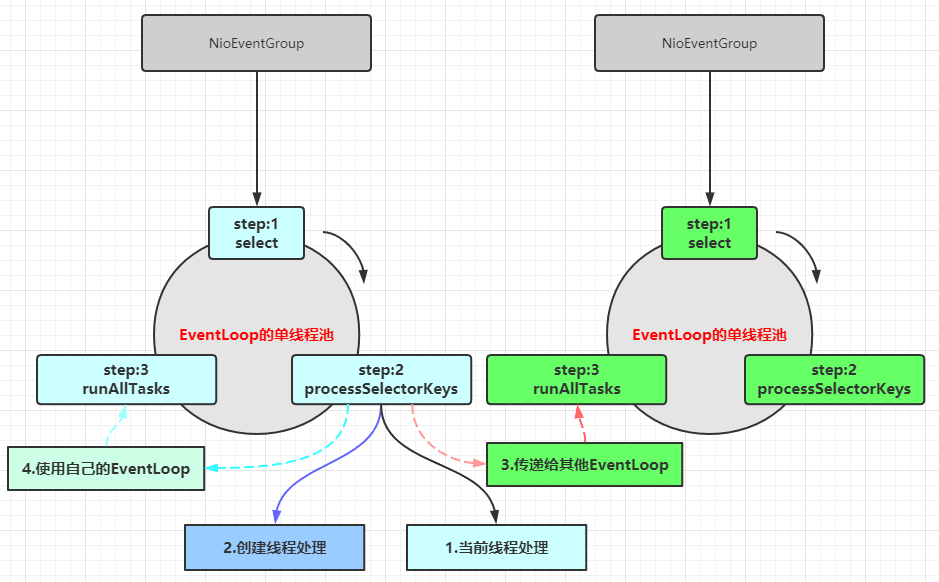
1 2 3 4 5 6 7 8 9 10 11 12 13 14 15 16 业务处理的几种策略: 1.直接在当前方法处理IO 和 业务 和 返回 弊端:processSelectorKeys和runTask(业务处理)捆绑,其他Channel需要等待它的处理 2.自己创建线程池 需要注意:当前线程和处理业务的线程肯定不是同一个线程 3.业务逻辑传递给其他EventLoop,每一个EventLoop都有一个单线程、Selector、还有一个task队列 编码:ctx.executor().parent().next().execute() 好处:将processSelectorKeys和runAllTasks解耦,可以将runAllTasks的压力分散到其他Selector中 需要注意:当前线程和处理业务线程可能不是同一个线程,处理业务线程可能是其他EventLoop的单线程 4.使用netty自己的eventloop来处理业务及返回 编码:ctx.executor().execute(); 作用:将所有processSelectorKeys先处理完,然后再开始按顺序执行runAllTasks 需要注意:当前线程和处理业务的线程肯定是同一个线程,都是由用一个EventLoop的单线程处理
1 2 3 4 5 6 7 8 9 10 11 12 13 14 15 16 17 18 19 20 21 22 23 24 25 26 27 28 29 30 31 32 33 34 35 36 37 38 public class ProviderHandler extends ChannelInboundHandlerAdapter @Override public void channelRead (ChannelHandlerContext ctx, Object out) throws Exception ProtocolMessage pmsg = (ProtocolMessage) out; String ioThreadName = Thread.currentThread().getName(); ctx.executor().parent().next().execute(() -> { String taskThreadName = Thread.currentThread().getName(); String param = (String) pmsg.msgBody.args[0 ]; Object result = null ; try { Object object = Dispatcher.get(pmsg.msgBody.name); Class<?> clazz = object.getClass(); Method m = clazz.getMethod(pmsg.msgBody.method, pmsg.msgBody.parameterTypes); result = m.invoke(object, pmsg.msgBody.args); byte [] resultBytes = SerializableUtils.toBytes(result); MsgHeader header = new MsgHeader(MsgHeader.recvProtocol, pmsg.header.uuid, resultBytes.length); byte [] headerBytes = SerializableUtils.toBytes(header); ByteBuf byteBuf = PooledByteBufAllocator.DEFAULT.heapBuffer(headerBytes.length + resultBytes.length); byteBuf.writeBytes(headerBytes); byteBuf.writeBytes(resultBytes); ctx.writeAndFlush(byteBuf); } catch (Exception e) { e.printStackTrace(); } }); } }
1 2 3 4 5 6 7 8 9 10 11 public class ConsumerHandler extends ChannelInboundHandlerAdapter @Override public void channelRead (ChannelHandlerContext ctx, Object out) throws Exception ProtocolMessage pmsg = (ProtocolMessage) out; CallBackUtils.callback(pmsg.header.uuid, pmsg.result); } }
1 2 3 4 5 6 7 8 9 10 11 12 13 14 15 public class CallBackUtils static ConcurrentHashMap<String, SynchronousQueue<Object>> map = new ConcurrentHashMap<>(); public static void add (String uuid, SynchronousQueue queue) map.put(uuid, queue); } public static void callback (String uuid, Object result) throws InterruptedException SynchronousQueue queue = map.get(uuid); queue.put(result); map.remove(uuid); } }
总结
