Spring的Aop原理和实现 BeanPostProcessor BeanPostProcessor是一个后置处理器,用于在所有 bean初始化前后进行一些处理工作;
1
2
3
4
5
6
7
8
9
10
11
12
13
14
15
16
17
package org.springframework.beans.factory.config;import org.springframework.beans.BeansException;import org.springframework.lang.Nullable;public interface BeanPostProcessor @Nullable default Object postProcessBeforeInitialization (Object bean, String beanName) throws BeansException return bean; } @Nullable default Object postProcessAfterInitialization (Object bean, String beanName) throws BeansException return bean; } }
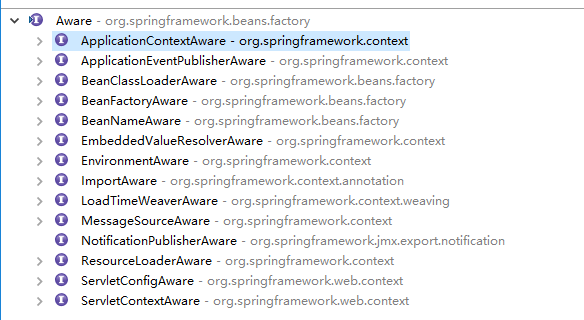
该BeanPostProcessor在spring底层中大量使用,比如我们需要获取ApplicationContext时,需要实现ApplicationContextAware接口
1
2
3
public interface ApplicationContextAware extends Aware void setApplicationContext (ApplicationContext arg0) throws BeansException }
那么setApplicationContext在什么时候调用呢?spring底层有一个ApplicationContextAwareProcessor类
1
2
3
4
5
6
7
8
9
10
11
12
13
14
15
16
17
18
19
20
21
22
23
24
25
26
27
28
29
30
31
32
33
34
35
36
37
38
39
40
41
42
43
44
45
46
47
48
49
50
51
52
53
54
55
56
57
58
59
60
61
62
class ApplicationContextAwareProcessor implements BeanPostProcessor private final ConfigurableApplicationContext applicationContext; private final StringValueResolver embeddedValueResolver; public ApplicationContextAwareProcessor (ConfigurableApplicationContext applicationContext) this .applicationContext = applicationContext; this .embeddedValueResolver = new EmbeddedValueResolver(applicationContext.getBeanFactory()); } @Nullable public Object postProcessBeforeInitialization (Object bean, String beanName) throws BeansException if (!(bean instanceof EnvironmentAware) && !(bean instanceof EmbeddedValueResolverAware) && !(bean instanceof ResourceLoaderAware) && !(bean instanceof ApplicationEventPublisherAware) && !(bean instanceof MessageSourceAware) && !(bean instanceof ApplicationContextAware)) { return bean; } else { AccessControlContext acc = null ; if (System.getSecurityManager() != null ) { acc = this .applicationContext.getBeanFactory().getAccessControlContext(); } if (acc != null ) { AccessController.doPrivileged(() -> { this .invokeAwareInterfaces(bean); return null ; }, acc); } else { this .invokeAwareInterfaces(bean); } return bean; } } private void invokeAwareInterfaces (Object bean) if (bean instanceof EnvironmentAware) { ((EnvironmentAware) bean).setEnvironment(this .applicationContext.getEnvironment()); } if (bean instanceof EmbeddedValueResolverAware) { ((EmbeddedValueResolverAware) bean).setEmbeddedValueResolver(this .embeddedValueResolver); } if (bean instanceof ResourceLoaderAware) { ((ResourceLoaderAware) bean).setResourceLoader(this .applicationContext); } if (bean instanceof ApplicationEventPublisherAware) { ((ApplicationEventPublisherAware) bean).setApplicationEventPublisher(this .applicationContext); } if (bean instanceof MessageSourceAware) { ((MessageSourceAware) bean).setMessageSource(this .applicationContext); } if (bean instanceof ApplicationContextAware) { ((ApplicationContextAware) bean).setApplicationContext(this .applicationContext); } } }
可以看到,spring源码中通过BeanPostProcessor接口,在容器自动装配bean的之前,对实现了ApplicationContextAware接口的bean进行了方法回调。
那么BeanPostProcessor接口又是在什么时候被调用的呢?通过跟踪源码调用链得知,当一个bean被初始化时,会调用AbstractBeanFactory的doGetBean方法,该方法中将会调用AbstractAutowireCapableBeanFactory的doCreateBean方法,以下是摘取部分doCreateBean方法:
1
2
3
4
5
6
7
8
9
10
11
protected Object doCreateBean (String beanName, RootBeanDefinition mbd, @Nullable Object[] args) throws BeanCreationException try { this .populateBean(beanName, mbd, instanceWrapper); exposedObject = this .initializeBean(beanName, exposedObject, mbd); } catch (Throwable arg17) { } }
从源码看到它先调用populateBean方法给刚创建好的bean对象进行属性赋值,然后调用initializeBean方法
1
2
3
4
5
6
7
8
9
10
11
12
13
14
15
16
17
18
19
20
21
22
23
protected Object initializeBean (String beanName, Object bean, @Nullable RootBeanDefinition mbd) Object wrappedBean = bean; if (mbd == null || !mbd.isSynthetic()) { wrappedBean = this .applyBeanPostProcessorsBeforeInitialization(bean, beanName); } try { this .invokeInitMethods(beanName, wrappedBean, mbd); } catch (Throwable arg5) { throw new BeanCreationException(mbd != null ?mbd.getResourceDescription():null , beanName, "Invocation of init method failed" , arg5); } if (mbd == null || !mbd.isSynthetic()) { wrappedBean = this .applyBeanPostProcessorsAfterInitialization(wrappedBean, beanName); } return wrappedBean; }
1
2
3
4
5
6
7
8
9
10
11
12
13
14
15
public Object applyBeanPostProcessorsBeforeInitialization (Object existingBean, String beanName) throws BeansException { Object result = existingBean; Object current; for (Iterator arg3 = this .getBeanPostProcessors().iterator(); arg3.hasNext(); result = current) { BeanPostProcessor processor = (BeanPostProcessor) arg3.next(); current = processor.postProcessBeforeInitialization(result, beanName); if (current == null ) { return result; } } return result; }
可以看到在initializeBean中调用了applyBeanPostProcessorsBeforeInitialization,该方法中将遍历容器中所有的BeanPostProcessor;挨个执行beforeInitialization方法,一但返回null,则跳出循环,不会执行后面的BeanPostProcessor.postProcessorsBeforeInitialization。
而applyBeanPostProcessorsAfterInitialization方法也和上文的方法中相似,也就是说,在初始化bean的过程中,其调用顺序如下:
populateBean(); //给Bean的属性赋值
initializeBean {
applyBeanPostProcessorsBeforeInitialization(bean, beanName); //Bean初始化之前调用
invokeInitMethods(beanName, wrappedBean, mbd); //执行自定义初始化
postProcessBeforeInitialization(result, beanName); //Bean初始化之后调用
}
Spring底层大量使用了BeanPostProcessor接口,比如我们的@Init、@destory,该注解工作的原理在于InitDestroyAnnotationBeanPostProcessor类,通过BeanPostProcessor的特性,扫描Bean的注解和方法,判断是否包含@Init、@destory注解,如果有,则进行方法反射调用。
还有如@Autowired、@PostConstruct,都是有其对应的XXXBeanPostProcessor接口。
Aware 自定义组件想要使用Spring容器底层的一些组件(ApplicationContext,BeanFactory,xxx),可以通过实现xxxAware,在创建对象时,会调用接口规定的方法注入相关组件。
1
2
public interface Aware }
如ApplicationContextAware,对应ApplicationContextAwareProcessor。
AOP 概念
AOP:【动态代理】
指在程序运行期间动态的将某段代码切入到指定方法指定位置进行运行的编程方式;
1、导入aop模块;Spring AOP:(spring-aspects)
2、定义一个业务逻辑类(MathCalculator);在业务逻辑运行的时候将日志进行打印(方法之前、方法运行结束、方法出现异常,xxx)
3、定义一个日志切面类(LogAspects):切面类里面的方法需要动态感知MathCalculator.div运行到哪里然后执行;
通知方法:
前置通知(@Before):logStart:在目标方法(div)运行之前运行
后置通知(@After):logEnd:在目标方法(div)运行结束之后运行(无论方法正常结束还是异常结束)
返回通知(@AfterReturning):logReturn:在目标方法(div)正常返回之后运行
异常通知(@AfterThrowing):logException:在目标方法(div)出现异常以后运行
环绕通知(@Around):动态代理,手动推进目标方法运行(joinPoint.procced())
4、给切面类的目标方法标注何时何地运行(通知注解);
5、将切面类和业务逻辑类(目标方法所在类)都加入到容器中;
6、必须告诉Spring哪个类是切面类(给切面类上加一个注解:@Aspect)
7、给配置类中加 @EnableAspectJAutoProxy 【开启基于注解的aop模式】
1 2 3 4 5 6 7 8 9 10 11 12 13 14 15 16 17 18 19 20 21 22 23 24 25 26 27 28 29 30 31 32 33 34 35 36 37 38 @Aspect public class LogAspects @Pointcut ("execution(public int com.MathCalculator.*(..))" ) public void pointCut () @Before ("pointCut()" ) public void logStart (JoinPoint joinPoint) Object[] args = joinPoint.getArgs(); System.out.println("" +joinPoint.getSignature().getName()+"运行。。。@Before:参数列表是:{" +Arrays.asList(args)+"}" ); } @After ("com.LogAspects.pointCut()" ) public void logEnd (JoinPoint joinPoint) System.out.println("" +joinPoint.getSignature().getName()+"结束。。。@After" ); } @AfterReturning (value="pointCut()" ,returning="result" ) public void logReturn (JoinPoint joinPoint,Object result) System.out.println("" +joinPoint.getSignature().getName()+"正常返回。。。@AfterReturning:运行结果:{" +result+"}" ); } @AfterThrowing (value="pointCut()" ,throwing="exception" ) public void logException (JoinPoint joinPoint,Exception exception) System.out.println("" +joinPoint.getSignature().getName()+"异常。。。异常信息:{" +exception+"}" ); } }
1
2
3
4
5
6
public class MathCalculator public int div (int i,int j) System.out.println("MathCalculator...div..." ); return i/j; } }
1
2
3
4
5
6
7
8
9
10
11
12
13
14
15
16
@EnableAspectJAutoProxy @Configuration public class MainConfigOfAOP @Bean public MathCalculator calculator () return new MathCalculator(); } @Bean public LogAspects logAspects () return new LogAspects(); } }
1
2
3
4
5
6
7
8
9
public class MainTest public static void main (String[] args) AnnotationConfigApplicationContext applicationContext = new AnnotationConfigApplicationContext(MainConfigOfAOP.class ) ; MathCalculator bean = applicationContext.getBean(MathCalculator.class ) ; bean.div(1 , 2 ); applicationContext.close(); } }
总结:
1、将业务逻辑组件和切面类都加入到容器中;告诉Spring哪个是切面类(@Aspect)
2、在切面类上的每一个通知方法上标注通知注解,告诉Spring何时何地运行(切入点表达式)
3、开启基于注解的aop模式;@EnableAspectJAutoProxy
原理 学习AOP原理的方向:【看给容器中注册了什么组件,这个组件什么时候工作,这个组件的功能是什么?】
@EnableAspectJAutoProxy注解是什么呢?
先了解这个ImportBeanDefinitionRegistrar接口的功能:
1
2
3
4
5
6
7
8
9
public interface ImportBeanDefinitionRegistrar default void registerBeanDefinitions (AnnotationMetadata importingClassMetadata, BeanDefinitionRegistry registry, BeanNameGenerator importBeanNameGenerator) this .registerBeanDefinitions(importingClassMetadata, registry); } default void registerBeanDefinitions (AnnotationMetadata importingClassMetadata, BeanDefinitionRegistry registry) } }
它的作用是通过实现ImportBeanDefinitionRegistrar接口的方法,创建自定义的对象和BeanDefinetion对象并设置相关属性,然后将BeanDefinetion注册到BeanDefinitionRegistry中,完成Bean对象的注册。
回过头来看看@EnableAspectJAutoProxy注解
1
2
3
4
5
6
7
8
9
@Target ({ElementType.TYPE})@Retention (RetentionPolicy.RUNTIME)@Documented @Import ({AspectJAutoProxyRegistrar.class }) public @interface EnableAspectJAutoProxy boolean proxyTargetClass () default false boolean exposeProxy () default false }
可以看到有注解@Import({AspectJAutoProxyRegistrar.class}),该注解的作用是给容器中导入AspectJAutoProxyRegistrar,利用AspectJAutoProxyRegistrar自定义给容器中注册bean。
1
2
3
4
5
6
7
8
9
10
11
12
13
14
15
16
17
class AspectJAutoProxyRegistrar implements ImportBeanDefinitionRegistrar public void registerBeanDefinitions (AnnotationMetadata importingClassMetadata, BeanDefinitionRegistry registry) AopConfigUtils.registerAspectJAnnotationAutoProxyCreatorIfNecessary(registry); AnnotationAttributes enableAspectJAutoProxy = AnnotationConfigUtils.attributesFor(importingClassMetadata, EnableAspectJAutoProxy.class ) ; if (enableAspectJAutoProxy != null ) { if (enableAspectJAutoProxy.getBoolean("proxyTargetClass" )) { AopConfigUtils.forceAutoProxyCreatorToUseClassProxying(registry); } if (enableAspectJAutoProxy.getBoolean("exposeProxy" )) { AopConfigUtils.forceAutoProxyCreatorToExposeProxy(registry); } } } }
那么它注册了什么Bean呢?
接着跟踪AopConfigUtils.registerAspectJAnnotationAutoProxyCreatorIfNecessary(registry);,将会调用该方法
1
2
3
4
5
6
@Nullable public static BeanDefinition registerAspectJAnnotationAutoProxyCreatorIfNecessary (BeanDefinitionRegistry registry, @Nullable Object source) return registerOrEscalateApcAsRequired(AnnotationAwareAspectJAutoProxyCreator.class , registry , source ) ; }
1
2
3
4
5
6
7
8
9
10
11
12
13
14
15
16
17
18
19
20
21
22
23
24
25
26
@Nullable private static BeanDefinition registerOrEscalateApcAsRequired (Class<?> cls, BeanDefinitionRegistry registry, @Nullable Object source) Assert.notNull(registry, "BeanDefinitionRegistry must not be null" ); if (registry.containsBeanDefinition("org.springframework.aop.config.internalAutoProxyCreator" )) { BeanDefinition beanDefinition1 = registry .getBeanDefinition("org.springframework.aop.config.internalAutoProxyCreator" ); if (!cls.getName().equals(beanDefinition1.getBeanClassName())) { int currentPriority = findPriorityForClass(beanDefinition1.getBeanClassName()); int requiredPriority = findPriorityForClass(cls); if (currentPriority < requiredPriority) { beanDefinition1.setBeanClassName(cls.getName()); } } return null ; } else { RootBeanDefinition beanDefinition = new RootBeanDefinition(cls); beanDefinition.setSource(source); beanDefinition.getPropertyValues().add("order" , Integer.valueOf(Integer.MIN_VALUE)); beanDefinition.setRole(2 ); registry.registerBeanDefinition("org.springframework.aop.config.internalAutoProxyCreator" , beanDefinition); return beanDefinition; } }
也就是说,AspectJAutoProxyRegistrar类给容器中注册了一个BeanName等于internalAutoProxyCreator的AnnotationAwareAspectJAutoProxyCreator对象
AnnotationAwareAspectJAutoProxyCreator是个什么对象呢?
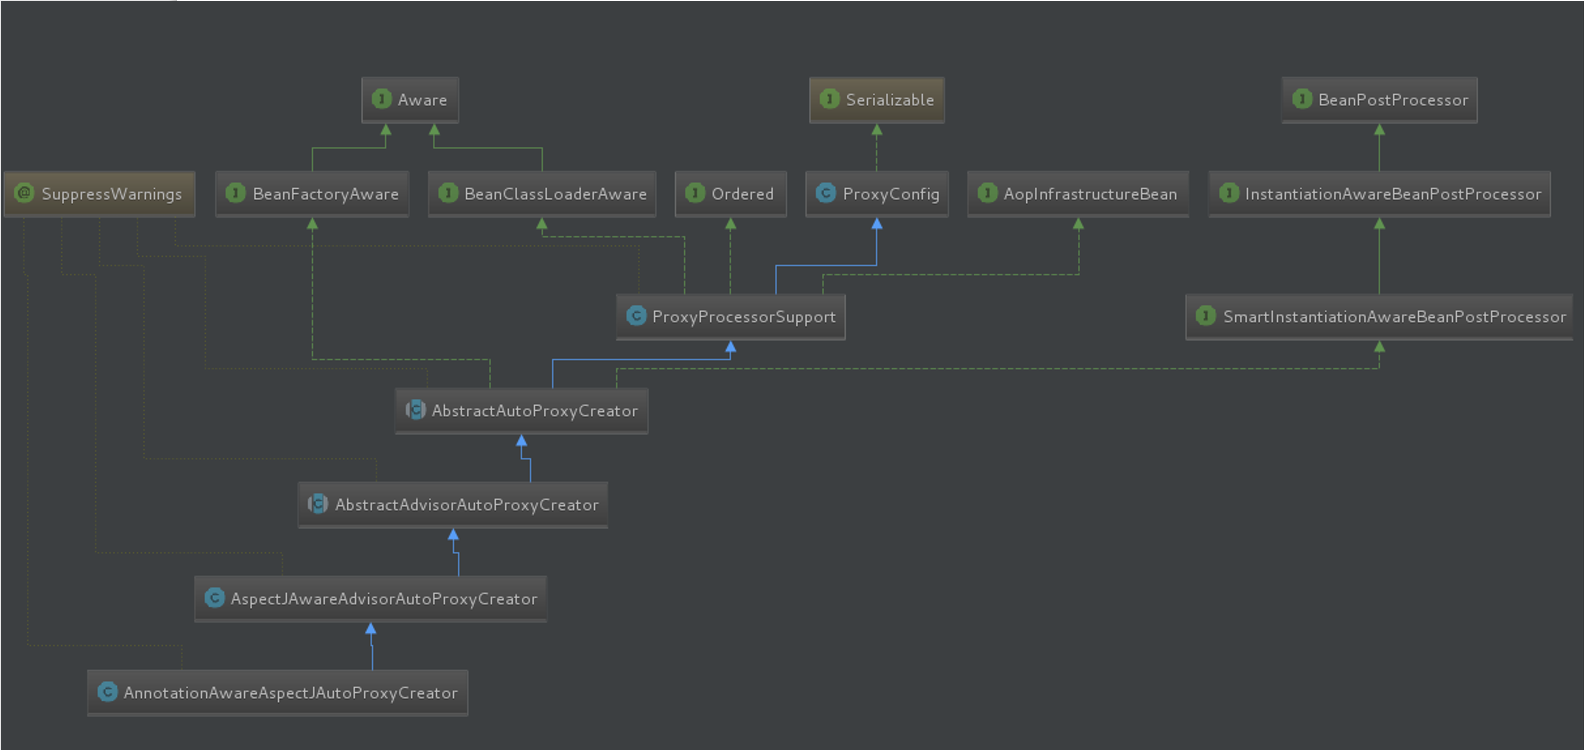
先分析一下它的继承关系
1
2
3
4
5
6
7
8
9
10
11
12
13
AnnotationAwareAspectJAutoProxyCreator : -> extends AspectJAwareAdvisorAutoProxyCreator -> extends AbstractAdvisorAutoProxyCreator -> extends AbstractAutoProxyCreator -> implements SmartInstantiationAwareBeanPostProcessor -> implements BeanFactoryAware -> extends ProxyProcessorSupport ProxyProcessorSupport -> extends ProxyConfig -> implements Ordered -> implements BeanClassLoaderAware -> implements AopInfrastructureBean
程序启动时,会先调度AbstractApplicationContext的刷新容器方法
1
2
3
4
5
6
7
8
9
10
11
12
13
14
15
16
17
18
19
20
21
22
23
24
25
26
27
28
29
30
31
32
33
34
35
36
37
38
39
40
41
42
43
44
45
46
47
48
49
50
51
52
53
54
55
56
57
58
59
60
61
62
63
64
65
66
@Override public void refresh () throws BeansException, IllegalStateException synchronized (this .startupShutdownMonitor) { prepareRefresh(); ConfigurableListableBeanFactory beanFactory = obtainFreshBeanFactory(); prepareBeanFactory(beanFactory); try { postProcessBeanFactory(beanFactory); invokeBeanFactoryPostProcessors(beanFactory); registerBeanPostProcessors(beanFactory); initMessageSource(); initApplicationEventMulticaster(); onRefresh(); registerListeners(); finishBeanFactoryInitialization(beanFactory); finishRefresh(); } catch (BeansException ex) { if (logger.isWarnEnabled()) { logger.warn("Exception encountered during context initialization - " + "cancelling refresh attempt: " + ex); } destroyBeans(); cancelRefresh(ex); throw ex; } finally { resetCommonCaches(); } } }
可以看到其中有一个方法是registerBeanPostProcessors,用来注册Bean的后置处理器
1 2 3 4 5 6 7 8 protected void registerBeanPostProcessors (ConfigurableListableBeanFactory beanFactory) PostProcessorRegistrationDelegate.registerBeanPostProcessors(beanFactory, this ); }
1
2
3
4
5
6
7
8
9
10
11
12
13
14
15
16
17
18
19
20
21
22
23
24
25
26
27
28
29
30
31
32
33
34
35
36
37
38
39
40
41
42
43
44
45
46
47
48
49
50
51
52
53
54
55
56
57
58
59
60
61
62
63
64
65
66
67
68
69
70
71
72
73
74
75
76
public static void registerBeanPostProcessors ( ConfigurableListableBeanFactory beanFactory, AbstractApplicationContext applicationContext) String[] postProcessorNames = beanFactory.getBeanNamesForType(BeanPostProcessor.class , true , false ) ; int beanProcessorTargetCount = beanFactory.getBeanPostProcessorCount() + 1 + postProcessorNames.length; beanFactory.addBeanPostProcessor(new BeanPostProcessorChecker(beanFactory, beanProcessorTargetCount)); List<BeanPostProcessor> priorityOrderedPostProcessors = new ArrayList<>(); List<BeanPostProcessor> internalPostProcessors = new ArrayList<>(); List<String> orderedPostProcessorNames = new ArrayList<>(); List<String> nonOrderedPostProcessorNames = new ArrayList<>(); for (String ppName : postProcessorNames) { if (beanFactory.isTypeMatch(ppName, PriorityOrdered.class )) { BeanPostProcessor pp = beanFactory.getBean(ppName, BeanPostProcessor.class ) ; priorityOrderedPostProcessors.add(pp); if (pp instanceof MergedBeanDefinitionPostProcessor) { internalPostProcessors.add(pp); } } else if (beanFactory.isTypeMatch(ppName, Ordered.class )) { orderedPostProcessorNames.add(ppName); } else { nonOrderedPostProcessorNames.add(ppName); } } sortPostProcessors(priorityOrderedPostProcessors, beanFactory); registerBeanPostProcessors(beanFactory, priorityOrderedPostProcessors); List<BeanPostProcessor> orderedPostProcessors = new ArrayList<>(orderedPostProcessorNames.size()); for (String ppName : orderedPostProcessorNames) { BeanPostProcessor pp = beanFactory.getBean(ppName, BeanPostProcessor.class ) ; orderedPostProcessors.add(pp); if (pp instanceof MergedBeanDefinitionPostProcessor) { internalPostProcessors.add(pp); } } sortPostProcessors(orderedPostProcessors, beanFactory); registerBeanPostProcessors(beanFactory, orderedPostProcessors); List<BeanPostProcessor> nonOrderedPostProcessors = new ArrayList<>(nonOrderedPostProcessorNames.size()); for (String ppName : nonOrderedPostProcessorNames) { BeanPostProcessor pp = beanFactory.getBean(ppName, BeanPostProcessor.class ) ; nonOrderedPostProcessors.add(pp); if (pp instanceof MergedBeanDefinitionPostProcessor) { internalPostProcessors.add(pp); } } registerBeanPostProcessors(beanFactory, nonOrderedPostProcessors); sortPostProcessors(internalPostProcessors, beanFactory); registerBeanPostProcessors(beanFactory, internalPostProcessors); beanFactory.addBeanPostProcessor(new ApplicationListenerDetector(applicationContext)); }
在第一步的注释位置断点,可以看到所有已经定义了的需要创建对象的后置处理器包含了org.springframework.aop.config.internalAutoProxyCreator的Bean名称
由于AnnotationAwareAspectJAutoProxyCreator类最终实现了Ordered接口,将调用getBean方法创建对象
1
2
3
4
@Override public <T> T getBean (String name, Class<T> requiredType) throws BeansException { return doGetBean(name, requiredType, null , false ); }
1 2 3 4 5 6 7 8 9 10 11 12 13 14 15 16 17 18 19 20 21 22 23 24 25 26 27 28 29 30 31 32 33 34 35 36 37 38 39 @SuppressWarnings ("unchecked" )protected <T> T doGetBean ( String name, @Nullable Class<T> requiredType, @Nullable Object[] args, boolean typeCheckOnly) throws BeansException { Object sharedInstance = getSingleton(beanName); if (sharedInstance != null && args == null ) { } else { if (mbd.isSingleton()) { sharedInstance = getSingleton(beanName, () -> { try { return createBean(beanName, mbd, args); } catch (BeansException ex) { } }); } } }
接下来分析一下创建Bean实例的过程:
1
2
3
4
5
6
7
8
9
10
11
12
13
14
15
16
17
18
19
20
21
22
23
24
25
26
27
28
29
@Override protected Object createBean (String beanName, RootBeanDefinition mbd, @Nullable Object[] args) throws BeanCreationException { try { Object bean = resolveBeforeInstantiation(beanName, mbdToUse); if (bean != null ) { return bean; } } catch (Throwable ex) { throw new BeanCreationException(mbdToUse.getResourceDescription(), beanName, "BeanPostProcessor before instantiation of bean failed" , ex); } try { Object beanInstance = doCreateBean(beanName, mbdToUse, args); if (logger.isTraceEnabled()) { logger.trace("Finished creating instance of bean '" + beanName + "'" ); } return beanInstance; } catch (BeanCreationException | ImplicitlyAppearedSingletonException ex) { } }
1
2
3
4
5
6
7
8
9
10
11
12
13
14
15
16
17
18
19
20
21
22
23
24
25
26
27
28
29
30
31
32
33
34
35
protected Object doCreateBean (String beanName, RootBeanDefinition mbd, @Nullable Object[] args) throws BeanCreationException { BeanWrapper instanceWrapper = null ; if (mbd.isSingleton()) { instanceWrapper = this .factoryBeanInstanceCache.remove(beanName); } if (instanceWrapper == null ) { instanceWrapper = createBeanInstance(beanName, mbd, args); } Object bean = instanceWrapper.getWrappedInstance(); Class<?> beanType = instanceWrapper.getWrappedClass(); if (beanType != NullBean.class ) { mbd.resolvedTargetType = beanType; } Object exposedObject = bean; try { populateBean(beanName, mbd, instanceWrapper); exposedObject = initializeBean(beanName, exposedObject, mbd); } catch (Throwable ex) { } return exposedObject; }
进一步分析initializeBean方法:
1
2
3
4
5
6
7
8
9
10
11
12
13
14
15
16
17
18
19
20
21
22
23
24
25
26
27
28
29
30
31
32
33
34
35
protected Object initializeBean (String beanName, Object bean, @Nullable RootBeanDefinition mbd) if (System.getSecurityManager() != null ) { AccessController.doPrivileged((PrivilegedAction<Object>) () -> { invokeAwareMethods(beanName, bean); return null ; }, getAccessControlContext()); } else { invokeAwareMethods(beanName, bean); } Object wrappedBean = bean; if (mbd == null || !mbd.isSynthetic()) { wrappedBean = applyBeanPostProcessorsBeforeInitialization(wrappedBean, beanName); } try { invokeInitMethods(beanName, wrappedBean, mbd); } catch (Throwable ex) { throw new BeanCreationException( (mbd != null ? mbd.getResourceDescription() : null ), beanName, "Invocation of init method failed" , ex); } if (mbd == null || !mbd.isSynthetic()) { wrappedBean = applyBeanPostProcessorsAfterInitialization(wrappedBean, beanName); } return wrappedBean; }
进一步观看它是如何处理Aware接口的方法回调的,invokeAwareMethods方法:
1
2
3
4
5
6
7
8
9
10
11
12
13
14
15
16
17
18
private void invokeAwareMethods (String beanName, Object bean) if (bean instanceof Aware) { if (bean instanceof BeanNameAware) { ((BeanNameAware) bean).setBeanName(beanName); } if (bean instanceof BeanClassLoaderAware) { ClassLoader bcl = getBeanClassLoader(); if (bcl != null ) { ((BeanClassLoaderAware) bean).setBeanClassLoader(bcl); } } if (bean instanceof BeanFactoryAware) { ((BeanFactoryAware) bean).setBeanFactory(AbstractAutowireCapableBeanFactory.this ); } } }
也就是说,invokeAwareMethods方法将会调用实现类实现的BeanFactoryAware.setBeanFactory(),通过之前的继承树分析,AnnotationAwareAspectJAutoProxyCreator实现了BeanFactoryAware接口。
1
2
3
public interface BeanFactoryAware extends Aware void setBeanFactory (BeanFactory arg0) throws BeansException }
观察AnnotationAwareAspectJAutoProxyCreator类的链路的setBeanFactory实现关系:
1
2
3
4
5
AbstractAutoProxyCreator.setBeanFactory(); AbstractAdvisorAutoProxyCreator.setBeanFactory(); -> initBeanFactory(); AnnotationAwareAspectJAutoProxyCreator.initBeanFactory方法();
通过分析链路调用,最终将会调用AbstractAdvisorAutoProxyCreator.setBeanFactory方法
1
2
3
4
5
6
7
8
9
10
public void setBeanFactory (BeanFactory beanFactory) super .setBeanFactory(beanFactory); if (!(beanFactory instanceof ConfigurableListableBeanFactory)) { throw new IllegalArgumentException( "AdvisorAutoProxyCreator requires a ConfigurableListableBeanFactory: " + beanFactory); } else { this .initBeanFactory((ConfigurableListableBeanFactory) beanFactory); } }
而initBeanFactory方法被子类复写,最终调用了AnnotationAwareAspectJAutoProxyCreator.initBeanFactory方法
1
2
3
4
5
6
7
8
9
protected void initBeanFactory (ConfigurableListableBeanFactory beanFactory) super .initBeanFactory(beanFactory); if (this .aspectJAdvisorFactory == null ) { this .aspectJAdvisorFactory = new ReflectiveAspectJAdvisorFactory(beanFactory); } this .aspectJAdvisorsBuilder = new BeanFactoryAspectJAdvisorsBuilderAdapter(this , beanFactory, this .aspectJAdvisorFactory); }
以上是创建和注册AnnotationAwareAspectJAutoProxyCreator的过程,接下来分析创建完Bean实例后逻辑。
回过头来接着看AbstractApplicationContext.refresh方法的第四步注释:
1 2 3 4 5 6 7 8 9 10 11 protected void finishBeanFactoryInitialization (ConfigurableListableBeanFactory beanFactory) beanFactory.preInstantiateSingletons(); }
1
2
3
4
5
6
7
8
9
10
11
12
13
14
15
16
17
18
19
20
@Override public void preInstantiateSingletons () throws BeansException List<String> beanNames = new ArrayList<>(this .beanDefinitionNames); for (String beanName : beanNames) { RootBeanDefinition bd = getMergedLocalBeanDefinition(beanName); if (!bd.isAbstract() && bd.isSingleton() && !bd.isLazyInit()) { if (isFactoryBean(beanName)) { } else { getBean(beanName); } } } }
这时候再回到上文的getBean方法,重新回顾它的调用链:
1
2
3
4
5
6
7
8
getBean :-> doGetBean() -> getSingleton() -> createBean() -> resolveBeforeInstantiation() -> doCreateBean()
Spring就是在这里保证了单实例的Bean只被创建一次,只要创建好的Bean都会被缓存起来;
在createBean创建Bean的过程中,会先调用resolveBeforeInstantiation方法,该方法的作用是给后置处理器一个机会来创建一个代理对象替代目标实例,如果能返回代理对象就使用,如果不能就将调用doCreateBean创建Bean实例。
1
2
3
4
5
6
7
8
9
10
11
12
13
14
15
16
17
18
19
20
@Nullable protected Object resolveBeforeInstantiation (String beanName, RootBeanDefinition mbd) Object bean = null ; if (!Boolean.FALSE.equals(mbd.beforeInstantiationResolved)) { if (!mbd.isSynthetic() && hasInstantiationAwareBeanPostProcessors()) { Class<?> targetType = determineTargetType(beanName, mbd); if (targetType != null ) { bean = applyBeanPostProcessorsBeforeInstantiation(targetType, beanName); if (bean != null ) { bean = applyBeanPostProcessorsAfterInitialization(bean, beanName); } } } mbd.beforeInstantiationResolved = (bean != null ); } return bean; }
进一步分析applyBeanPostProcessorsBeforeInstantiation方法
1
2
3
4
5
6
7
8
9
10
11
12
13
14
15
@Nullable protected Object applyBeanPostProcessorsBeforeInstantiation (Class<?> beanClass, String beanName) for (BeanPostProcessor bp : getBeanPostProcessors()) { if (bp instanceof InstantiationAwareBeanPostProcessor) { InstantiationAwareBeanPostProcessor ibp = (InstantiationAwareBeanPostProcessor) bp; Object result = ibp.postProcessBeforeInstantiation(beanClass, beanName); if (result != null ) { return result; } } } return null ; }
根据上文的继承关系分析得知,AnnotationAwareAspectJAutoProxyCreator的父类实现了SmartInstantiationAwareBeanPostProcessor接口
1
2
public interface SmartInstantiationAwareBeanPostProcessor extends InstantiationAwareBeanPostProcessor }
1
2
3
4
5
6
public interface InstantiationAwareBeanPostProcessor extends BeanPostProcessor @Nullable default Object postProcessBeforeInstantiation (Class<?> beanClass, String beanName) throws BeansException return null ; } }
所以可以得出结论,最终会在这里调用AnnotationAwareAspectJAutoProxyCreator的父类AbstractAutoProxyCreator实现的postProcessBeforeInstantiation方法,用来尝试创建代理对象替代目标对象。
值得注意的是,InstantiationAwareBeanPostProcessor和BeanPostProcessor不太一样。
BeanPostProcessor.postProcessBeforeInitialization:是在Bean对象创建完成初始化前后调用的InstantiationAwareBeanPostProcessor.postProcessBeforeInstantiation:是在创建Bean实例之前先尝试用后置处理器返回对象的
它们的调用时机不同,并且它们的方法名不同,一个是Initialization,另一个是Instantiation。
所以能够得到一个结论,AnnotationAwareAspectJAutoProxyCreator在所有bean创建之前会有一个拦截,会先调用InstantiationAwareBeanPostProcessor.postProcessBeforeInstantiation(),先尝试返回bean的代理实例。
接下来了解InstantiationAwareBeanPostProcessor.postProcessBeforeInstantiation()方法
1
2
3
4
5
6
7
8
9
10
11
12
13
14
15
16
17
18
19
20
21
22
23
24
25
26
27
28
29
30
31
32
@Override public Object postProcessBeforeInstantiation (Class<?> beanClass, String beanName) Object cacheKey = getCacheKey(beanClass, beanName); if (!StringUtils.hasLength(beanName) || !this .targetSourcedBeans.contains(beanName)) { if (this .advisedBeans.containsKey(cacheKey)) { return null ; } if (isInfrastructureClass(beanClass) || shouldSkip(beanClass, beanName)) { this .advisedBeans.put(cacheKey, Boolean.FALSE); return null ; } } TargetSource targetSource = getCustomTargetSource(beanClass, beanName); if (targetSource != null ) { if (StringUtils.hasLength(beanName)) { this .targetSourcedBeans.add(beanName); } Object[] specificInterceptors = getAdvicesAndAdvisorsForBean(beanClass, beanName, targetSource); Object proxy = createProxy(beanClass, beanName, specificInterceptors, targetSource); this .proxyTypes.put(cacheKey, proxy.getClass()); return proxy; } return null ; }
isInfrastructureClass方法是用来判断该Bean是否是切面的基础类型
1
2
3
4
5
6
7
8
9
10
protected boolean isInfrastructureClass (Class<?> beanClass) boolean retVal = Advice.class .isAssignableFrom (beanClass ) || Pointcut .class .isAssignableFrom (beanClass ) || Advisor .class .isAssignableFrom (beanClass ) || AopInfrastructureBean .class .isAssignableFrom (beanClass ) ; if (retVal && logger.isTraceEnabled()) { logger.trace("Did not attempt to auto-proxy infrastructure class [" + beanClass.getName() + "]" ); } return retVal; }
而AnnotationAwareAspectJAutoProxyCreator复写了该方法,增加了一个@Aspect注解的切面判断:
1
2
3
4
5
6
@Override protected boolean isInfrastructureClass (Class<?> beanClass) return (super .isInfrastructureClass(beanClass) || (this .aspectJAdvisorFactory != null && this .aspectJAdvisorFactory.isAspect(beanClass))); }
1
2
3
4
@Override public boolean isAspect (Class<?> clazz) return (hasAspectAnnotation(clazz) && !compiledByAjc(clazz)); }
shouldSkip方法用来判断是否跳过当前Bean
1
2
3
4
5
6
7
8
9
10
11
12
13
@Override protected boolean shouldSkip (Class<?> beanClass, String beanName) List<Advisor> candidateAdvisors = findCandidateAdvisors(); for (Advisor advisor : candidateAdvisors) { if (advisor instanceof AspectJPointcutAdvisor && ((AspectJPointcutAdvisor) advisor).getAspectName().equals(beanName)) { return true ; } } return super .shouldSkip(beanClass, beanName); }
1
2
3
protected boolean shouldSkip (Class<?> beanClass, String beanName) return AutoProxyUtils.isOriginalInstance(beanName, beanClass); }
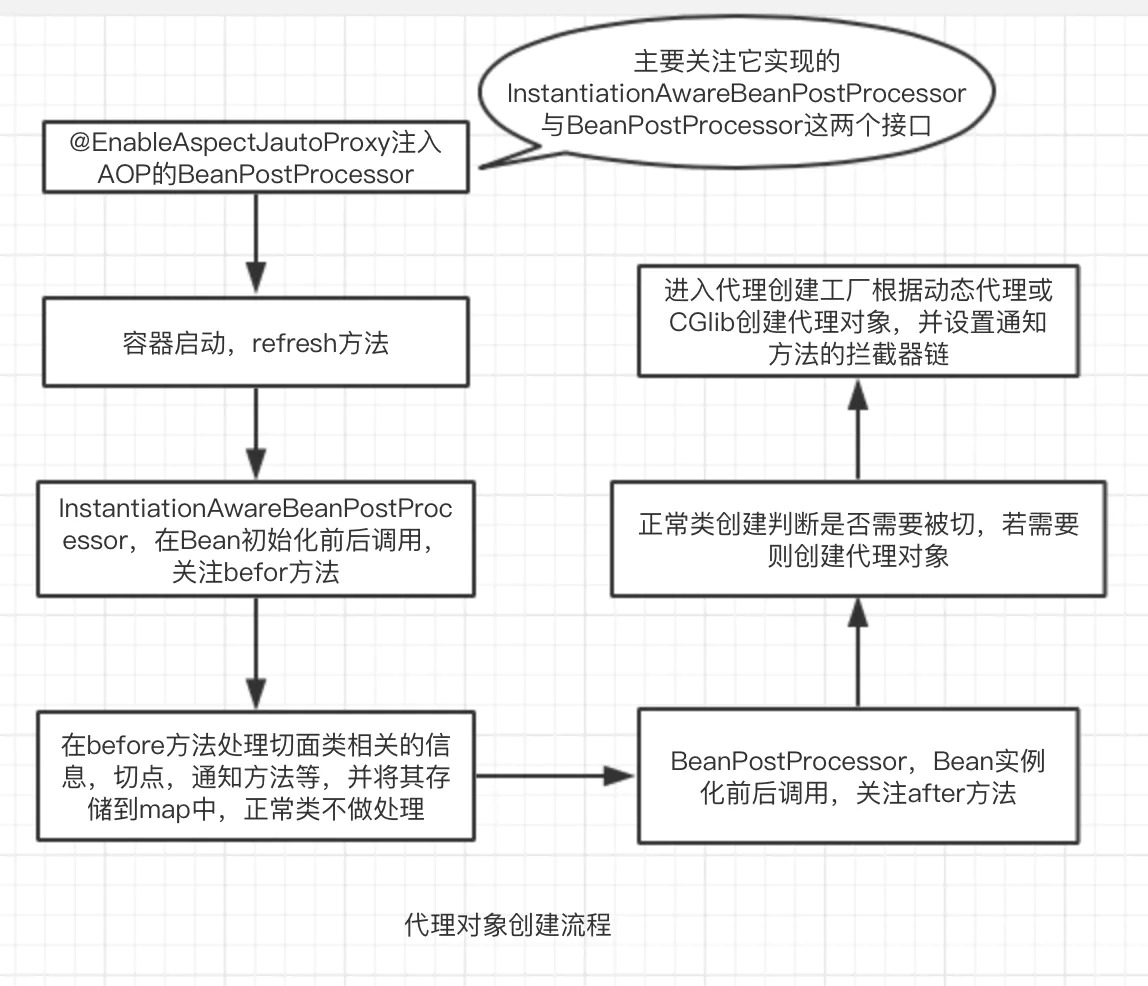
跟踪源码后,最终InstantiationAwareBeanPostProcessor.postProcessBeforeInstantiation()尝试创建代理对象失败,将调用doCreateBean创建普通实例,最终会在initializeBean()方法中,调用BeanPostProcessor后置处理器的实现。
由于AbstractAutoProxyCreator类实现了postProcessAfterInitialization方法,所以将被调用。
1
2
3
4
5
6
7
8
9
10
11
@Override public Object postProcessAfterInitialization (@Nullable Object bean, String beanName) if (bean != null ) { Object cacheKey = getCacheKey(bean.getClass(), beanName); if (this .earlyProxyReferences.remove(cacheKey) != bean) { return wrapIfNecessary(bean, beanName, cacheKey); } } return bean; }
1
2
3
4
5
6
7
8
9
10
11
12
13
14
15
16
17
18
19
20
21
22
23
24
25
26
27
28
protected Object wrapIfNecessary (Object bean, String beanName, Object cacheKey) if (StringUtils.hasLength(beanName) && this .targetSourcedBeans.contains(beanName)) { return bean; } if (Boolean.FALSE.equals(this .advisedBeans.get(cacheKey))) { return bean; } if (isInfrastructureClass(bean.getClass()) || shouldSkip(bean.getClass(), beanName)) { this .advisedBeans.put(cacheKey, Boolean.FALSE); return bean; } Object[] specificInterceptors = getAdvicesAndAdvisorsForBean(bean.getClass(), beanName, null ); if (specificInterceptors != DO_NOT_PROXY) { this .advisedBeans.put(cacheKey, Boolean.TRUE); Object proxy = createProxy( bean.getClass(), beanName, specificInterceptors, new SingletonTargetSource(bean)); this .proxyTypes.put(cacheKey, proxy.getClass()); return proxy; } this .advisedBeans.put(cacheKey, Boolean.FALSE); return bean; }
进一步分析getAdvicesAndAdvisorsForBean方法
1
2
3
4
5
6
7
8
9
10
11
@Override @Nullable protected Object[] getAdvicesAndAdvisorsForBean( Class<?> beanClass, String beanName, @Nullable TargetSource targetSource) { List<Advisor> advisors = findEligibleAdvisors(beanClass, beanName); if (advisors.isEmpty()) { return DO_NOT_PROXY; } return advisors.toArray(); }
1
2
3
4
5
6
7
8
9
10
11
12
protected List<Advisor> findEligibleAdvisors (Class<?> beanClass, String beanName) List<Advisor> candidateAdvisors = findCandidateAdvisors(); List<Advisor> eligibleAdvisors = findAdvisorsThatCanApply(candidateAdvisors, beanClass, beanName); extendAdvisors(eligibleAdvisors); if (!eligibleAdvisors.isEmpty()) { eligibleAdvisors = sortAdvisors(eligibleAdvisors); } return eligibleAdvisors; }
1
2
3
4
5
6
7
8
9
10
11
12
protected List<Advisor> findAdvisorsThatCanApply ( List<Advisor> candidateAdvisors, Class<?> beanClass, String beanName) ProxyCreationContext.setCurrentProxiedBeanName(beanName); try { return AopUtils.findAdvisorsThatCanApply(candidateAdvisors, beanClass); } finally { ProxyCreationContext.setCurrentProxiedBeanName(null ); } }
回到wrapIfNecessary方法,当获取到的advisors增强器不为空时,将调用createProxy创建代理对象
1
2
3
4
5
6
7
8
9
10
11
12
13
14
15
16
17
18
19
20
21
22
23
24
25
26
27
28
29
30
31
32
protected Object createProxy (Class<?> beanClass, @Nullable String beanName, @Nullable Object[] specificInterceptors, TargetSource targetSource) if (this .beanFactory instanceof ConfigurableListableBeanFactory) { AutoProxyUtils.exposeTargetClass((ConfigurableListableBeanFactory) this .beanFactory, beanName, beanClass); } ProxyFactory proxyFactory = new ProxyFactory(); proxyFactory.copyFrom(this ); if (!proxyFactory.isProxyTargetClass()) { if (shouldProxyTargetClass(beanClass, beanName)) { proxyFactory.setProxyTargetClass(true ); } else { evaluateProxyInterfaces(beanClass, proxyFactory); } } Advisor[] advisors = buildAdvisors(beanName, specificInterceptors); proxyFactory.addAdvisors(advisors); proxyFactory.setTargetSource(targetSource); customizeProxyFactory(proxyFactory); proxyFactory.setFrozen(this .freezeProxy); if (advisorsPreFiltered()) { proxyFactory.setPreFiltered(true ); } return proxyFactory.getProxy(getProxyClassLoader()); }
进一步分析proxyFactory.getProxy(getProxyClassLoader());是怎么通过代理工厂创建代理对象的
1
2
3
public Object getProxy (@Nullable ClassLoader classLoader) return createAopProxy().getProxy(classLoader); }
1
2
3
4
5
6
protected final synchronized AopProxy createAopProxy () if (!this .active) { activate(); } return getAopProxyFactory().createAopProxy(this ); }
1
2
3
4
5
6
7
8
9
10
11
12
13
14
15
16
17
18
19
20
21
@Override public AopProxy createAopProxy (AdvisedSupport config) throws AopConfigException if (config.isOptimize() || config.isProxyTargetClass() || hasNoUserSuppliedProxyInterfaces(config)) { Class<?> targetClass = config.getTargetClass(); if (targetClass == null ) { throw new AopConfigException("TargetSource cannot determine target class: " + "Either an interface or a target is required for proxy creation." ); } if (targetClass.isInterface() || Proxy.isProxyClass(targetClass)) { return new JdkDynamicAopProxy(config); } return new ObjenesisCglibAopProxy(config); } else { return new JdkDynamicAopProxy(config); } }
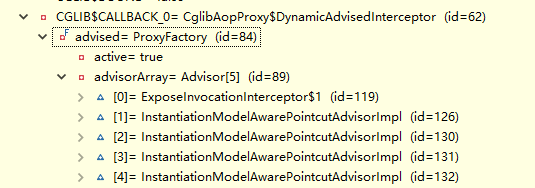
由于我们没有实现接口,所以spring选择了创建Cglib动态代理对象,容器中保存了组件的代理对象(cglib增强后的对象),这个对象里面保存了详细信息(比如增强器,目标对象,xxx);
比如可以看到存储在代理对象中的通知方法、切入方法、切入时机等等信息
接着进下一步执行的方法,可以看到cglib动态代理对象执行了intercept方法
1
2
3
4
5
6
7
8
9
10
11
12
13
14
15
16
17
18
19
20
21
22
23
24
25
26
27
28
29
30
31
32
33
34
35
36
37
38
39
40
41
42
43
44
45
46
47
48
49
50
51
@Override @Nullable public Object intercept (Object proxy, Method method, Object[] args, MethodProxy methodProxy) throws Throwable Object oldProxy = null ; boolean setProxyContext = false ; Object target = null ; TargetSource targetSource = this .advised.getTargetSource(); try { if (this .advised.exposeProxy) { oldProxy = AopContext.setCurrentProxy(proxy); setProxyContext = true ; } target = targetSource.getTarget(); Class<?> targetClass = (target != null ? target.getClass() : null ); List<Object> chain = this .advised.getInterceptorsAndDynamicInterceptionAdvice(method, targetClass); Object retVal; if (chain.isEmpty() && Modifier.isPublic(method.getModifiers())) { Object[] argsToUse = AopProxyUtils.adaptArgumentsIfNecessary(method, args); retVal = methodProxy.invoke(target, argsToUse); } else { retVal = new CglibMethodInvocation(proxy, target, method, args, targetClass, chain, methodProxy).proceed(); } retVal = processReturnType(proxy, target, method, retVal); return retVal; } finally { if (target != null && !targetSource.isStatic()) { targetSource.releaseTarget(target); } if (setProxyContext) { AopContext.setCurrentProxy(oldProxy); } } }
看看他是怎么调用方法生成拦截器链的
1
2
3
4
5
6
7
8
9
10
public List<Object> getInterceptorsAndDynamicInterceptionAdvice (Method method, @Nullable Class<?> targetClass) MethodCacheKey cacheKey = new MethodCacheKey(method); List<Object> cached = this .methodCache.get(cacheKey); if (cached == null ) { cached = this .advisorChainFactory.getInterceptorsAndDynamicInterceptionAdvice( this , method, targetClass); this .methodCache.put(cacheKey, cached); } return cached; }
1
2
3
4
5
6
7
8
9
10
11
12
13
14
15
16
17
18
19
20
21
22
23
24
25
26
27
28
29
30
31
32
33
34
35
36
37
38
39
40
41
42
43
44
45
46
47
48
49
50
51
52
53
54
55
56
57
58
59
60
61
@Override public List<Object> getInterceptorsAndDynamicInterceptionAdvice ( Advised config, Method method, @Nullable Class<?> targetClass) AdvisorAdapterRegistry registry = GlobalAdvisorAdapterRegistry.getInstance(); Advisor[] advisors = config.getAdvisors(); List<Object> interceptorList = new ArrayList<>(advisors.length); Class<?> actualClass = (targetClass != null ? targetClass : method.getDeclaringClass()); Boolean hasIntroductions = null ; for (Advisor advisor : advisors) { if (advisor instanceof PointcutAdvisor) { PointcutAdvisor pointcutAdvisor = (PointcutAdvisor) advisor; if (config.isPreFiltered() || pointcutAdvisor.getPointcut().getClassFilter().matches(actualClass)) { MethodMatcher mm = pointcutAdvisor.getPointcut().getMethodMatcher(); boolean match; if (mm instanceof IntroductionAwareMethodMatcher) { if (hasIntroductions == null ) { hasIntroductions = hasMatchingIntroductions(advisors, actualClass); } match = ((IntroductionAwareMethodMatcher) mm).matches(method, actualClass, hasIntroductions); } else { match = mm.matches(method, actualClass); } if (match) { MethodInterceptor[] interceptors = registry.getInterceptors(advisor); if (mm.isRuntime()) { for (MethodInterceptor interceptor : interceptors) { interceptorList.add(new InterceptorAndDynamicMethodMatcher(interceptor, mm)); } } else { interceptorList.addAll(Arrays.asList(interceptors)); } } } } else if (advisor instanceof IntroductionAdvisor) { IntroductionAdvisor ia = (IntroductionAdvisor) advisor; if (config.isPreFiltered() || ia.getClassFilter().matches(actualClass)) { Interceptor[] interceptors = registry.getInterceptors(advisor); interceptorList.addAll(Arrays.asList(interceptors)); } } else { Interceptor[] interceptors = registry.getInterceptors(advisor); interceptorList.addAll(Arrays.asList(interceptors)); } } return interceptorList; }
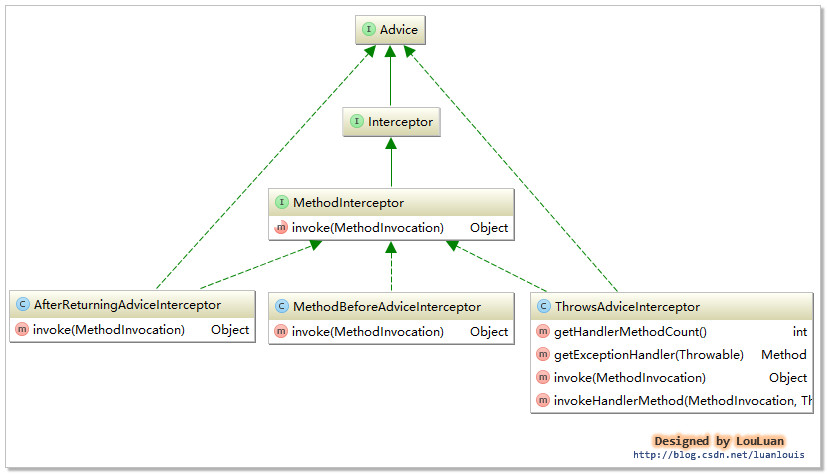
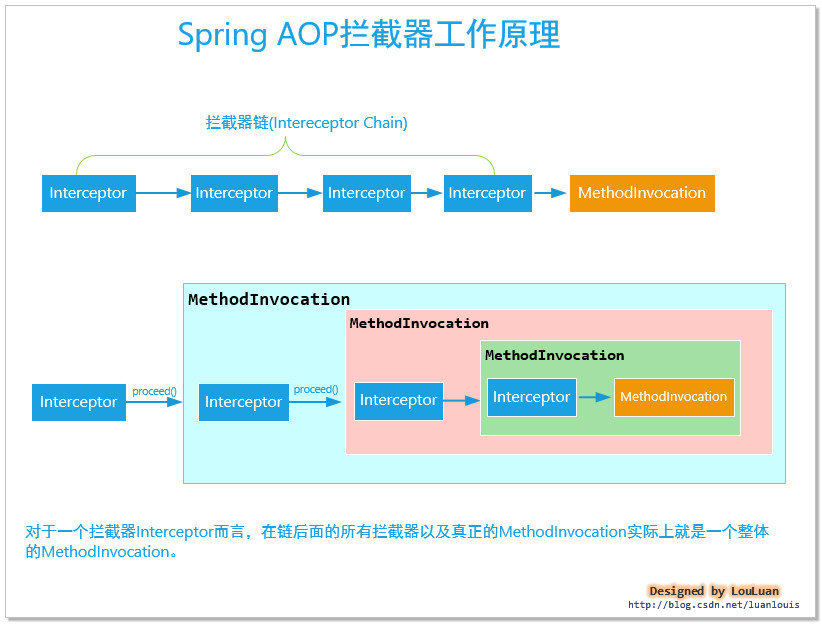
可以看到,生成了一条拦截器链(每一个通知方法又被包装为方法拦截器,利用MethodInterceptor机制)
1
2
3
4
5
6
7
8
9
10
11
12
13
14
15
16
17
18
19
20
@Override public MethodInterceptor[] getInterceptors(Advisor advisor) throws UnknownAdviceTypeException { List<MethodInterceptor> interceptors = new ArrayList<>(3 ); Advice advice = advisor.getAdvice(); if (advice instanceof MethodInterceptor) { interceptors.add((MethodInterceptor) advice); } for (AdvisorAdapter adapter : this .adapters) { if (adapter.supportsAdvice(advice)) { interceptors.add(adapter.getInterceptor(advisor)); } } if (interceptors.isEmpty()) { throw new UnknownAdviceTypeException(advisor.getAdvice()); } return interceptors.toArray(new MethodInterceptor[0 ]); }
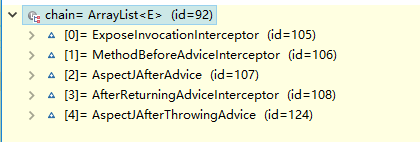
最终可以看到如上图,有5个拦截器,其中一个是spring自带的ExposeInvocationInterceptor,而AspectJAfterAdvice和AspectJAfterThrowingAdvice是MethodInterceptor接口,直接添加到了拦截器中,剩下的则被AdvisorAdapter转换成MethodInterceptor。
以上就是拦截器链链的创建过程,回到intercept方法,当拦截器链创建成功之后,若存在拦截器链,将调用CglibMethodInvocation.proceed()方法。
1
2
3
4
5
6
7
8
9
10
11
12
13
14
15
16
17
18
19
20
21
22
23
24
25
26
27
28
29
30
31
32
33
34
35
36
private int currentInterceptorIndex = -1 ;@Override @Nullable public Object proceed () throws Throwable if (this .currentInterceptorIndex == this .interceptorsAndDynamicMethodMatchers.size() - 1 ) { return invokeJoinpoint(); } Object interceptorOrInterceptionAdvice = this .interceptorsAndDynamicMethodMatchers.get(++this .currentInterceptorIndex); if (interceptorOrInterceptionAdvice instanceof InterceptorAndDynamicMethodMatcher) { InterceptorAndDynamicMethodMatcher dm = (InterceptorAndDynamicMethodMatcher) interceptorOrInterceptionAdvice; Class<?> targetClass = (this .targetClass != null ? this .targetClass : this .method.getDeclaringClass()); if (dm.methodMatcher.matches(this .method, targetClass, this .arguments)) { return dm.interceptor.invoke(this ); } else { return proceed(); } } else { return ((MethodInterceptor) interceptorOrInterceptionAdvice).invoke(this ); } }
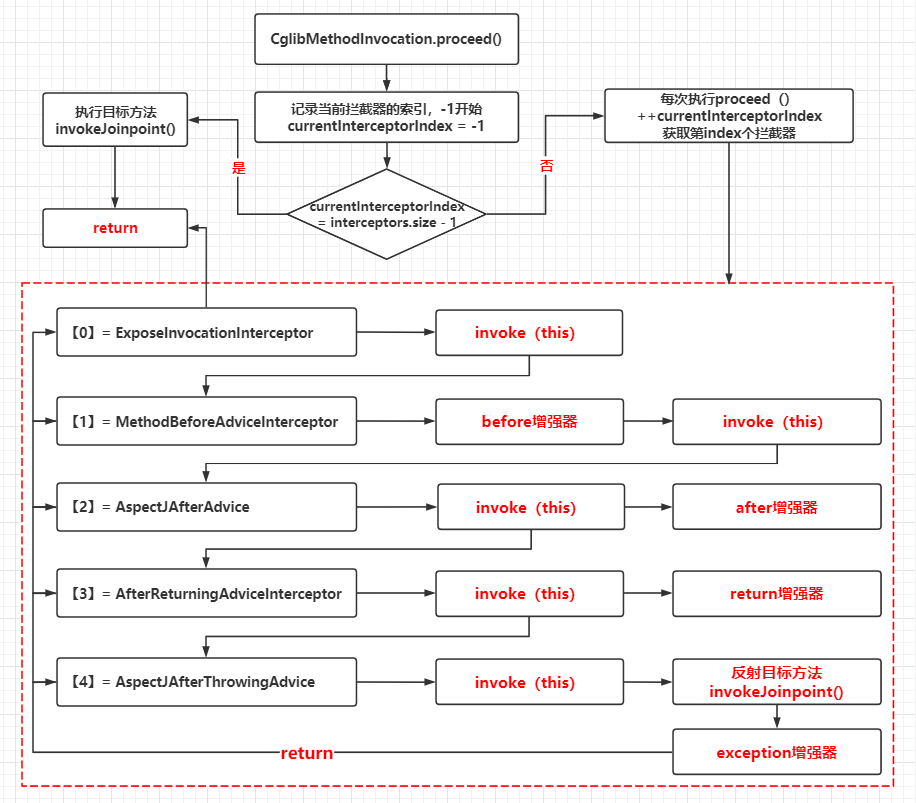
根据逻辑分析,最开始的时候currentInterceptorIndex= -1,然后执行++currentInterceptorIndex = 0,并获取下标【0】的拦截器,也就是ExposeInvocationInterceptor,并执行它的invoke方法
1 2 3 4 5 6 7 8 9 10 11 12 13 14 @Override public Object invoke (MethodInvocation mi) throws Throwable MethodInvocation oldInvocation = invocation.get(); invocation.set(mi); try { return mi.proceed(); } finally { invocation.set(oldInvocation); } }
这时候,再次调用了proceed方法,由于currentInterceptorIndex = 0,再次执行++currentInterceptorIndex,所以将获取下标【1】的拦截器MethodBeforeAdviceInterceptor并执行它的invoke方法
1 2 3 4 5 6 7 @Override public Object invoke (MethodInvocation mi) throws Throwable this .advice.before(mi.getMethod(), mi.getArguments(), mi.getThis()); return mi.proceed(); }
1 2 3 4 5 6 7 8 9 10 11 12 @Override public Object invoke (MethodInvocation mi) throws Throwable try { return mi.proceed(); } finally { invokeAdviceMethod(getJoinPointMatch(), null , null ); } }
1 2 3 4 5 6 7 8 9 @Override public Object invoke (MethodInvocation mi) throws Throwable Object retVal = mi.proceed(); this .advice.afterReturning(retVal, mi.getMethod(), mi.getArguments(), mi.getThis()); return retVal; }
1 2 3 4 5 6 7 8 9 10 11 12 13 14 15 @Override public Object invoke (MethodInvocation mi) throws Throwable try { return mi.proceed(); } catch (Throwable ex) { if (shouldInvokeOnThrowing(ex)) { invokeAdviceMethod(getJoinPointMatch(), null , ex); } throw ex; } }
以上就是Spring的Aop工作原理过程,具体调用链如下图:
流程
AOP的切入过程:
1 2 3 4 5 6 7 8 9 10 11 12 13 14 15 16 17 18 19 20 21 22 23 24 25 26 27 28 29 30 31 32 33 34 35 36 37 38 39 40 41 42 43 44 45 46 47 48 49 50 51 52 53 54 55 56 57 58 59 60 61 62 63 64 65 66 67 68 AbstractApplicationContext.refresh() -> registerBeanPostProcessors(beanFactory) -> beanFactory.getBeanNamesForType(BeanPostProcessor) -> beanFactory.addBeanPostProcessor(BeanPostProcessor) -> beanFactory.getBean() -> doGetBean() -> createBean() -> doCreateBean() -> createBeanInstance() -> populateBean() -> initializeBean() -> invokeAwareMethods() -> AbstractAdvisorAutoProxyCreator.setBeanFactory(beanFactory) -> AnnotationAwareAspectJAutoProxyCreator.initBeanFactory(beanFactory) -> applyBeanPostProcessorsBeforeInitialization() -> BeanPostProcessor.postProcessBeforeInitialization() -> invokeInitMethods() -> applyBeanPostProcessorsAfterInitialization() -> BeanPostProcessor.postProcessAfterInitialization() -> beanFactory.addBeanPostProcessor(postProcessor) -> finishBeanFactoryInitialization(beanFactory) -> preInstantiateSingletons() -> beanNames.iterator() -> beanFactory.getBean() -> doGetBean() -> getSingleton(beanName) -> createBean() -> resolveBeforeInstantiation(beanName, mbdToUse) -> applyBeanPostProcessorsBeforeInstantiation(targetType, beanName) -> InstantiationAwareBeanPostProcessor.postProcessBeforeInstantiation() -> applyBeanPostProcessorsAfterInitialization(bean, beanName) -> BeanPostProcessor.postProcessAfterInitialization() -> doCreateBean()
动态代理对象的创建过程:
1
2
3
4
5
6
7
8
9
10
11
12
13
14
15
16
17
18
19
20
21
22
23
24
25
26
27
28
29
30
31
32
33
34
35
36
37
38
39
40
41
42
43
44
45
46
47
48
49
50
51
52
53
54
55
56
createBean() :-> resolveBeforeInstantiation(beanName, mbdToUse) -> applyBeanPostProcessorsBeforeInstantiation(targetType, beanName) -> InstantiationAwareBeanPostProcessor.postProcessBeforeInstantiation() -> isInfrastructureClass() -> AbstractAutoProxyCreator.isInfrastructureClass() -> AspectJAdvisorFactory.isAspect() -> shouldSkip() -> findCandidateAdvisors(); -> super.shouldSkip() -> doCreateBean() -> createBeanInstance() -> populateBean() -> initializeBean() -> invokeAwareMethods() -> applyBeanPostProcessorsBeforeInitialization() -> BeanPostProcessor.postProcessBeforeInitialization() -> invokeInitMethods() -> applyBeanPostProcessorsAfterInitialization() -> BeanPostProcessor.postProcessAfterInitialization() -> wrapIfNecessary(bean, beanName, cacheKey) -> getAdvicesAndAdvisorsForBean(bean.getClass(), beanName, null); -> findEligibleAdvisors() -> findCandidateAdvisors(); -> findAdvisorsThatCanApply() -> sortAdvisors() -> createProxy() -> buildAdvisors() -> proxyFactory.addAdvisors() -> proxyFactory.getProxy(getProxyClassLoader()); -> createAopProxy(AdvisedSupport config)
动态代理的拦截(目标方法执行)过程:
1 2 3 4 5 6 7 8 9 10 11 12 13 14 15 16 17 18 19 20 21 22 23 24 25 26 27 28 29 30 31 32 33 34 35 36 37 38 39 CglibAopProxy.intercept() -> ProxyFactory.getInterceptorsAndDynamicInterceptionAdvice() -> AdvisorChainFactory.getInterceptorsAndDynamicInterceptionAdvice() -> AdvisorAdapterRegistry.getInterceptors(advisor); -> methodProxy.invoke(target, argsToUse); -> CglibMethodInvocation.proceed() -> ExposeInvocationInterceptor.invoke() -> MethodBeforeAdviceInterceptor.invoke() -> MethodBeforeAdvice.before() -> AspectJAfterAdvice.invoke() -> AfterReturningAdviceInterceptor.invoke() -> AspectJAfterThrowingAdvice.invoke() -> invokeJoinpoint() -> invokeAdviceMethod() -> AfterReturningAdvice.afterReturning() -> invokeAdviceMethod()
总结 1 2 3 4 5 6 7 8 9 10 11 12 13 14 15 16 17 18 19 1.@EnableAspectJAutoProxy 开启AOP功能 2.@EnableAspectJAutoProxy 会给容器中注册一个组件AnnotationAwareAspectJAutoProxyCreator 3.AnnotationAwareAspectJAutoProxyCreator是一个后置处理器; 4.容器的创建流程: 1.registerBeanPostProcessors()注册后置处理器;创建AnnotationAwareAspectJAutoProxyCreator对象 2.finishBeanFactoryInitialization()初始化剩下的单实例bean 1.创建业务逻辑组件和切面组件 2.AnnotationAwareAspectJAutoProxyCreator拦截组件的创建过程 3.组件创建完之后,判断组件是否需要增强 是:切面的通知方法,包装成增强器(Advisor);给业务逻辑组件创建一个代理对象(cglib); 否:创建普通Bean实例 5.执行目标方法: 1.代理对象执行目标方法 2.CglibAopProxy.intercept(); 1.得到目标方法的拦截器链(增强器包装成拦截器MethodInterceptor) 2.利用拦截器的链式机制,依次进入每一个拦截器进行执行; 3.效果: 正常执行:前置通知-》目标方法-》后置通知-》返回通知 出现异常:前置通知-》目标方法-》后置通知-》异常通知
“本篇文章主要摘自参考资料 ”
