Spring Cloud SSO
单机服务
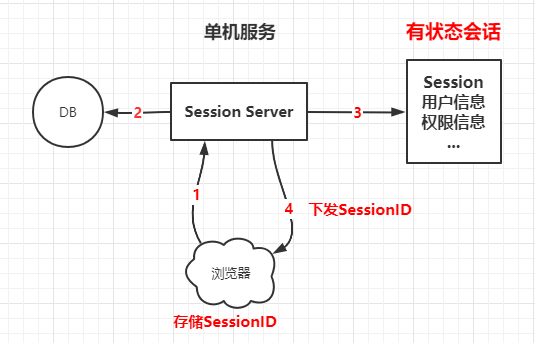
在单机服务中,同一个浏览器访问系统,系统需要在登录后将用户信息存储在Session会话中,并返回一个SessionID到浏览器中,浏览器下次请求该系统时,携带SessionID到系统中,校验通过则无需再次登录。
单点登录
单点登录(Single Sign On),简称为 SSO,其含义在于用户只需要登录一次就可以访问所有相互信任的应用系统。
在多个微服务的场景下,用户只要向其中一个服务发起了登录请求后,后续再访问其他微服务/子系统的时候,无需再次登录,其内部服务的流转可以通过网关进行负债均衡和流量分发。
对浏览器来说,始终使用的是同一个协议、域名、端口的网页地址,根据浏览器同源策略,用户在任意一台服务器登录成功后,服务器将返回一个【SessionID/Token】给浏览器,浏览器在下次请求中携带该信息访问任意子系统均无需登录。
共享Session
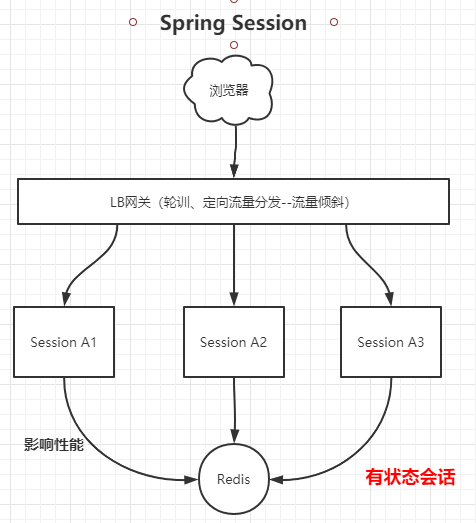
通过将多个微服务的Session会话的信息共享到Redis中,每个微服务共享份Session信息,当浏览器携带了SessionID到各个服务中时,服务均能获取到相应的会话信息。
共享Session是有状态的会话
1
2
3
4
5
6
7
8
9
10
11
12
13
14
15
16
| <dependency>
<groupId>org.springframework.boot</groupId>
<artifactId>spring-boot-starter-security</artifactId>
</dependency>
<dependency>
<groupId>org.springframework.boot</groupId>
<artifactId>spring-boot-starter-data-redis</artifactId>
</dependency>
<dependency>
<groupId>org.springframework.session</groupId>
<artifactId>spring-session-data-redis</artifactId>
</dependency>
<dependency>
<groupId>org.springframework.boot</groupId>
<artifactId>spring-boot-starter-web</artifactId>
</dependency>
|
1
2
3
4
5
6
7
8
| spring.redis.host=localhost
spring.redis.port=6379
spring.security.user.name=123
spring.security.user.password=123
server.port=81
|
通过使用Security进行登录验证,使用Spring Session进行共享Session,它会自动将我们需要存储的Session会话信息持久化到Redis中,并返回一个Token令牌给浏览器。
只要浏览器在访问当前系统或子系统时,携带Token令牌,就能达到多个子系统共享Session,单点登录的功能。
JWT
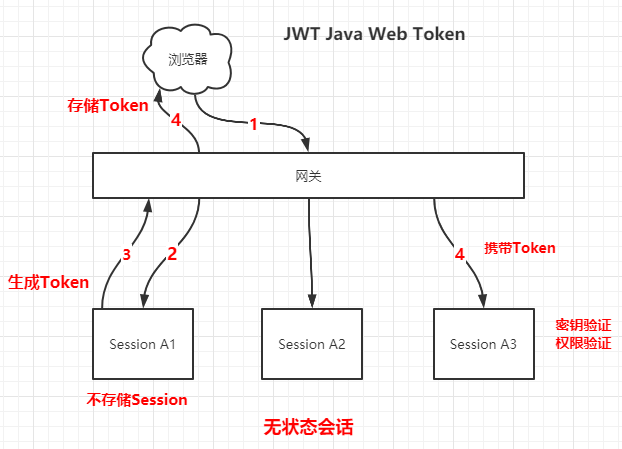
JWT,全称是Java Web Token,主要是通过生成Token并返回给浏览器,各个服务本地不存储会话信息,浏览器通过传递Token进行SSO单点登录。
1
2
3
4
5
6
7
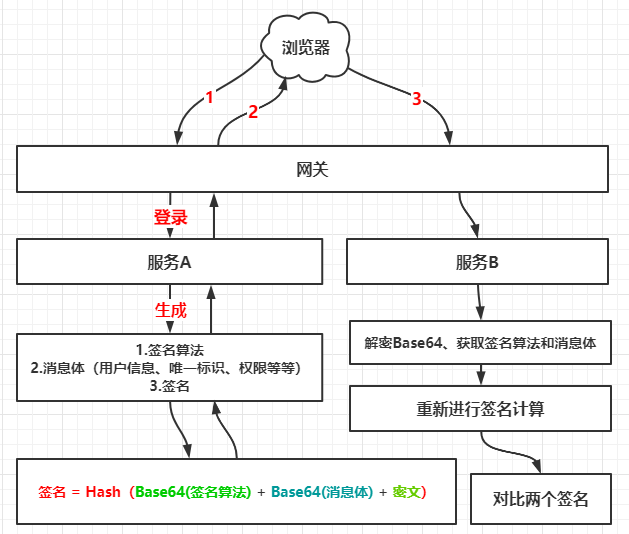
| Token包含三个部分:
1.头部信息:签名算法
2.消息体、载荷(用户信息、唯一标识、权限、其他)
3.签名
签名的生成过程:
签名 = Hash(Base64(头部信息) + '.' + Base64(消息体) + '.' + 密文)
|
Token = Base64(头部信息) + ‘.’ + Base64(消息体) + ‘.’ + 签名 ,以点号做分隔。
在这种情况下,服务器生成签名所使用的密文并没有传递到浏览器中,所以该签名无法被伪造。
而浏览器是可以将Token进行Base64解码获得其中的签名算法和消息体内容,就算他人恶意组装Token发送到服务器,由于他们无法获取生成签名的密文,最终服务器通过重新计算的签名与原签名不相同,就可以达到防篡改的目的。
1
2
3
4
5
|
{
“alg”: “HS256”,// 签名算法
“typ”: “JWT” //token类型
}
|
1
2
3
4
5
6
|
{
"exp"(expiration time): 过期时间,
"sub" (subject):主题, //一般用用户id,用来标识用户会话
"iat" (Issued At):签发时间
}
|
实现
1
2
3
4
5
| <dependency>
<groupId>io.jsonwebtoken</groupId>
<artifactId>jjwt</artifactId>
<version>0.7.0</version>
</dependency>
|
1
2
3
4
5
6
7
8
9
10
11
12
13
14
15
16
17
18
19
20
21
22
23
24
25
26
27
28
29
30
31
32
33
34
35
36
37
38
39
40
41
42
43
44
45
46
47
48
49
50
51
52
53
54
55
56
57
58
59
60
61
62
63
64
65
66
| package com.kuro.admin;
import java.util.Base64;
import java.util.Calendar;
import java.util.Date;
import io.jsonwebtoken.Claims;
import io.jsonwebtoken.ExpiredJwtException;
import io.jsonwebtoken.Jwts;
public class JwtUtil {
private static String secret = "ko346134h_we]rg3in_yip1!";
public static String createToken(String subject, Date issueDate) {
Calendar c = Calendar.getInstance();
c.setTime(issueDate);
c.add(Calendar.DAY_OF_MONTH, 20);
String compactJws = Jwts.builder()
.setSubject(subject)
.setIssuedAt(issueDate)
.setExpiration(c.getTime())
.signWith(io.jsonwebtoken.SignatureAlgorithm.HS512, secret)
.compact();
return compactJws;
}
public static String parseToken(String token) {
try {
Claims claims = Jwts.parser().setSigningKey(secret).parseClaimsJws(token).getBody();
if (claims != null){
return claims.getSubject();
}
}catch (ExpiredJwtException e){
e.printStackTrace();
System.out.println("jwt过期了");
}
return "";
}
}
|
1
2
3
4
5
6
7
8
9
10
11
12
13
14
15
16
17
18
19
20
21
22
23
24
25
26
27
| @WebFilter(filterName = "authFilter", urlPatterns = "/**")
@Component
public class MyFi implements Filter {
@Override
public void doFilter(ServletRequest request, ServletResponse response, FilterChain chain)
throws IOException, ServletException {
HttpServletRequest req = (HttpServletRequest) request;
String token = req.getHeader("token");
if (token != null) {
String parseToken = JwtUtil.parseToken(token);
if (!StringUtils.isEmpty(parseToken)) {
System.out.println("auth success");
chain.doFilter(request, response);
}
} else {
System.out.println("auth failed");
}
}
@Override
public void init(FilterConfig filterConfig) throws ServletException {
System.out.println("来了老弟");
}
|
Oauth2
OAuth(开放授权)是一个开放标准,允许用户授权第三方移动应用访问他们存储在另外的服务提供者上的信息,而不需要将用户名和密码提供给第三方移动应用或分享他们数据的所有内容,OAuth2.0是OAuth协议的延续版本,但不向后兼容OAuth 1.0。
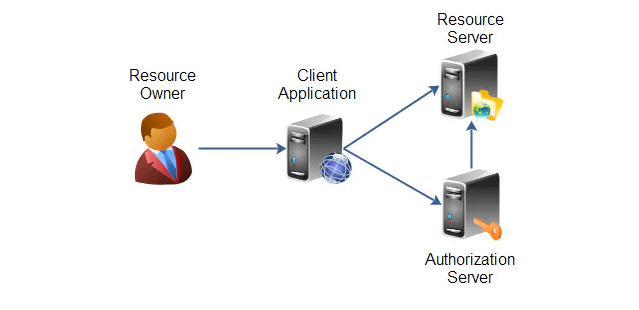
Resource Owner
资源拥有者,对应微信的每个用户微信上设置的个人信息是属于每个用户的,不属于腾讯。
Resource Server
资源服务器,一般就是用户数据的一些操作(增删改查)的REST API,比如微信的获取用户基本信息的接口。
Client Application
第三方客户端,对比微信中就是各种微信公众号开发的应用,第三方应用经过认证服务器授权后即可访问资源服务器的REST API来获取用户的头像、性别、地区等基本信息。
Authorization Server
认证服务器,验证第三方客户端是否合法。如果合法就给客户端颁布token,第三方通过token来调用资源服务器的API。
授权类型
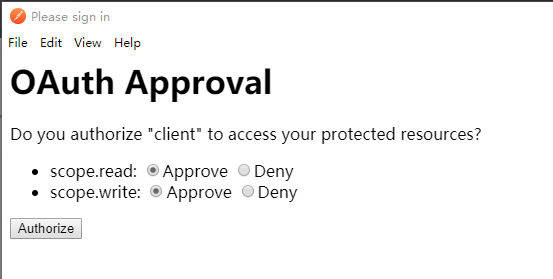
anthorization_code
授权码类型,适用于Web Server Application。模式为:客户端先调用/oauth/authorize/进到用户授权界面,用户授权后返回code,客户端然后根据code和appSecret获取access token。
implicit 简化类型,相对于授权码类型少了授权码获取的步骤。客户端应用授权后认证服务器会直接将access token放在客户端的url。客户端解析url获取token。这种方式其实是不太安全的,可以通过https安全通道和缩短access token的有效时间来较少风险。
password
密码类型,客户端应用通过用户的username和password获access token。适用于资源服务器、认证服务器与客户端具有完全的信任关系,因为要将用户要将用户的用户名密码直接发送给客户端应用,客户端应用通过用户发送过来的用户名密码获取token,然后访问资源服务器资源。比如支付宝就可以直接用淘宝用户名和密码登录,因为它们属于同一家公司,彼此充分信任。
client_credentials
客户端类型,是不需要用户参与的一种方式,用于不同服务之间的对接。比如自己开发的应用程序要调用短信验证码服务商的服务,调用地图服务商的服务、调用手机消息推送服务商的服务。当需要调用服务是可以直接使用服务商给的appID和appSecret来获取token,得到token之后就可以直接调用服务。
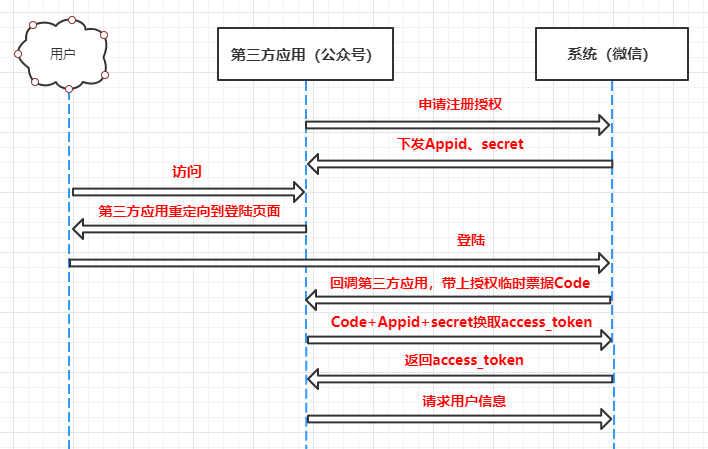
微信授权参照文档
依赖
1
2
3
4
5
6
7
8
| <dependency>
<groupId>org.springframework.cloud</groupId>
<artifactId>spring-cloud-starter-oauth2</artifactId>
</dependency>
<dependency>
<groupId>org.springframework.cloud</groupId>
<artifactId>spring-cloud-starter-security</artifactId>
</dependency>
|
服务端
服务端端口8080,客户端端口8081
认证服务器
1
2
3
4
5
6
7
8
9
10
11
12
13
14
15
16
17
18
19
20
21
22
23
24
25
26
27
28
29
30
31
32
33
34
| @EnableAuthorizationServer
@Configuration
public class AuthorizationServerConfiguration extends AuthorizationServerConfigurerAdapter {
@Override
public void configure(ClientDetailsServiceConfigurer clients) throws Exception {
clients.inMemory().withClient("client")
.redirectUris("http://localhost:8081/callback")
.scopes("read","write")
.secret("secret")
.authorizedGrantTypes("authorization_code","password","implicit","client_credentials");}
@Override
public void configure(AuthorizationServerSecurityConfigurer security) throws Exception {
security.tokenKeyAccess("isAuthenticated()")
.checkTokenAccess("permitAll()")
.allowFormAuthenticationForClients();
}
@Override
public void configure(AuthorizationServerEndpointsConfigurer endpoints) throws Exception {
endpoints.authenticationManager(authenticationManager);
}
@Autowired
@Qualifier("authenticationManagerBean")
private AuthenticationManager authenticationManager;
}
|
security配置
1
2
3
4
5
6
7
8
9
10
11
12
13
14
15
16
17
18
19
20
21
22
23
24
25
26
27
28
29
30
31
32
33
| @Configuration
public class SecurityConfiguration extends WebSecurityConfigurerAdapter {
@Override
protected void configure(HttpSecurity http) throws Exception {
http.formLogin()
.and().csrf().disable()
.authorizeRequests().anyRequest().authenticated();
}
@Override
public void configure(WebSecurity web) throws Exception {
super.configure(web);
}
@Override
protected void configure(AuthenticationManagerBuilder auth) throws Exception {
auth.inMemoryAuthentication().withUser("111").password("222").authorities("user")
.and().withUser("admin").password("admin").authorities("admin");
}
@Bean
@Override
public AuthenticationManager authenticationManagerBean() throws Exception {
return super.authenticationManagerBean();
}
@Bean
PasswordEncoder passwordEancoder() {
return NoOpPasswordEncoder.getInstance();
}
}
|
资源服务器
1
2
3
4
5
6
7
8
9
10
11
12
13
| @EnableGlobalMethodSecurity(prePostEnabled = true)
@EnableResourceServer
@Configuration
public class ResourceServerConfiguration extends ResourceServerConfigurerAdapter {
@Override
public void configure(HttpSecurity http) throws Exception {
http.antMatcher("/oauth2/api/**").authorizeRequests()
.antMatchers(HttpMethod.GET, "/oauth2/api/read/**").access("#oauth2.hasScope('read')")
.antMatchers(HttpMethod.GET, "/oauth2/api/write/**").access("#oauth2.hasScope('write')")
;
}
}
|
接口服务
1
2
3
4
5
6
7
8
9
10
11
12
13
14
15
16
17
18
19
20
|
@RestController
public class MainController {

    @GetMapping("/oauth2/api/me")
    public String me() {
    return "这是一个匿名访问接口,无需access_token";
    }


    @GetMapping("/oauth2/api/read/xxoo")
    public String xxoo() {
        return "这是一个需要read权限的接口"。
    }

    @GetMapping("/oauth2/api/write/xxoo")
    public String write() {
        return "这是一个需要write权限的接口";
    }
}
|
PostMan测试

最后发送请求:
1
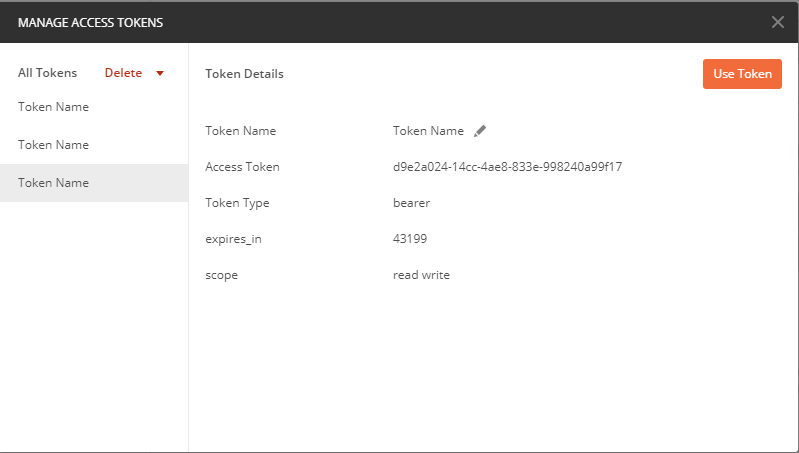
| http://localhost:8080/oauth2/api/read/xxoo?access_token=d9e2a024-14cc-4ae8-833e-998240a99f17
|
客户端
1
2
3
4
5
6
7
8
9
10
11
12
13
14
15
16
17
18
19
20
| @RestController
public class UserController {
@RequestMapping(value = "/callback", method = RequestMethod.GET)
public String callback(@RequestParam("code") String code) throws IOException {
ResponseEntity<String> response = null;
System.out.println("Authorization code------" + code);
RestTemplate restTemplate = new RestTemplate();
String access_token_url = "http://localhost:8080/oauth/token";
access_token_url += "?client_id=client&code=" + code;
access_token_url += "&grant_type=authorization_code";
access_token_url += "&redirect_uri=http://localhost:8081/callback";
access_token_url += "&client_secret=secret";
System.out.println("access_token_url " + access_token_url);
response = restTemplate.exchange(access_token_url, HttpMethod.POST, null, String.class);
System.out.println(response.getBody());
JSONObject object = JSONObject.parseObject(response.getBody());
return object.getString("access_token");
}
}
|
在客户端中提供回调的接口callback,与服务端中的重定向接口一致,通过前端触发请求:
1
| http://localhost:8080/oauth/authorize?response_type=code&client_id=client&redirect_uri=http://localhost:8081/callback
|
通过登录授权之后发送code到回调接口的callback参数中,并且在接口中触发oauth/token请求获取token。
如何取舍以下两种场景?
1.获取token之后将token返回给前端,等待前端下次请求时,再调用授权系统的相关查询信息
2.获取Token之后主动调用授权系统的相关信息,然后返回前端
微信的API接口则使用的是第一种方式,而JWT则是选择第二种。
如果是基于过滤器实现的话,切记要增加注解@ServletComponentScan
1
2
3
4
5
6
| @WebFilter(filterName = "oathFilter", urlPatterns = {"/callback"})
public class Oauth2Filter implements Filter {
@Override
public void doFilter(ServletRequest servletRequest, ServletResponse servletResponse, FilterChain filterChain) throws IOException, ServletException {
}
|
1
2
3
4
5
| @SpringBootApplication
@ServletComponentScan
public class ClientApplication {
}
|
参考资料