Spring Boot Security 基本使用 1 2 3 4 <dependency > <groupId > org.springframework.boot</groupId > <artifactId > spring-boot-starter-security</artifactId > </dependency >
基本原理 1 2 3 4 5 6 7 8 9 10 11 12 13 14 15 org.springframework.security.web.context.request.async.WebAsyncManagerIntegrationFil ter org.springframework.security.web.context.SecurityContextPersistenceFilter org.springframework.security.web.header.HeaderWriterFilter org.springframework.security.web.csrf.CsrfFilter org.springframework.security.web.authentication.logout.LogoutFilter org.springframework.security.web.authentication.UsernamePasswordAuthenticationFilter org.springframework.security.web.authentication.ui.DefaultLoginPageGeneratingFilter org.springframework.security.web.authentication.ui.DefaultLogoutPageGeneratingFilter org.springframework.security.web.savedrequest.RequestCacheAwareFilter org.springframework.security.web.servletapi.SecurityContextHolderAwareRequestFilter org.springframework.security.web.authentication.AnonymousAuthenticationFilter org.springframework.security.web.session.SessionManagementFilter org.springframework.security.web.access.ExceptionTranslationFilter org.springframework.security.web.access.intercept.FilterSecurityInterceptor
重点看三个过滤器:基本位于过滤链的最底部 。
ExceptionTranslationFilter:是个异常过滤器,用来处理在认证授权过程中抛出的异常
UsernamePasswordAuthenticationFilter :对/login 的 POST 请求做拦截,校验表单中用户名,密码。
过滤器如何进行加载的?
1 2 3 4 5 6 7 8 9 10 11 12 13 14 public class DelegatingFilterProxy extends GenericFilterBean protected Filter initDelegate (WebApplicationContext wac) throws ServletException String targetBeanName = this .getTargetBeanName(); Assert.state(targetBeanName != null , "No target bean name set" ); Filter delegate = (Filter)wac.getBean(targetBeanName, Filter.class ) ; if (this .isTargetFilterLifecycle()) { delegate.init(this .getFilterConfig()); } return delegate; } }
1 2 3 4 5 6 7 8 9 10 11 12 13 14 15 16 17 18 19 20 21 22 23 24 25 26 27 28 public class FilterChainProxy extends GenericFilterBean private void doFilterInternal (ServletRequest request, ServletResponse response, FilterChain chain) throws IOException, ServletException FirewalledRequest fwRequest = firewall .getFirewalledRequest((HttpServletRequest) request); HttpServletResponse fwResponse = firewall .getFirewalledResponse((HttpServletResponse) response); List<Filter> filters = getFilters(fwRequest); if (filters == null || filters.size() == 0 ) { if (logger.isDebugEnabled()) { logger.debug(UrlUtils.buildRequestUrl(fwRequest) + (filters == null ? " has no matching filters" : " has an empty filter list" )); } fwRequest.reset(); chain.doFilter(fwRequest, fwResponse); return ; } VirtualFilterChain vfc = new VirtualFilterChain(fwRequest, chain, filters); vfc.doFilter(fwRequest, fwResponse); } }
UserDetailsService 当什么也没有配置的时候,账号和密码是由 Spring Security 定义生成的。而在实际项目中账号和密码都是从数据库中查询出来的。 所以我们要通过自定义逻辑控制认证逻辑。
如果需要自定义逻辑时,只需要实现 UserDetailsService 接口即可。接口定义如下:
1 2 3 public interface UserDetailsService UserDetails loadUserByUsername (String username) throws UsernameNotFoundException ; }
返回值 UserDetails ,这个类是系统默认的用户“主体 ”
1 2 3 4 5 6 7 8 9 10 11 12 13 14 15 16 public interface UserDetails extends Serializable Collection<? extends GrantedAuthority> getAuthorities(); String getPassword () ; String getUsername () ; boolean isAccountNonExpired () boolean isAccountNonLocked () boolean isCredentialsNonExpired () boolean isEnabled () }
User类是UserDetails的实现类,以后我们只需要使用 User 这个实体类即可!
1 2 3 4 5 6 7 package org.springframework.security.core.userdetails;public class User implements UserDetails , CredentialsContainer public User (String username, String password, Collection<? extends GrantedAuthority> authorities) this (username, password, true , true , true , true , authorities); } }
username表示用户名。此值是客户端表单传递过来的数据。默认情况下必须叫 username,否则无
法接收。
PasswordEncoder 1 2 3 4 5 6 7 8 9 10 public interface PasswordEncoder String encode (CharSequence rawPassword) ; boolean matches (CharSequence rawPassword, String encodedPassword) default boolean upgradeEncoding (String encodedPassword) return false ; } }
1 2 BCryptPasswordEncoder 是 Spring Security 官方推荐的密码解析器,平时多使用这个解析器。 BCryptPasswordEncoder 是对 bcrypt 强散列方法的具体实现。是基于 Hash 算法实现的单向加密。可以通过 strength 控制加密强度,默认 10.
1 2 3 4 5 6 7 8 9 10 11 12 13 @Test public void test01 () BCryptPasswordEncoder bCryptPasswordEncoder = new BCryptPasswordEncoder(); String midkuro = bCryptPasswordEncoder.encode("midkuro" ); System.out.println("加密之后数据:\t" +midkuro); boolean result = bCryptPasswordEncoder.matches("midkuro" , midkuro); System.out.println("比较结果:\t" +result); }
登录设定 配置文件 第一种方式:通过配置文件配置固定的账号密码进行登录。
在没配置其账号密码时,默认的账号是user ,密码会在控制台中输出随机密码
1 Using generated security password: 6e86c6e9-d661-41ae-aabc-bea8817c4f7b
1 2 spring.security.user.name =111 spring.security.user.password =111
配置类 第二种方式:通过配置类
1 2 3 4 5 6 7 8 9 10 11 12 13 14 15 16 17 @Configuration public class SecurityConfig extends WebSecurityConfigurerAdapter @Override protected void configure (AuthenticationManagerBuilder auth) throws Exception BCryptPasswordEncoder passwordEncoder = new BCryptPasswordEncoder(); String password = passwordEncoder.encode("123" ); auth.inMemoryAuthentication().withUser("lucy" ).password(password).roles("admin" ); } @Bean PasswordEncoder password () { return new BCryptPasswordEncoder(); } }
自定义编写实现类 创建配置类,设置使用哪个UserDetailsService实现类。
1 2 3 4 5 6 7 8 9 10 11 12 13 14 @Configuration public class SecurityConfig extends WebSecurityConfigurerAdapter @Autowired private UserDetailsService userDetailsService; @Override protected void configure (AuthenticationManagerBuilder auth) throws Exception auth.userDetailsService(userDetailsService).passwordEncoder(password()); } @Bean PasswordEncoder password () { return new BCryptPasswordEncoder(); } }
编写实现类,通过传入的userName查数据库并返回User对象,User对象有用户名密码和操作权限。
1 2 3 4 5 6 7 8 9 10 11 12 13 14 15 16 17 18 19 20 21 22 23 24 @Service ("userDetailsService" )public class MyUserDetailsService implements UserDetailsService @Autowired private UsersMapper usersMapper; @Override public UserDetails loadUserByUsername (String username) throws UsernameNotFoundException QueryWrapper<Users> wrapper = new QueryWrapper(); wrapper.eq("username" ,username); Users users = usersMapper.selectOne(wrapper); if (users == null ) { throw new UsernameNotFoundException("用户名不存在!" ); } List<GrantedAuthority> auths = AuthorityUtils.commaSeparatedStringToAuthorityList("admin" ); return new User(users.getUsername(), new BCryptPasswordEncoder().encode(users.getPassword()),auths); } }
1 2 3 4 5 6 7 8 @Data @AllArgsConstructor @NoArgsConstructor public class Users private Integer id; private String username; private String password; }
自定义登录页 1 2 3 4 5 6 7 8 9 10 11 12 13 14 15 16 17 18 19 20 21 @Configuration public class SecurityConfig extends WebSecurityConfigurerAdapter @Override protected void configure (HttpSecurity http) throws Exception http.formLogin() .loginPage("/login.html" ) .loginProcessingUrl("/user/login" ) .defaultSuccessUrl("/test/index" ).permitAll() .and().authorizeRequests() .antMatchers("/" ,"/test/hello" ,"/user/login" ).permitAll() .and().csrf().disable(); } }
1 2 3 4 5 6 7 8 9 10 11 12 13 14 @RestController @RequestMapping ("/test" )public class TestController @RequestMapping ("hello" ) public String hello () return "hello security" ; } @RequestMapping ("index" ) public String index () return "hello index" ; } }
1 2 3 4 5 6 7 8 9 10 11 12 13 14 15 16 17 18 19 20 21 22 <!DOCTYPE html > <html xmlns:th ="http://www.thymeleaf.org" > <head lang ="en" > <meta http-equiv ="Content-Type" content ="text/html; charset=UTF-8" /> <title > xx</title > </head > <body > <h1 > 表单提交</h1 > <form action ="/user/login" method ="post" > <input type ="hidden" name ="${_csrf.parameterName}" value ="${_csrf.token}" /> <input type ="text" name ="username" /> <input type ="text" name ="password" /> <input type ="submit" /> </form > </body > </html >
用户授权 1.在配置类设置当前访问地址有哪些权限
1 2 3 4 5 6 7 8 9 10 11 12 13 14 15 16 17 18 19 20 @Override protected void configure (HttpSecurity http) throws Exception http.authorizeRequests() .antMatchers("/test/index1" ).hasAuthority("admins" ) true ..antMatchers("/test/index2" ).hasAnyAuthority("admins,manager" ) .antMatchers("/test/index3" ).hasRole("sale" ) .antMatchers("/test/index4" ).hasAnyRole("sale" ); }
1 2 3 最长匹配原则(has more characters)说明: URL请求/app/dir/file.jsp,现在存在两个路径匹配模式/**/*.jsp和/app/dir/*.jsp,那么会根据模式/app/dir/*.jsp来匹配
2.在UserDetailsService,设置返回的User对象的权限
1 List<GrantedAuthority> auths = AuthorityUtils.commaSeparatedStringToAuthorityList("admins,ROLE_sale" );
值得注意的是,这里用户添加角色时,名称是Role_sale,原因在于Security会在配置类中的角色名称中自动添加前缀,权限和角色底层校验逻辑一致,而Authority并没有。
1 2 3 4 5 6 7 8 9 10 11 12 13 private static String hasAuthority (String authority) return "hasAuthority('" + authority + "')" ; } private static String hasRole (String role) Assert.notNull(role, "role cannot be null" ); if (role.startsWith("ROLE_" )) { throw new IllegalArgumentException("role should not start with 'ROLE_' since it is automatically inserted. Got '" + role + "'" ); } else { return "hasRole('ROLE_" + role + "')" ; } }
hasRole 和 hasAuthority 写代码时前缀不同,但是最终执行是一样的,功能上没什么区别;设计上来说,role 和 authority 这是两个层面的权限设计思路,一个是角色,一个是权限,角色是权限的集合。
自定义403页面 1 2 3 4 5 @Override protected void configure (HttpSecurity http) throws Exception http.exceptionHandling().accessDeniedPage("/unauth.html" ); }
认证授权注解 使用注解先要开启注解功能!
1 2 3 4 5 6 @Configuration @EnableWebSecurity @EnableGlobalMethodSecurity (prePostEnabled = true ,securedEnabled = true )public class SecuritySecureConfig extends WebSecurityConfigurerAdapter }
@Secured 判断是否具有角色,另外需要注意的是这里匹配的字符串需要添加前缀“ROLE_“,必须要有ROLE_sale或者ROLE_manager的角色。
1 2 3 4 5 @GetMapping ("update" )@Secured ({"ROLE_sale" ,"ROLE_manager" })public String update () return "hello update" ; }
@PreAuthorize 该注解适合进入方法前的权限验证,可以将登录用户的 roles/permissions 参数传到方法中。
1 2 3 4 5 6 7 @GetMapping ("update" )@PreAuthorize ("hasRole('ROLE_sale') AND hasRole('ROLE_manager')" )public String update () return "hello update" ; }
@PostAuthorize @PostAuthorize 注解使用并不多,在方法执行后再进行权限验证,适合验证带有返回值的权限.
1 2 3 4 5 6 @GetMapping ("update" )@PostAuthorize ("hasAnyAuthority('admins')" )public String update () System.out.println("会执行这个输出语句...." ); return "hello update" ; }
@PostFilter 权限验证之后对数据进行过滤,留下用户名是 admin1 的数据,表达式中的 filterObject 引用的是方法返回值 List 中的某一个元素。
1 2 3 4 5 6 7 8 @RequestMapping ("getAll" )@PostFilter ("filterObject.username == 'admin1'" )public List<UserInfo> getAllUser () ArrayList<UserInfo> list = new ArrayList<>(); list.add(new Users(11 ,"admin1" ,"6666" )); list.add(new Users(21 ,"admin2" ,"888" )); return list; }
@PreFilter 进入控制器之前对数据进行过滤,只保留users.id是偶数的数据。
1 2 3 4 5 6 7 8 @RequestMapping ("test" )@PreFilter (value = "filterObject.id%2==0" )public List<UserInfo> getTestPreFilter (@RequestBody List<Users> list) list.forEach(t-> { System.out.println(t.getId()+"\t" +t.getUsername()); }); return list; }
权限继承 1 2 3 4 5 6 7 @Bean RoleHierarchy roleHierarchy () { RoleHierarchyImpl impl = new RoleHierarchyImpl(); impl.setHierarchy("ROLE_admin > ROLE_user" ); return impl; }
用户注销 1 2 3 4 5 6 @Override protected void configure (HttpSecurity http) throws Exception http.logout().logoutUrl("/logout" ) .logoutSuccessUrl("/test/hello" ).permitAll(); }
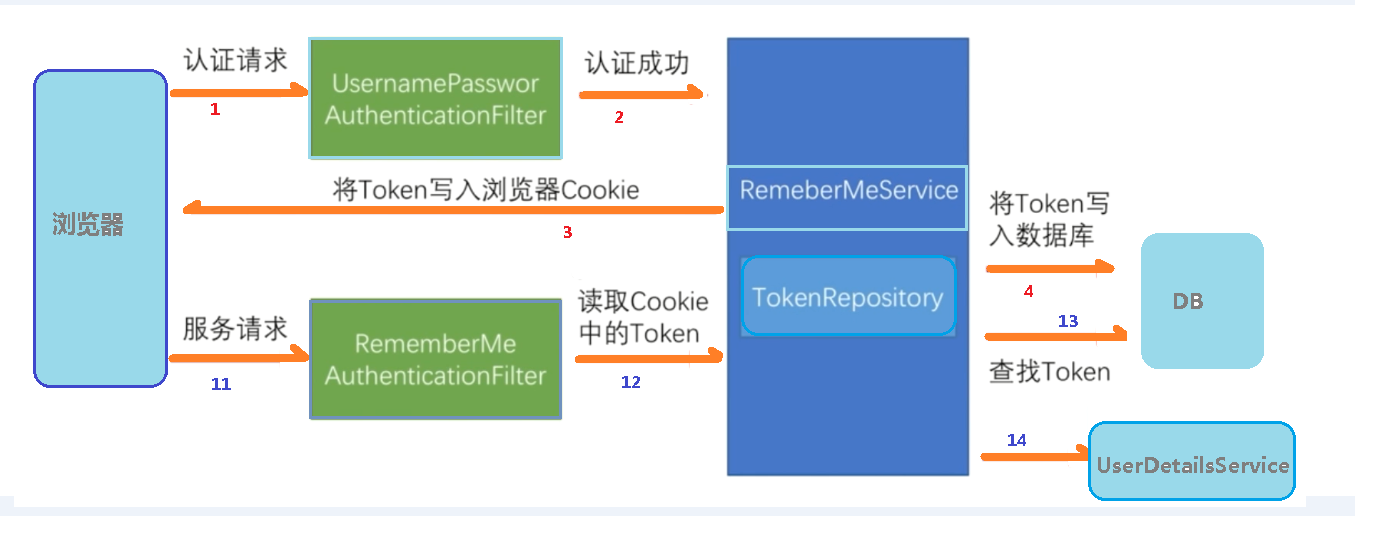
自动登录
基于Cookie技术和安全框架机制实现自动登录
1 2 3 4 5 6 7 8 9 #rememberMe中将cookie写到数据库的表,代码中粘贴出来的 CREATE TABLE `persistent_logins` ( `username` varchar(64) NOT NULL, `series` varchar(64) NOT NULL, `token` varchar(64) NOT NULL, `last_used` timestamp NOT NULL DEFAULT CURRENT_TIMESTAMP ON UPDATE CURRENT_TIMESTAMP, PRIMARY KEY (`series`) ) ENGINE=InnoDB DEFAULT CHARSET=utf8;
1 2 3 4 5 6 7 8 9 10 11 12 13 14 15 16 17 18 19 20 21 22 23 24 25 @Configuration public class SecurityConfig extends WebSecurityConfigurerAdapter @Autowired private DataSource dataSource; @Bean public PersistentTokenRepository persistentTokenRepository () JdbcTokenRepositoryImpl jdbcTokenRepository = new JdbcTokenRepositoryImpl(); jdbcTokenRepository.setDataSource(dataSource); return jdbcTokenRepository; } @Override protected void configure (HttpSecurity http) throws Exception http.rememberMe().tokenRepository(persistentTokenRepository()) .tokenValiditySeconds(60 ) .userDetailsService(userDetailsService); } }
1 2 <input type ="checkbox" name ="remember-me" title ="自动登录" /> <br />
踢除其他登录 最简单的原理是保存用户ID和Session的映射关系,保证只有一个机器进行登录操作,新的机器登录时会踢出旧的登录Session。
1 2 3 4 5 @Override protected void configure (HttpSecurity http) throws Exception http.sessionManagement().maximumSessions(1 ); }
禁止其他登录 1 2 3 4 5 @Override protected void configure (HttpSecurity http) throws Exception http.maximumSessions(1 ).maxSessionsPreventsLogin(true ); }
清理过期Session 1 2 3 4 @Bean HttpSessionEventPublisher httpSessionEventPublisher () { return new HttpSessionEventPublisher(); }
退出登录处理器 1 2 3 4 5 6 7 8 9 10 11 @Override protected void configure (HttpSecurity http) throws Exception http .addLogoutHandler(new LogoutHandler() { @Override public void logout (HttpServletRequest request, HttpServletResponse response, Authentication authentication) System.out.println("退出" ); } }); }
登录成功处理器 登录成功之后的处理操作
1 2 3 4 5 6 7 8 9 10 11 12 13 14 15 @Override protected void configure (HttpSecurity http) throws Exception http .successHandler(new AuthenticationSuccessHandler() { @Override public void onAuthenticationSuccess (HttpServletRequest request, HttpServletResponse response, Authentication authentication) throws IOException, ServletException System.out.println("登录成功" ); request.getSession().getAttribute(name) request.getRequestDispatcher("" ).forward(request, response); } }); }
登录失败处理器 1 2 3 4 5 6 7 8 9 10 11 .failureHandler(new AuthenticationFailureHandler() { @Override public void onAuthenticationFailure (HttpServletRequest request, HttpServletResponse response, AuthenticationException exception) throws IOException, ServletException exception.printStackTrace(); request.getRequestDispatcher(request.getRequestURL().toString()).forward(request, response); } })
1 2 3 4 5 6 7 常见登录失败异常: LockedException 账户被锁定 CredentialsExpiredException 密码过期 AccountExpiredException 账户过期 DisabledException 账户被禁用 BadCredentialsException 密码错误 UsernameNotFoundException 用户名错误
浏览器策略 同源 浏览器的同源策略是一种安全功能,同源策略限制了从同一个源加载的文档或脚本如何与来自另一个源的资源进行交互。这是一个用于隔离潜在恶意文件的重要安全机制。
所谓同源是指:域名、协议、端口均相同。当出现域名、协议、端口中任意一个不同时,则不是同源的。
所以就产生了在www.abc.com网站中的Ajax请求到www.bcd.com网站的跨域问题。
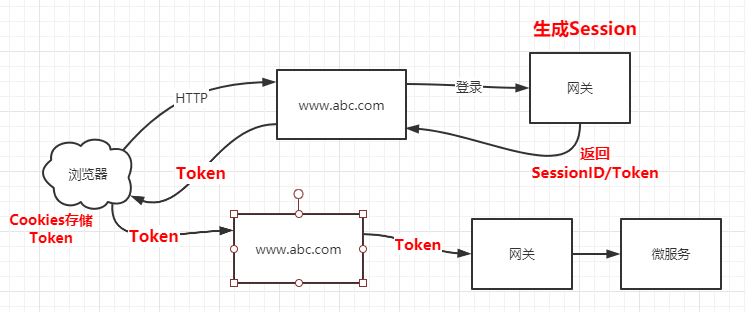
1 2 3 4 5 6 1.浏览器发送HTTP请求到服务器 2.服务器发送给网关进行登录验证 3.网关登录验证,创建Session会话,返回会话标识SessionID/Token/令牌等标记信息 4.浏览器接受到SessionID/Token后,将其存储在Cookies中 5.下次发送HTTP请求时携带Cookies中的SessionID/Token到服务器中 6.定位同一个会话并访问
页面中常用的记住账号、自动登录 等功能,最简单的实现就是在服务器中创建一个永不过期的会话,然后Cookies存储相关信息即可。
跨域 当访问一个服务器的网页时,它的Ajax请求到了另外一个非同源的连接时,则将触发跨域请求,Cookies一般情况下是无法跨域的。
1 2 3 4 jsonp解决跨域: 只能发起GET请求,通过jsonp发送的请求,会随带 cookie 一起发送。 Cors解决跨域: 在浏览器中指定Origin来源,如果在服务器接受范围,请求则成功
1 2 3 4 5 6 Cors解决跨域原理: 1.www.bcd.com服务器需要开启允许跨域 Access-Control-Allow-Origin: http://www.abc.com 标识允许这个域名对它进行跨域请求 1.www.abc.com页面中的Ajax跨域请求www.bcd.com 2.Ajax在请求的过程中需要携带自身请求的Cookies信息和Origin来源:www.abc.com到www.bcd.com中 3.www.bcd.com服务器校验请求的Origin来源是否处于可允许的列表中 4.www.bcd.com响应请求
XSS 1 2 3 4 5 6 7 8 9 10 11 12 13 14 15 XSS攻击通常指的是通过利用网页开发时留下的漏洞,通过巧妙的方法注入恶意指令代码到网页,当用户打开网页时,服务器自动加载并执行攻击者恶意制造的网页程序。 嵌入的脚本一般通过JS实现,如<script src = "www.baidu.com" /> APP基本没有XSS跨站点攻击。 WEB解决办法: 1.防止非法JS嵌入到网页中 2.URL ENCODE特殊符号(%、;、&等等) 3.定期扫描静态资源是否匹配关键字(script、src) 4.敏感资源人机交互(图形验证码、手机验证码) 5.所有接口改成Post请求 APP的Token丢了解决办法: 1.代码混淆(编译后的文件加密,无法反编译) 2.Token绑定IP地址,切换IP地址则Token失效
CSRF 跨站请求攻击,简单地说,是攻击者通过一些技术手段欺骗用户的浏览器去访问一个自己曾经认证过的网站并运行一些操作(如发邮件,发消息,甚至财产操作如转账和购买商品)。由于浏览器曾经认证过,所以被访问的网站会认为是真正的用户操作而去运行。
这利用了 web 中用户身份验证的一个漏洞:简单的身份验证只能保证请求发自某个用户的浏览器,却不能保证请求本身是用户自愿发出的 。
1 2 3 4 5 CSRF攻击原理: 1.用户登录受信任网站A,并且在本地生成Cookie 2.用户访问受信任网站A,浏览器自动携带Cookie,不需要再做任何验证 3.用户在未登出信任网站A时,访问了危险网站B 4.危险网站B通过浏览器同源,发送了一个请求到信任网站A中,以你的名义发送恶意请求
可以通过增加人为验证机制,或者每个请求动态生成Hash值解决。
Hash值放在Cookies中容易被CSRF利用进行二次请求,因为他能从Cookies中获取到Hash值,而把Hash值放在每次请求的页面中,即使用户没有退出受信任网站A,危险网站B也无法从信任网站A的页面中中获取Hash值。
从 Spring Security 4.0 开始,默认情况下会启用 CSRF 保护 ,以防止 CSRF 攻击应用程序,Spring Security CSRF 会针对 PATCH,POST,PUT 和 DELETE 方法进行防护。
需要在页面表单中嵌入_csrf.token的值,每次后台都会下发一个新的csrfToken 到浏览器,并将生成 csrfToken 保存到 HttpSession 或者 Cookie 中。
1 2 3 4 5 <input type ="hidden" name ="${_csrf.parameterName}" value ="${_csrf.token}" /> <input type ="hidden" th:if ="${_csrf}!=null" th:value ="${_csrf.token}" name ="_csrf" />
1 2 3 4 5 6 7 8 public final class CsrfConfigurer <H extends HttpSecurityBuilder <H >> extends AbstractHttpConfigurer <CsrfConfigurer <H >, H > { private CsrfTokenRepository csrfTokenRepository = new LazyCsrfTokenRepository( new HttpSessionCsrfTokenRepository()); }
1 2 3 4 5 6 7 8 9 10 11 12 13 14 15 16 17 18 19 20 21 22 23 24 25 26 27 28 29 30 31 32 33 34 35 36 37 38 39 40 41 42 43 44 45 46 47 48 49 public final class CsrfFilter extends OncePerRequestFilter @Override protected void doFilterInternal (HttpServletRequest request, HttpServletResponse response, FilterChain filterChain) throws ServletException, IOException { request.setAttribute(HttpServletResponse.class .getName (), response ) ; CsrfToken csrfToken = this .tokenRepository.loadToken(request); final boolean missingToken = csrfToken == null ; if (missingToken) { csrfToken = this .tokenRepository.generateToken(request); this .tokenRepository.saveToken(csrfToken, request, response); } request.setAttribute(CsrfToken.class .getName (), csrfToken ) ; request.setAttribute(csrfToken.getParameterName(), csrfToken); if (!this .requireCsrfProtectionMatcher.matches(request)) { filterChain.doFilter(request, response); return ; } String actualToken = request.getHeader(csrfToken.getHeaderName()); if (actualToken == null ) { actualToken = request.getParameter(csrfToken.getParameterName()); } if (!csrfToken.getToken().equals(actualToken)) { if (this .logger.isDebugEnabled()) { this .logger.debug("Invalid CSRF token found for " + UrlUtils.buildFullRequestUrl(request)); } if (missingToken) { this .accessDeniedHandler.handle(request, response, new MissingCsrfTokenException(actualToken)); } else { this .accessDeniedHandler.handle(request, response, new InvalidCsrfTokenException(csrfToken, actualToken)); } return ; } filterChain.doFilter(request, response); } }
微服务 1 2 3 4 5 <dependency > <groupId > io.jsonwebtoken</groupId > <artifactId > jjwt</artifactId > <version > 0.7.0</version > </dependency >
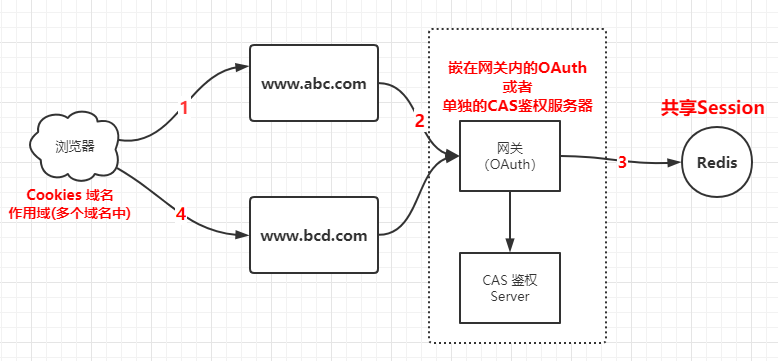
单点登录 跨域是不同的系统内部互相通信时的浏览器不同源问题,而单点登录是指一个浏览器在系统A登录后,当浏览器访问系统B时,不需要再次登录。
1 2 3 4 5 6 7 单点登录过程: 1.浏览器向www.abc.com发起登录HTTP请求 2.不通的域名系统最终汇集到同一个网关上做鉴权操作 3.通过网关上的OAuth或者第三方的CAS鉴权,产生Session会话 4.持久化Session会话到Redis中,多个域名共享 5.返回SessionID/Token到浏览器中,缓存到Cookies中 6.请求www.bcd.com时,发送cookies中的SessonID/Token进行免登录。
自定义加密策略 1 2 3 4 5 6 7 8 9 10 11 12 13 14 @Component public class DefaultPasswordEncoder implements PasswordEncoder @Override public String encode (CharSequence charSequence) return MD5.encrypt(charSequence.toString()); } @Override public boolean matches (CharSequence charSequence, String encodedPassword) return encodedPassword.equals(MD5.encrypt(charSequence.toString())); } }
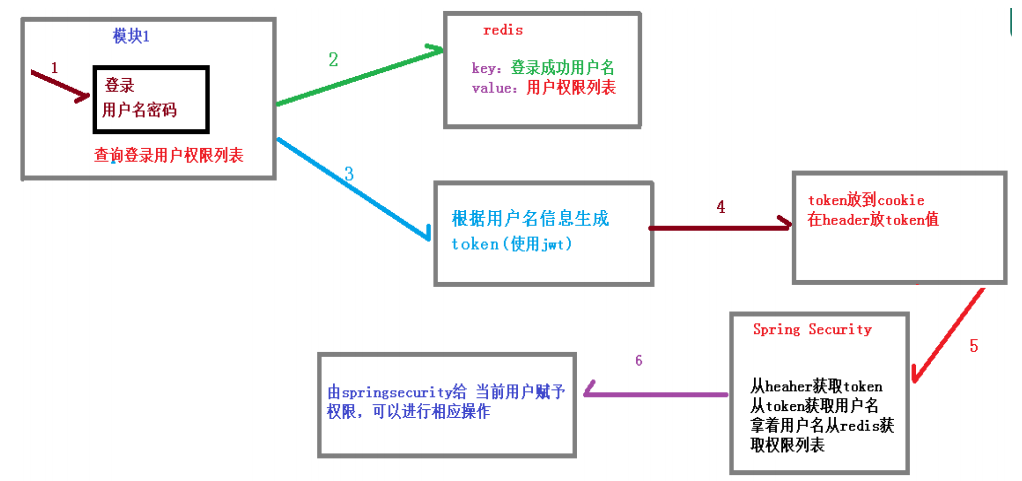
创建Token 1 2 3 4 5 6 7 8 9 10 11 12 13 14 15 16 17 18 19 20 21 @Component public class TokenManager private long tokenEcpiration = 24 *60 *60 *1000 ; private String tokenSignKey = "123456" ; public String createToken (String username) String token = Jwts.builder().setSubject(username) .setExpiration(new Date(System.currentTimeMillis()+tokenEcpiration)) .signWith(SignatureAlgorithm.HS512, tokenSignKey).compressWith(CompressionCodecs.GZIP).compact(); return token; } public String getUserInfoFromToken (String token) String userinfo = Jwts.parser().setSigningKey(tokenSignKey).parseClaimsJws(token).getBody().getSubject(); return userinfo; } public void removeToken (String token) }
登出处理器 1 2 3 4 5 6 7 8 9 10 11 12 13 14 15 16 17 18 19 20 21 22 23 24 public class TokenLogoutHandler implements LogoutHandler private TokenManager tokenManager; private RedisTemplate redisTemplate; public TokenLogoutHandler (TokenManager tokenManager,RedisTemplate redisTemplate) this .tokenManager = tokenManager; this .redisTemplate = redisTemplate; } @Override public void logout (HttpServletRequest request, HttpServletResponse response, Authentication authentication) String token = request.getHeader("token" ); if (token != null ) { tokenManager.removeToken(token); String username = tokenManager.getUserInfoFromToken(token); redisTemplate.delete(username); } ResponseUtil.out(response, R.ok()); } }
未授权处理器 1 2 3 4 5 6 7 public class UnauthEntryPoint implements AuthenticationEntryPoint @Override public void commence (HttpServletRequest httpServletRequest, HttpServletResponse httpServletResponse, AuthenticationException e) throws IOException, ServletException ResponseUtil.out(httpServletResponse, R.error()); } }
认证过滤器 1 2 3 4 5 6 7 8 9 10 11 12 13 14 15 16 17 18 19 20 21 22 23 24 25 26 27 28 29 30 31 32 33 34 35 36 37 38 39 40 41 42 43 44 45 46 47 48 49 50 51 52 53 public class TokenLoginFilter extends UsernamePasswordAuthenticationFilter private TokenManager tokenManager; private RedisTemplate redisTemplate; private AuthenticationManager authenticationManager; public TokenLoginFilter (AuthenticationManager authenticationManager, TokenManager tokenManager, RedisTemplate redisTemplate) this .authenticationManager = authenticationManager; this .tokenManager = tokenManager; this .redisTemplate = redisTemplate; this .setPostOnly(false ); this .setRequiresAuthenticationRequestMatcher(new AntPathRequestMatcher("/admin/acl/login" ,"POST" )); } @Override public Authentication attemptAuthentication (HttpServletRequest request, HttpServletResponse response) throws AuthenticationException { try { User user = new ObjectMapper().readValue(request.getInputStream(), User.class ) ; return authenticationManager.authenticate(new UsernamePasswordAuthenticationToken(user.getUsername(),user.getPassword(), new ArrayList<>())); } catch (IOException e) { e.printStackTrace(); throw new RuntimeException(); } } @Override protected void successfulAuthentication (HttpServletRequest request, HttpServletResponse response, FilterChain chain, Authentication authResult) throws IOException, ServletException { SecurityUser user = (SecurityUser)authResult.getPrincipal(); String token = tokenManager.createToken(user.getCurrentUserInfo().getUsername()); redisTemplate.opsForValue().set(user.getCurrentUserInfo().getUsername(),user.getPermissionValueList()); ResponseUtil.out(response, R.ok().data("token" ,token)); } protected void unsuccessfulAuthentication (HttpServletRequest request, HttpServletResponse response, AuthenticationException failed) throws IOException, ServletException { ResponseUtil.out(response, R.error()); } }
1 2 3 4 5 6 7 8 9 10 @Data public class User implements Serializable private static final long serialVersionUID = 1L ; private String username; private String password; private String nickName; private String salt; private String token; }
授权过滤器 1 2 3 4 5 6 7 8 9 10 11 12 13 14 15 16 17 18 19 20 21 22 23 24 25 26 27 28 29 30 31 32 33 34 35 36 37 38 39 40 41 42 43 44 public class TokenAuthFilter extends BasicAuthenticationFilter private TokenManager tokenManager; private RedisTemplate redisTemplate; public TokenAuthFilter (AuthenticationManager authenticationManager,TokenManager tokenManager,RedisTemplate redisTemplate) super (authenticationManager); this .tokenManager = tokenManager; this .redisTemplate = redisTemplate; } @Override protected void doFilterInternal (HttpServletRequest request, HttpServletResponse response, FilterChain chain) throws IOException, ServletException UsernamePasswordAuthenticationToken authRequest = getAuthentication(request); if (authRequest != null ) { SecurityContextHolder.getContext().setAuthentication(authRequest); } chain.doFilter(request,response); } private UsernamePasswordAuthenticationToken getAuthentication (HttpServletRequest request) String token = request.getHeader("token" ); if (token != null ) { String username = tokenManager.getUserInfoFromToken(token); List<String> permissionValueList = (List<String>)redisTemplate.opsForValue().get(username); Collection<GrantedAuthority> authority = new ArrayList<>(); for (String permissionValue : permissionValueList) { SimpleGrantedAuthority auth = new SimpleGrantedAuthority(permissionValue); authority.add(auth); } return new UsernamePasswordAuthenticationToken(username,token,authority); } return null ; } }
1 2 3 4 5 6 7 8 9 10 11 12 13 14 15 16 17 18 19 20 21 22 23 24 25 26 27 28 29 30 31 32 33 34 35 36 37 38 39 40 41 42 43 44 45 46 47 48 49 50 51 52 53 54 55 56 57 58 59 60 61 62 @Data public class SecurityUser implements UserDetails private transient User currentUserInfo; private List<String> permissionValueList; public SecurityUser () } public SecurityUser (User user) if (user != null ) { this .currentUserInfo = user; } } @Override public Collection<? extends GrantedAuthority> getAuthorities() { Collection<GrantedAuthority> authorities = new ArrayList<>(); for (String permissionValue : permissionValueList) { if (StringUtils.isEmpty(permissionValue)) continue ; SimpleGrantedAuthority authority = new SimpleGrantedAuthority(permissionValue); authorities.add(authority); } return authorities; } @Override public String getPassword () return currentUserInfo.getPassword(); } @Override public String getUsername () return currentUserInfo.getUsername(); } @Override public boolean isAccountNonExpired () return true ; } @Override public boolean isAccountNonLocked () return true ; } @Override public boolean isCredentialsNonExpired () return true ; } @Override public boolean isEnabled () return true ; } }
核心配置类 1 2 3 4 5 6 7 8 9 10 11 12 13 14 15 16 17 18 19 20 21 22 23 24 25 26 27 28 29 30 31 32 33 34 35 36 37 38 39 40 41 42 43 44 45 46 47 48 49 50 51 @Configuration @EnableWebSecurity @EnableGlobalMethodSecurity (prePostEnabled = true )public class TokenWebSecurityConfig extends WebSecurityConfigurerAdapter private TokenManager tokenManager; private RedisTemplate redisTemplate; private DefaultPasswordEncoder defaultPasswordEncoder; private UserDetailsService userDetailsService; @Autowired public TokenWebSecurityConfig (UserDetailsService userDetailsService, DefaultPasswordEncoder defaultPasswordEncoder, TokenManager tokenManager, RedisTemplate redisTemplate) this .userDetailsService = userDetailsService; this .defaultPasswordEncoder = defaultPasswordEncoder; this .tokenManager = tokenManager; this .redisTemplate = redisTemplate; } @Override protected void configure (HttpSecurity http) throws Exception http.exceptionHandling() .authenticationEntryPoint(new UnauthEntryPoint()) .and().csrf().disable() .authorizeRequests() .anyRequest().authenticated() .and().logout().logoutUrl("/admin/acl/index/logout" ) .addLogoutHandler(new TokenLogoutHandler(tokenManager,redisTemplate)).and() .addFilter(new TokenLoginFilter(authenticationManager(), tokenManager, redisTemplate)) .addFilter(new TokenAuthFilter(authenticationManager(), tokenManager, redisTemplate)).httpBasic(); } @Override public void configure (AuthenticationManagerBuilder auth) throws Exception auth.userDetailsService(userDetailsService).passwordEncoder(defaultPasswordEncoder); } @Override public void configure (WebSecurity web) throws Exception web.ignoring().antMatchers("/img/**" ,"/js/**" ); } }
自定义实现类 1 2 3 4 5 6 7 8 9 10 11 12 13 14 15 16 17 18 19 20 21 22 23 24 25 26 27 28 29 30 31 32 33 34 @Service ("userDetailsService" )public class UserDetailsServiceImpl implements UserDetailsService @Autowired private UserService userService; @Autowired private PermissionService permissionService; @Override public UserDetails loadUserByUsername (String username) throws UsernameNotFoundException DbUser user = userService.selectByUsername(username); if (user == null ) { throw new UsernameNotFoundException("用户不存在" ); } User curUser = new User(); BeanUtils.copyProperties(user,curUser); List<String> permissionValueList = permissionService.selectPermissionValueByUserId(user.getId()); SecurityUser securityUser = new SecurityUser(); securityUser.setCurrentUserInfo(curUser); securityUser.setPermissionValueList(permissionValueList); return securityUser; } }
1 2 3 4 5 6 7 8 9 10 11 12 13 14 15 16 17 18 用户认证流程: TokenLoginFilter.attemptAuthentication UserDetailsService.loadUserByUsername TokenLoginFilter.successfulAuthentication tokenManager.createToken() redisTemplate.opsForValue().set() response.write(token) 认证成功后进入授权流程: TokenAuthFilter.doFilterInternal()
过滤器介绍 SpringSecurity 的过滤器介绍
SpringSecurity 采用的是责任链的设计模式,它有一条很长的过滤器链。现在对这条过滤器链的 15 个过滤器进行说明:
(1) WebAsyncManagerIntegrationFilter:将 Security 上下文与 Spring Web 中用于处理异步请求映射的 WebAsyncManager 进行集成。
(2) SecurityContextPersistenceFilter:在每次请求处理之前将该请求相关的安全上下文信息加载到SecurityContextHolder 中,然后在该次请求处理完成之后,将SecurityContextHolder 中关于这次请求的信息存储到一个“仓储”中,然后将SecurityContextHolder 中的信息清除,例如在 Session 中维护一个用户的安全信息就是这个过滤器处理的。
(3) HeaderWriterFilter:用于将头信息加入响应中。
(4) CsrfFilter:用于处理跨站请求伪造。
(5)LogoutFilter:用于处理退出登录。
(6)UsernamePasswordAuthenticationFilter:用于处理基于表单的登录请求,从表单中获取用户名和密码。默认情况下处理来自 /login 的请求。从表单中获取用户名和密码时,默认使用的表单 name 值为 username 和 password,这两个值可以通过设置这个过滤器的 usernameParameter 和 passwordParameter 两个参数的值进行修改。
(7)DefaultLoginPageGeneratingFilter:如果没有配置登录页面,那系统初始化时就会配置这个过滤器,并且用于在需要进行登录时生成一个登录表单页面。
(8)BasicAuthenticationFilter:检测和处理 http basic 认证。
(9)RequestCacheAwareFilter:用来处理请求的缓存。
(10)SecurityContextHolderAwareRequestFilter:主要是包装请求对象 request。
(11)AnonymousAuthenticationFilter:检测 SecurityContextHolder 中是否存在Authentication 对象,如果不存在为其提供一个匿名 Authentication。
(12)SessionManagementFilter:管理 session 的过滤器
(13)ExceptionTranslationFilter:处理 AccessDeniedException 和AuthenticationException 异常。
(14)FilterSecurityInterceptor:可以看做过滤器链的出口。
(15)RememberMeAuthenticationFilter:当用户没有登录而直接访问资源时, 从 cookie 里找出用户的信息, 如果 Spring Security 能够识别出用户提供的 remember me cookie, 用户将不必填写用户名和密码, 而是直接登录进入系统,该过滤器默认不开启。
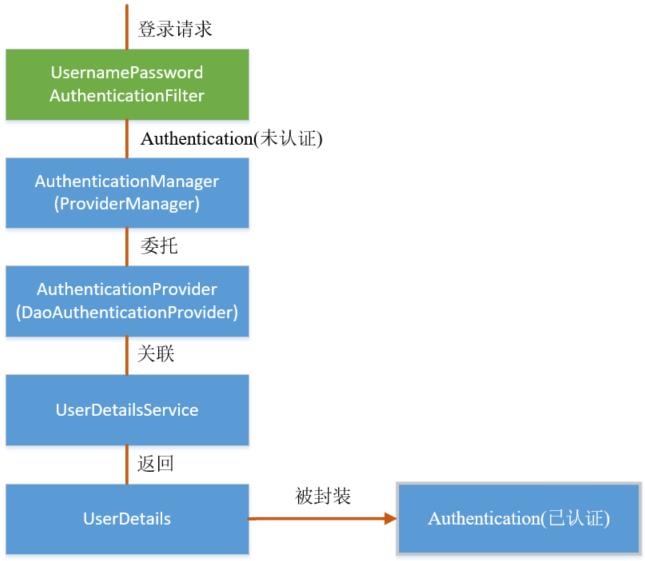
基本流程 Spring Security 采取过滤链实现认证与授权,只有当前过滤器通过,才能进入下一个过滤器:
绿色部分是认证过滤器,需要我们自己配置,可以配置多个认证过滤器。认证过滤器可以使用 Spring Security 提供的认证过滤器,也可以自定义过滤器(例如:短信验证)。认证过滤器要在 configure(HttpSecurity http) 方法中配置,没有配置不生效。下面会重点介绍以下三个过滤器:
UsernamePasswordAuthenticationFilter 过滤器:该过滤器会拦截前端提交的 POST 方式的登录表单请求,并进行身份认证。
ExceptionTranslationFilter 过滤器:该过滤器不需要我们配置,对于前端提交的请求会直接放行,捕获后续抛出的异常并进行处理(例如:权限访问限制)。
FilterSecurityInterceptor 过滤器:该过滤器是过滤器链的最后一个过滤器,根据资源权限配置来判断当前请求是否有权限访问对应的资源。如果访问受限会抛出相关异常,并由 ExceptionTranslationFilter 过滤器进行捕获和处理。
认证流程
当前端提交的是一个 POST 方式的登录表单请求,就会被该过滤器拦截,并进行身份认证。该过滤器的 doFilter() 方法实现在其抽象父类。
分析UsernamePasswordAuthenticationFilter 认证过滤器,一般都是查看doFilter方法,该方法是在父类中实现的。
1 2 3 4 5 6 7 8 9 10 11 12 13 14 15 16 17 18 19 20 21 22 23 24 25 26 27 28 29 30 31 32 33 34 35 36 37 38 39 40 41 42 43 44 45 46 47 48 49 50 51 52 53 54 55 56 public abstract class AbstractAuthenticationProcessingFilter extends GenericFilterBean implements ApplicationEventPublisherAware , MessageSourceAware { public void doFilter (ServletRequest req, ServletResponse res, FilterChain chain) throws IOException, ServletException { HttpServletRequest request = (HttpServletRequest) req; HttpServletResponse response = (HttpServletResponse) res; if (!requiresAuthentication(request, response)) { chain.doFilter(request, response); return ; } if (logger.isDebugEnabled()) { logger.debug("Request is to process authentication" ); } Authentication authResult; try { authResult = attemptAuthentication(request, response); if (authResult == null ) { return ; } sessionStrategy.onAuthentication(authResult, request, response); } catch (InternalAuthenticationServiceException failed) { logger.error( "An internal error occurred while trying to authenticate the user." , failed); unsuccessfulAuthentication(request, response, failed); return ; } catch (AuthenticationException failed) { unsuccessfulAuthentication(request, response, failed); return ; } if (continueChainBeforeSuccessfulAuthentication) { chain.doFilter(request, response); } successfulAuthentication(request, response, chain, authResult); } }
然后再来详细分析子类的attemptAuthentication认证方法。
1 2 3 4 5 6 7 8 9 10 11 12 13 14 15 16 17 18 19 20 21 22 23 24 25 26 27 28 29 30 31 32 33 public Authentication attemptAuthentication (HttpServletRequest request, HttpServletResponse response) throws AuthenticationException if (postOnly && !request.getMethod().equals("POST" )) { throw new AuthenticationServiceException( "Authentication method not supported: " + request.getMethod()); } String username = obtainUsername(request); String password = obtainPassword(request); if (username == null ) { username = "" ; } if (password == null ) { password = "" ; } username = username.trim(); UsernamePasswordAuthenticationToken authRequest = new UsernamePasswordAuthenticationToken( username, password); setDetails(request, authRequest); return this .getAuthenticationManager().authenticate(authRequest); }
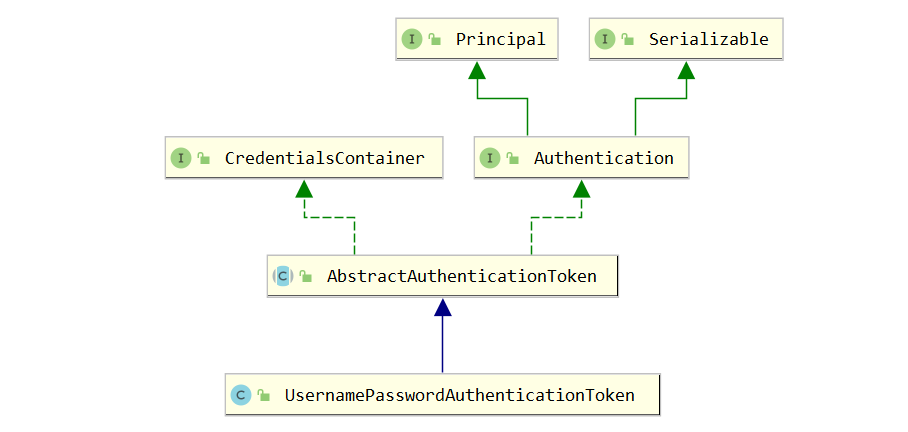
1 2 3 4 5 6 7 8 9 10 11 12 13 14 public interface Authentication extends Principal , Serializable Collection<? extends GrantedAuthority> getAuthorities(); Object getCredentials () ; Object getDetails () ; Object getPrincipal () ; boolean isAuthenticated () void setAuthenticated (boolean isAuthenticated) throws IllegalArgumentException }
以下类实现了Authentication接口,并通过参数的不同进行区分认证状态。
1 2 3 4 5 6 7 8 9 10 11 12 13 14 15 16 17 18 19 20 21 22 23 public class UsernamePasswordAuthenticationToken extends AbstractAuthenticationToken private final Object principal; private Object credentials; public UsernamePasswordAuthenticationToken (Object principal, Object credentials) super (null ); this .principal = principal; this .credentials = credentials; setAuthenticated(false ); } public UsernamePasswordAuthenticationToken (Object principal, Object credentials, Collection<? extends GrantedAuthority> authorities) super (authorities); this .principal = principal; this .credentials = credentials; super .setAuthenticated(true ); } }
上述过程中,UsernamePasswordAuthenticationFilter 过滤器的attemptAuthentication() 方法最后过程将未认证的 Authentication 对象传入ProviderManager 类的 authenticate() 方法进行身份认证。
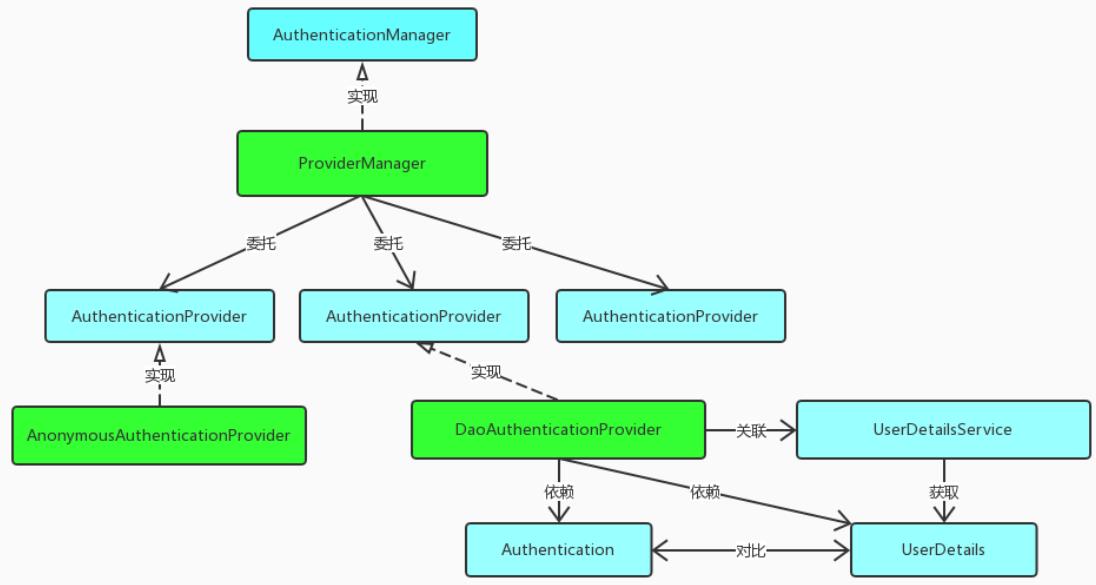
ProviderManager 是 AuthenticationManager 接口的实现类,该接口是认证相关的核心接口,也是认证的入口。
在实际开发中,我们可能有多种不同的认证方式,例如:用户名+ 密码、邮箱+密码、手机号+验证码等,而这些认证方式的入口始终只有一个,那就是AuthenticationManager。
在该接口的常用实现类 ProviderManager 内部会维护一个List 列表,存放多种认证方式,实际上这是委托者模式(Delegate)的应用。
每种认证方式对应着一个 AuthenticationProvider,AuthenticationManager 根据认证方式的不同(根据传入的 Authentication 类型判断)委托对应的 AuthenticationProvider 进行用户认证。
1 2 3 4 5 6 7 8 9 10 11 12 13 14 15 16 17 18 19 20 21 22 23 24 25 26 27 28 29 30 31 32 33 34 35 36 37 38 39 40 41 42 43 44 45 46 47 48 49 50 51 52 53 54 55 56 57 58 59 60 61 62 63 64 65 66 67 68 69 70 71 72 73 public class ProviderManager implements AuthenticationManager , MessageSourceAware ,InitializingBean public Authentication authenticate (Authentication authentication) throws AuthenticationException { Class<? extends Authentication> toTest = authentication.getClass(); AuthenticationException lastException = null ; AuthenticationException parentException = null ; Authentication result = null ; Authentication parentResult = null ; boolean debug = logger.isDebugEnabled(); for (AuthenticationProvider provider : getProviders()) { if (!provider.supports(toTest)) { continue ; } try { result = provider.authenticate(authentication); if (result != null ) { copyDetails(authentication, result); break ; } } catch (AuthenticationException e) { } } if (result == null && parent != null ) { try { result = parentResult = parent.authenticate(authentication); } catch (ProviderNotFoundException e) { } } if (result != null ) { if (eraseCredentialsAfterAuthentication && (result instanceof CredentialsContainer)) { ((CredentialsContainer) result).eraseCredentials(); } if (parentResult == null ) { eventPublisher.publishAuthenticationSuccess(result); } return result; } if (lastException == null ) { lastException = new ProviderNotFoundException(messages.getMessage( "ProviderManager.providerNotFound" , new Object[] { toTest.getName() }, "No AuthenticationProvider found for {0}" )); } if (parentException == null ) { prepareException(lastException, authentication); } throw lastException; } }
上述过程就是认证流程的最核心部分,接下来重新回到UsernamePasswordAuthenticationFilter 过滤器的 doFilter() 方法,查看认证成功/失败的处理:
1 2 3 4 5 6 7 8 9 10 11 12 13 14 15 16 17 18 protected void successfulAuthentication (HttpServletRequest request, HttpServletResponse response, FilterChain chain, Authentication authResult) throws IOException, ServletException { SecurityContextHolder.getContext().setAuthentication(authResult); rememberMeServices.loginSuccess(request, response, authResult); if (this .eventPublisher != null ) { eventPublisher.publishEvent(new InteractiveAuthenticationSuccessEvent( authResult, this .getClass())); } successHandler.onAuthenticationSuccess(request, response, authResult); }
1 2 3 4 5 6 7 8 9 10 11 protected void unsuccessfulAuthentication (HttpServletRequest request, HttpServletResponse response, AuthenticationException failed) throws IOException, ServletException { SecurityContextHolder.clearContext(); rememberMeServices.loginFail(request, response); failureHandler.onAuthenticationFailure(request, response, failed); }
权限访问流程 上一个部分通过源码的方式介绍了认证流程,下面介绍权限访问流程,主要是对ExceptionTranslationFilter 过滤器和 FilterSecurityInterceptor 过滤器进行介绍。
1 2 3 4 5 6 7 8 9 10 11 12 13 14 15 16 17 18 19 20 21 22 23 24 25 26 27 28 29 30 public class ExceptionTranslationFilter extends GenericFilterBean public void doFilter (ServletRequest req, ServletResponse res, FilterChain chain) throws IOException, ServletException { HttpServletRequest request = (HttpServletRequest) req; HttpServletResponse response = (HttpServletResponse) res; try { chain.doFilter(request, response); logger.debug("Chain processed normally" ); } catch (IOException ex) { throw ex; } catch (Exception ex) { Throwable[] causeChain = throwableAnalyzer.determineCauseChain(ex); RuntimeException ase = (AuthenticationException) throwableAnalyzer .getFirstThrowableOfType(AuthenticationException.class , causeChain ) ; if (ase == null ) { ase = (AccessDeniedException) throwableAnalyzer.getFirstThrowableOfType( AccessDeniedException.class , causeChain ) ; } } } }
FilterSecurityInterceptor 是过滤器链的最后一个过滤器,该过滤器是过滤器链的最后一个过滤器,根据资源权限配置来判断当前请求是否有权限访问对应的资源。如果访问受限会抛出相关异常,最终所抛出的异常会由前一个过滤器ExceptionTranslationFilter 进行捕获和处理。具体源码如下:
1 2 3 4 5 6 7 8 9 10 11 12 13 14 15 16 17 18 19 20 21 22 23 24 25 26 27 28 29 30 31 32 33 34 35 public class FilterSecurityInterceptor extends AbstractSecurityInterceptor implements Filter public void doFilter (ServletRequest request, ServletResponse response, FilterChain chain) throws IOException, ServletException FilterInvocation fi = new FilterInvocation(request, response, chain); invoke(fi); } public void invoke (FilterInvocation fi) throws IOException, ServletException if ((fi.getRequest() != null ) && (fi.getRequest().getAttribute(FILTER_APPLIED) != null ) && observeOncePerRequest) { fi.getChain().doFilter(fi.getRequest(), fi.getResponse()); } else { if (fi.getRequest() != null && observeOncePerRequest) { fi.getRequest().setAttribute(FILTER_APPLIED, Boolean.TRUE); } InterceptorStatusToken token = super .beforeInvocation(fi); try { fi.getChain().doFilter(fi.getRequest(), fi.getResponse()); } finally { super .finallyInvocation(token); } super .afterInvocation(token, null ); } } }
需要注意,Spring Security 的过滤器链是配置在 SpringMVC 的核心组件DispatcherServlet 运行之前。也就是说,请求通过 Spring Security 的所有过滤器,不意味着能够正常访问资源,该请求还需要通过 SpringMVC 的拦截器链。
认证共享 在前面讲解认证成功的处理方法 successfulAuthentication() 时,有以下代码:
1 SecurityContextHolder.getContext().setAuthentication(authResult);
1 2 3 4 5 6 7 8 9 10 11 12 13 14 15 16 17 18 19 20 21 22 23 24 25 26 27 28 public class SecurityContextHolder public static void clearContext () strategy.clearContext(); } public static SecurityContext getContext () return strategy.getContext(); } private static void initialize () if (!StringUtils.hasText(strategyName)) { strategyName = MODE_THREADLOCAL; } } public static void setContext (SecurityContext context) strategy.setContext(context); } }
前面提到过,在 UsernamePasswordAuthenticationFilter 过滤器认证成功之后,会在认证成功的处理方法中将已认证的用户信息对象 Authentication 封装进SecurityContext,并存入 SecurityContextHolder。
之后,响应会通过 SecurityContextPersistenceFilter 过滤器,该过滤器的位置在所有过滤器的最前面 ,请求到来先进它,响应返回最后一个通过它,所以在该过滤器中处理已认证的用户信息对象 Authentication 与 Session 绑定。
认证成功的响应通过 SecurityContextPersistenceFilter 过滤器时,会从SecurityContextHolder 中取出封装了已认证用户信息对象 Authentication 的SecurityContext,放进 Session 中。
当请求再次到来时,请求首先经过该过滤器,该过滤器会判断当前请求的 Session 是否存有 SecurityContext 对象,如果有则将该对象取出再次放入 SecurityContextHolder 中,之后该请求所在的线程获得认证用户信息,后续的资源访问不需要进行身份认证;
当响应再次返回时,该过滤器同样从 SecurityContextHolder 取出SecurityContext 对象,放入 Session 中。具体源码如下:
1 2 3 4 5 6 7 8 9 10 11 12 13 14 15 16 17 18 19 20 21 22 23 24 25 26 27 28 29 30 31 32 33 34 public class SecurityContextPersistenceFilter extends GenericFilterBean public void doFilter (ServletRequest req, ServletResponse res, FilterChain chain) throws IOException, ServletException { HttpServletRequest request = (HttpServletRequest) req; HttpServletResponse response = (HttpServletResponse) res; HttpRequestResponseHolder holder = new HttpRequestResponseHolder(request,response); SecurityContext contextBeforeChainExecution = repo.loadContext(holder); try { SecurityContextHolder.setContext(contextBeforeChainExecution); chain.doFilter(holder.getRequest(), holder.getResponse()); } finally { SecurityContext contextAfterChainExecution = SecurityContextHolder .getContext(); SecurityContextHolder.clearContext(); repo.saveContext(contextAfterChainExecution, holder.getRequest(), holder.getResponse()); request.removeAttribute(FILTER_APPLIED); } } }
图形验证码 1 2 3 4 5 <dependency > <groupId > com.github.penggle</groupId > <artifactId > kaptcha</artifactId > <version > 2.3.2</version > </dependency >
1 2 3 4 5 6 7 8 9 10 11 12 13 14 15 16 17 18 19 20 21 22 23 24 25 26 27 @Autowired Producer captchaProducer; @GetMapping ("/kaptcha" )public void getKaptchaImage (HttpServletRequest request, HttpServletResponse response) throws Exception HttpSession session = request.getSession(); response.setDateHeader("Expires" , 0 ); response.setHeader("Cache-Control" , "no-store, no-cache, must-revalidate" ); response.addHeader("Cache-Control" , "post-check=0, pre-check=0" ); response.setHeader("Pragma" , "no-cache" ); response.setContentType("image/jpeg" ); String capText = captchaProducer.createText(); session.setAttribute(Constants.KAPTCHA_SESSION_KEY, capText); BufferedImage bi = captchaProducer.createImage(capText); ServletOutputStream out = response.getOutputStream(); ImageIO.write(bi, "jpg" , out); try { out.flush(); } finally { out.close(); } }
1 2 3 4 5 6 7 8 9 10 11 12 13 14 15 16 17 18 19 20 21 22 23 @Configuration public class Kaconfig @Bean public DefaultKaptcha getDefaultKaptcha () DefaultKaptcha captchaProducer = new DefaultKaptcha(); Properties properties = new Properties(); properties.setProperty("kaptcha.border" , "yes" ); properties.setProperty("kaptcha.border.color" , "105,179,90" ); properties.setProperty("kaptcha.textproducer.font.color" , "blue" ); properties.setProperty("kaptcha.image.width" , "310" ); properties.setProperty("kaptcha.image.height" , "240" ); properties.setProperty("kaptcha.textproducer.font.size" , "30" ); properties.setProperty("kaptcha.session.key" , "code" ); properties.setProperty("kaptcha.textproducer.char.length" , "4" ); properties.setProperty("kaptcha.obscurificator.impl" , "com.google.code.kaptcha.impl.ShadowGimpy" ); properties.setProperty("kaptcha.textproducer.font.names" , "宋体,楷体,微软雅黑" ); Config config = new Config(properties); captchaProducer.setConfig(config); return captchaProducer; } }
1 2 3 4 5 6 7 8 9 10 11 12 13 14 15 16 17 18 19 20 21 22 23 24 25 26 27 28 29 30 31 32 33 public class CodeFilter implements Filter @Override public void doFilter (ServletRequest request, ServletResponse response, FilterChain chain) throws IOException, ServletException { HttpServletRequest req = (HttpServletRequest)request; HttpServletResponse resp = (HttpServletResponse)response; String uri = req.getServletPath(); if (uri.equals("/login" ) && req.getMethod().equalsIgnoreCase("post" )) { String sessionCode = req.getSession().getAttribute(Constants.KAPTCHA_SESSION_KEY).toString(); String formCode = req.getParameter("code" ).trim(); if (StringUtils.isEmpty(formCode)) { throw new RuntimeException("验证码不能为空" ); } if (sessionCode.equalsIgnoreCase(formCode)) { System.out.println("验证通过" ); } System.out.println(req.getSession().getAttribute(Constants.KAPTCHA_SESSION_KEY)); throw new AuthenticationServiceException("xx" ); } chain.doFilter(request, response); } }
校验图片验证码,最好在最外层的Filter中进行,不要让请求流转到校验账号密码的Filter中
1 2 3 4 5 6 7 8 9 10 @Configuration @EnableWebSecurity public class SecuritySecureConfig extends WebSecurityConfigurerAdapter @Override protected void configure (HttpSecurity http) throws Exception http.addFilterBefore(new CodeFilter, UsernamePasswordAuthenticationFilter.class ) ; } }
