Spring Boot Cache
JSR 规范
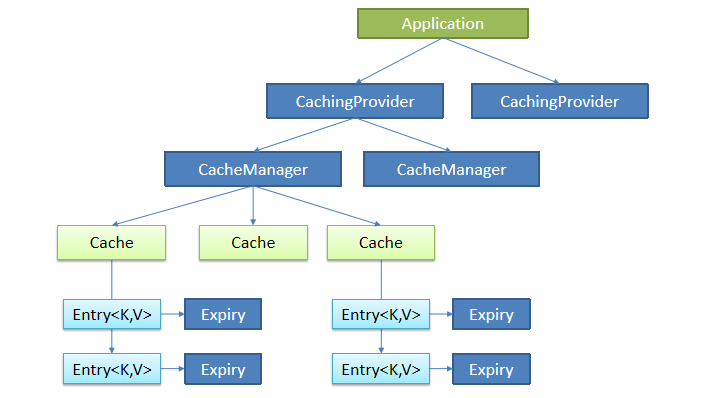
Java Caching定义了5个核心接口,分别是CachingProvider, CacheManager,Cache, Entry 和 Expiry。
CachingProvider定义了创建、配置、获取、管理和控制多个CacheManager。一个应用可以在运行期访问多个CachingProvider。
CacheManager定义了创建、配置、获取、管理和控制多个唯一命名的Cache,这些Cache存在于CacheManager的上下文中。一个CacheManager仅被一个CachingProvider所拥有。
Cache是一个类似Map的数据结构并临时存储以Key为索引的值。一个Cache仅被一个CacheManager所拥有。
Entry是一个存储在Cache中的key-value对。
Expiry 每一个存储在Cache中的条目有一个定义的有效期。一旦超过这个时间,条目为过期的状态。一旦过期,条目将不可访问、更新和删除。缓存有效期可以通过ExpiryPolicy设置。

如果要使用JSR规范,可以引入以下依赖
1
2
3
4
| <dependency>
<groupId>javax.cache</groupid>
<artifactId>cache-api</artifactId>
</dependency>
|
Spring Cache
Spring从3.1开始定义了org.springframework.cache.Cache和org.springframework.cache.CacheManager接口来统一不同的缓存技术;并支持使用JCache(JSR-107)注解简化我们开发;
Cache接口为缓存的组件规范定义,包含缓存的各种操作集合;
Cache接口下Spring提供了各种xxxCache的实现;如RedisCache,EhCacheCache , ConcurrentMapCache等;
每次调用需要缓存功能的方法时,Spring会检查检查指定参数的指定的目标方法是否已经被调用过;如果有就直接从缓存中获取方法调用后的结果,如果没有就调用方法并缓存结果后返回给用户。下次调用直接从缓存中获取。
使用Spring缓存抽象时我们需要关注以下两点;
- 确定方法需要被缓存以及他们的缓存策略
- 从缓存中读取之前缓存存储的数据
缓存注解
| Cache |
缓存接口,定义缓存操作。实现有:RedisCache、EhCacheCache、ConcurrentMapCache等 |
| CacheManager |
缓存管理器,管理各种缓存(Cache)组件 |
| @Cacheable |
主要针对方法配置,能够根据方法的请求参数对其结果进行缓存 |
| @CacheEvict |
清空缓存 |
| @CachePut |
保证方法被调用,又希望结果被缓存。 |
| @EnableCaching |
开启基于注解的缓存 |
| keyGenerator |
缓存数据时key生成策略 |
| serialize |
缓存数据时value序列化策略 |
案例:
1
2
3
4
5
6
| @Cacheable(value = {"emp"})
public Employee getEmp(Integer id){
System.out.println("查询"+id+"号员工");
Employee emp = employeeMapper.getEmpById(id);
return emp;
}
|

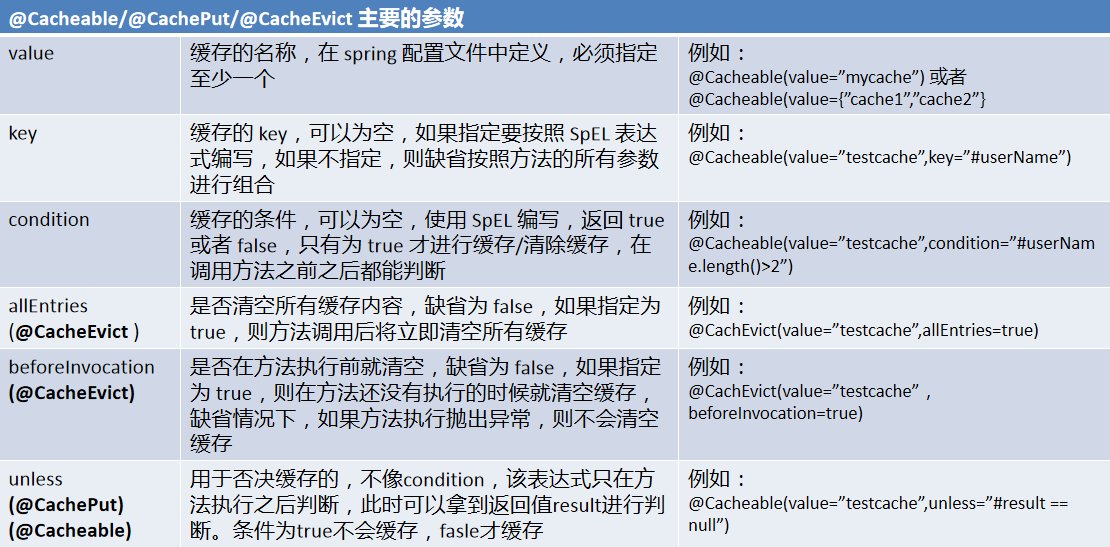
cacheNames/value:指定缓存组件的名字;将方法的返回结果放在哪个缓存中,是数组的方式,可以指定多个缓存;
key:缓存数据使用的key;可以用它来指定。默认是使用方法参数的值:《方法参数,方法返回值》
编写SpEL:#id #a0 #p0 #root.args[0] 都表示参数id的值.
cacheManager:指定缓存管理器;或者cacheResolver指定获取解析器
keyGenerator:key的生成器;可以自己指定key的生成器的组件id,和key属性二选一使用
condition:指定符合条件的情况下才缓存;如condition = "#id>0“
unless:否定缓存;当unless指定的条件为true,方法的返回值就不会被缓存;可以获取到结果进行判断
如unless = "#result == null"
sync:是否使用异步模式
原理
通过自动配置类CacheAutoConfiguration加载
1
2
3
4
5
6
7
8
9
| @Configuration
@ConditionalOnClass(CacheManager.class)
@ConditionalOnBean(CacheAspectSupport.class)
@ConditionalOnMissingBean(value = CacheManager.class, name = "cacheResolver")
@EnableConfigurationProperties(CacheProperties.class)
@AutoConfigureAfter({ CouchbaseAutoConfiguration.class, HazelcastAutoConfiguration.class,
HibernateJpaAutoConfiguration.class, RedisAutoConfiguration.class })
@Import(CacheConfigurationImportSelector.class)
public class CacheAutoConfiguration {}
|
@Import(CacheConfigurationImportSelector.class)主要用于导入容器中需要使用的组件。
1
2
3
4
5
6
7
8
9
10
11
| static class CacheConfigurationImportSelector implements ImportSelector {
@Override
public String[] selectImports(AnnotationMetadata importingClassMetadata) {
CacheType[] types = CacheType.values();
String[] imports = new String[types.length];
for (int i = 0; i < types.length; i++) {
imports[i] = CacheConfigurations.getConfigurationClass(types[i]);
}
return imports;
}
}
|
具体导入了以下组件:
1
2
3
4
5
6
7
8
9
10
11
| org.springframework.boot.autoconfigure.cache.GenericCacheConfiguration
org.springframework.boot.autoconfigure.cache.JCacheCacheConfiguration
org.springframework.boot.autoconfigure.cache.EhCacheCacheConfiguration
org.springframework.boot.autoconfigure.cache.HazelcastCacheConfiguration
org.springframework.boot.autoconfigure.cache.InfinispanCacheConfiguration
org.springframework.boot.autoconfigure.cache.CouchbaseCacheConfiguration
org.springframework.boot.autoconfigure.cache.RedisCacheConfiguration
org.springframework.boot.autoconfigure.cache.CaffeineCacheConfiguration
org.springframework.boot.autoconfigure.cache.GuavaCacheConfiguration
org.springframework.boot.autoconfigure.cache.SimpleCacheConfiguration【默认】
org.springframework.boot.autoconfigure.cache.NoOpCacheConfiguration
|
默认生效的配置类:SimpleCacheConfiguration。
1
2
3
4
5
6
7
8
9
10
11
12
13
14
15
16
17
18
19
20
21
22
23
24
| @Configuration
@ConditionalOnMissingBean(CacheManager.class)
@Conditional(CacheCondition.class)
class SimpleCacheConfiguration {
private final CacheProperties cacheProperties;
private final CacheManagerCustomizers customizerInvoker;
SimpleCacheConfiguration(CacheProperties cacheProperties, CacheManagerCustomizers customizerInvoker) {
this.cacheProperties = cacheProperties;
this.customizerInvoker = customizerInvoker;
}
@Bean
public ConcurrentMapCacheManager cacheManager() {
ConcurrentMapCacheManager cacheManager = new ConcurrentMapCacheManager();
List<String> cacheNames = this.cacheProperties.getCacheNames();
if (!cacheNames.isEmpty()) {
cacheManager.setCacheNames(cacheNames);
}
return this.customizerInvoker.customize(cacheManager);
}
}
|
它主要作用是给容器中注入一个cacheManager(缓存管理器),cacheManager是一个接口,提供了一个通过name获取一个缓存对象cache的API。
1
2
3
4
5
6
| public interface CacheManager {
@Nullable
Cache getCache(String name);
Collection<String> getCacheNames();
}
|
SimpleCacheConfiguration使用ConcurrentMapCacheManager实例化cacheManager。
1
2
3
4
5
6
7
8
9
10
11
12
13
14
15
16
17
18
19
20
21
22
23
24
25
26
27
| public class ConcurrentMapCacheManager implements CacheManager, BeanClassLoaderAware {
private final ConcurrentMap<String, Cache> cacheMap = new ConcurrentHashMap<>(16);
@Override
@Nullable
public Cache getCache(String name) {
Cache cache = this.cacheMap.get(name);
if (cache == null && this.dynamic) {
synchronized (this.cacheMap) {
cache = this.cacheMap.get(name);
if (cache == null) {
cache = createConcurrentMapCache(name);
this.cacheMap.put(name, cache);
}
}
}
return cache;
}
protected Cache createConcurrentMapCache(String name) {
SerializationDelegate actualSerialization = (isStoreByValue() ? this.serialization : null);
return new ConcurrentMapCache(name, new ConcurrentHashMap<>(256),
isAllowNullValues(), actualSerialization);
}
}
|
可以看到ConcurrentMapCacheManager使用了ConcurrentMapCache类型作为缓存组件。
1
2
3
4
| public class ConcurrentMapCache extends AbstractValueAdaptingCache {
private final String name;
private final ConcurrentMap<Object, Object> store;
}
|
ConcurrentMapCacheManager可以获取和创建ConcurrentMapCache类型的缓存组件;他的作用将数据保存在ConcurrentMap中;
@Cacheable
方法运行之前,先去查询Cache(缓存组件),按照cacheNames指定的名字获取;(CacheManager先获取相应的缓存),第一次获取缓存如果没有Cache组件会自动创建。
去Cache中查找缓存的内容,使用一个key,默认就是方法的参数;
key是按照某种策略生成的;默认是使用keyGenerator生成的,默认使用SimpleKeyGenerator生成key;
SimpleKeyGenerator生成key的默认策略;
- 如果没有参数;
key=new SimpleKey();
- 如果有一个参数:
key=参数的值
- 如果有多个参数:
key=new SimpleKey(params);
没有查到缓存就调用目标方法;
将目标方法返回的结果,放进缓存中:
核心:
使用CacheManager【ConcurrentMapCacheManager】按照名字得到Cache【ConcurrentMapCache】组件
key使用keyGenerator生成的,默认是SimpleKeyGenerator.
@Cacheable标注的方法执行之前先来检查缓存中有没有这个数据,默认按照参数的值作为key去查询缓存
如果没有就运行方法并将结果放入缓存;以后再来调用就可以直接使用缓存中的数据;
@CachePut
既调用方法,又更新缓存数据;同步更新缓存,修改了数据库的某个数据,同时更新缓存;
运行时机:
先调用目标方法
将目标方法的结果缓存起来
通过调度updateEmp修改员工信息,并指定key才能达到更新缓存的目的,否则无法更新对应的缓存信息。下例使用传入的参数的员工id:key = "#employee.id"或者返回后的id:key = "#result.id"当做key,更新缓存中相同key的Cache对象,达到执行更新语句时更新缓存数据目的。
注意:@Cacheable的key是不能用#result
1
2
3
4
5
6
| @CachePut(value = "emp",key = "#result.id")
public Employee updateEmp(Employee employee){
System.out.println("updateEmp:"+employee);
employeeMapper.updateEmp(employee);
return employee;
}
|
@CacheEvict
缓存清除注解:
key:指定要清除的数据
allEntries = true时,将清除这个缓存中的所有数据。
beforeInvocation = false:缓存的清除是否在方法之前执行,默认代表缓存清除操作是在方法执行之后执行;如果出现异常缓存就不会清除
beforeInvocation = true:代表清除缓存操作是在方法运行之前执行,无论方法是否出现异常,缓存都清除
1
2
3
4
5
6
| @CacheEvict(value="emp",allEntries = true )
public void deleteEmp(Integer id){
System.out.println("deleteEmp:"+id);
employeeMapper.deleteEmpById(id);
int i = 10/0;
}
|
@Caching
1
2
3
4
5
6
7
8
9
10
11
12
13
|
@Caching(
cacheable = {
@Cacheable(value="emp",key = "#lastName")
},
put = {
@CachePut(value="emp",key = "#result.id"),
@CachePut(value="emp",key = "#result.email")
}
)
public Employee getEmpByLastName(String lastName){
return employeeMapper.getEmpByLastName(lastName);
}
|
@CacheConfig
1
2
3
4
5
6
7
8
9
10
11
12
|
@CacheConfig(cacheNames="emp")
@Service
public class EmployeeService {
@CachePut(key = "#result.id")
public Employee updateEmp(Employee employee){
System.out.println("updateEmp:"+employee);
employeeMapper.updateEmp(employee);
return employee;
}
}
|
自定义KeyGenerator
1
2
3
4
5
6
7
8
9
10
11
12
13
| @Configuration
public class MyCacheConfig {
@Bean("myKeyGenerator")
public KeyGenerator keyGenerator(){
return new KeyGenerator(){
@Override
public Object generate(Object target, Method method, Object... params) {
return method.getName() + Arrays.asList(params).toString();
}
};
}
}
|
1
2
3
4
5
6
| @Cacheable(value = {"emp"}, keyGenerator = "myKeyGenerator")
public Employee getEmp(Integer id){
System.out.println("查询"+ id +"号员工");
Employee emp = employeeMapper.getEmpById(id);
return emp;
}
|
缓存API
1
2
3
4
5
6
7
8
9
10
|
public Employee getEmpById(Integer id){
Employee employee = employeeMapper.getEmpById(id);
Cache cache = empCacheManager.getCache("emp");
dept.put("emp:1",employee);
return employee;
}
|
RedisCache
缓存配置类的初始化是有顺序的,当添加了Redis组件后,有一个RedisCacheConfiguration类,当找不到其他缓存配置类时,默认使用SimpleCacheConfiguration。
1
2
3
4
5
6
7
8
9
10
11
12
13
14
15
16
17
18
19
| @Configuration
@ConditionalOnClass({RedisConnectionFactory.class})
@AutoConfigureAfter({RedisAutoConfiguration.class})
@ConditionalOnBean({RedisConnectionFactory.class})
@ConditionalOnMissingBean({CacheManager.class})
@Conditional({CacheCondition.class})
class RedisCacheConfiguration {
@Bean
public RedisCacheManager cacheManager(RedisConnectionFactory redisConnectionFactory, ResourceLoader resourceLoader) {
RedisCacheManagerBuilder builder = RedisCacheManager.builder(redisConnectionFactory).cacheDefaults(this.determineConfiguration(resourceLoader.getClassLoader()));
List<String> cacheNames = this.cacheProperties.getCacheNames();
if (!cacheNames.isEmpty()) {
builder.initialCacheNames(new LinkedHashSet(cacheNames));
}
return (RedisCacheManager)this.customizerInvoker.customize(builder.build());
}
}
|
看到使用RedisCacheConfiguration时,默认创建RedisCacheManager作为缓存管理类,以RedisCache作为组件。
默认保存数据以key-value的形式存储到Redis,都是Object对象,利用序列化保存,默认创建的RedisCacheManager操作Redis使用的是RedisTemplate<Object,Object>对象,使用的是JDK序列化机制,正常情况下需要配置redisTemplate的序列化机制,达到以JSON的方式序列化对象。
1
2
3
4
5
6
7
8
9
10
11
12
13
14
15
16
17
18
19
20
21
22
23
24
25
26
27
28
29
30
31
32
33
34
35
36
37
| @Configuration
public class MyRedisConfig {
@Bean
public RedisTemplate<Object, Employee> empRedisTemplate(
RedisConnectionFactory redisConnectionFactory)
throws UnknownHostException {
RedisTemplate<Object, Employee> template = new RedisTemplate<Object, Employee>();
template.setConnectionFactory(redisConnectionFactory);
FastJsonRedisSerializer<Employee> ser = new FastJsonRedisSerializer<Employee>(Employee.class);
template.setDefaultSerializer(ser);
return template;
}
@Bean
public RedisCacheManager employeeCacheManager(RedisConnectionFactory redisConnectionFactory) {
RedisCacheConfiguration config = RedisCacheConfiguration.defaultCacheConfig()
.serializeKeysWith(RedisSerializationContext.SerializationPair.fromSerializer(RedisSerializer.string()))
.serializeValuesWith(RedisSerializationContext.SerializationPair.fromSerializer(new FastJsonRedisSerializer<>(Object.class)))
.disableCachingNullValues();
return RedisCacheManager.builder(
RedisCacheWriter.nonLockingRedisCacheWriter(redisConnectionFactory)).cacheDefaults(config).build();
}
@Override
public KeyGenerator keyGenerator() {
return (target, method, params) -> {
StringBuilder sb = new StringBuilder();
sb.append(target.getClass().getName());
sb.append(method.getName());
for (Object obj : params) {
sb.append(obj.toString());
}
return sb.toString();
};
}
}
|
当序列化的对象(Employee)里属性包含其他实体类(如Department)时,这时候缓存Employee对象时依旧能存储到redis中,但是无法反序列化回来。
原因是因为我们操作的是RedisTemplate<Object, Employee>对象,无法反序列化非Employee的对象,所以这个时候需要添加Department类的相关RedisCacheManager及RedisTemplate<Object,Department>。


